
:max_bytes(150000):strip_icc():format(webp)/dts-play-fi-lifestyle-aaa-5a4c211daad52b00366a3575.jpg)
Updated In 2024, Mastering FCPX Made Easy Best Online Tutorials and Guides
Mastering FCPX Made Easy: Best Online Tutorials and Guides
Final Cut Pro alternative - Wondershare Filmora
An easy yet powerful editor
Numerous effects to choose from
Detailed tutorials provided by official channel
Videos have become a vital part of any marketing strategy. You need video material to stay alive digitally, whether you’re a freelance filmmaker, a blogger, a YouTuber, or a member of a full-time agency. However, if you think making movies and editing them in post-production isn’t challenging, you haven’t done it with Final Cut Pro X.
Video editing is a pain. Mastering non-linear editing software like Final Cut Pro is one of the most challenging, soul-crushing, and time-consuming tasks you can do. But that’s why you have us and our comprehensive guide to help you find the best tutorial course on using Final Cut Pro like a pro. After learning from these lessons, you will master the basics and advanced techniques of Final Cut Pro X. Let’s get started, beginners and pros!
In this article
01 The Best Video Courses For Final Cut Pro in YouTube
02 The Best Websites to Learn Final Cut Pro Basics
03 Is Paid Class of FCPX Worth For Beginners?
Part1: The Best Video Courses For Final Cut Pro in YouTube
Finding good Final Cut Pro X tutorials on YouTube may be like looking for a needle in a haystack. Millions of videos on the internet promise to teach Final Cut tips and tricks, but only a handful of them deliver the degree of training you require.
Even if you discover competent video editing teachers on YouTube, there’s a high chance they won’t teach you how to use the particular program function you need. It’s incredibly aggravating to spend so much time looking for what you need!
But don’t lose heart just yet. You can discover a professional video editing instructor that offers a variety of free lessons, tips, and tools for beginners and professionals with a bit of assistance.
Check out our top 5 Recommendations to learn Final Cut Pro on YouTube before you waste hours scanning through dozens of videos:
1.FCPX Tour – Final Cut Pro Tips from Basic to Advance
This isn’t a regular tutorial; instead, it’s a presentation. On the other hand, this channel physically walks you through capturing footage, transferring it to your timeline, and then starting to edit it. Everything from music to speech to light color grading to a quick exporting procedure is covered in this video. After seeing this tutorial, there’s no chance you won’t grasp how to edit a video. It’s just good, reliable information.

Why recommend this channle?
• Learn basic to advanced level techniques.
• Unique workflow gives subscribers a clear understading about the tutorial.
• Practical approach for subscribers to reproduce the work instantly.
2.Shutterstock Tutorials – Learn Tips For Beginners
It takes some time to become familiar with Final Cut Pro X. However, after you’ve mastered the fundamentals, you’ll be able to complete tasks faster than ever before. Follow this channel for a comprehensive explanation of the best beginner techniques for editing in Final Cut Pro X, whether you’re new to editing or need a refresher course.
There are a few essential interface explanations as well as some tips and tricks for using the tools. Enjoy!

Why recommend this channle?
• Informative and easy. Best tips for people who are beginners in Final Cut Pro.
3.Marcos Rocha – A Heaven for Advanced Techniques
Having mastered the basics, let’s move on to some advanced workflow ideas. It takes some time to become comfortable enough (when editing) to experiment with keyboard shortcuts and workflow shortcuts. This is the beauty of editing. Watching lessons on this channel will assist you in putting some of these advanced concepts, shortcuts, and tips into practice as they become second nature to you.

Why recommend this channle?
• Great for shortcuts, tips, and advanced concepts of FCPX.
• Efficient workflow and easy-to-understand videos.
• Even beginners can benefit from these tutorials.
4.Brad and Donna – Game-Changing Plugins
Everyone needs and appreciates free things, whether they’re new to FCPX or a professional editor. Your budget will not always be sufficient, and you will frequently find yourselves at a fork in the road when the funds are few. So, the good news for FCPX editors is that there is a slew of free plugins, including overlays, LUTs, flares, and titles, that are very excellent (and don’t seem like your dingus friend produced them). You can watch the tutorial course if you want to learn more about these free and paid plugins in all price ranges.

Why recommend this channle?
• Informative FCPX videos.
• Tips about various effects, color grading, graphics, keyframes, etc.
• Posts new content every week.
5.Totally Exposed – Complete Guide for Beginners
Are you new to Final Cut Pro X and don’t know where to start? If you’re new to FCPX and want to get started with video editing, you can join this FREE hour-long in-depth training that will get you up and running in no time!

When you’re learning from a seasoned expert, it’s easy to feel left behind as they go through tools and features you’ve never heard of. On the other hand, the Totally Exposed channel puts such concerns to rest with one-of-a-kind lessons in which we learn with Neil, a novice who has never used FCP X before.
Importing, basic terminologies, cutting clips, and adding music, as well as adding effects, titles, and exporting the finished material, are all covered in this video. It’s more of a trawling movie than a fast instruction at over one hour long. However, it’s ideal for novice users who want to take things a little more slowly and absorb knowledge over time.
Why recommend this channle?
• Extensive yet still very well-paced for beginners.
• Amazing teaching skills.
However, all the video tutorials are quite long because FCPX is powerful but not easy to get started with. You can always choose Wondershare Filmora to boost your editing.
For Win 7 or later (64-bit)
For macOS 10.12 or later
Part2: The Best Websites to Read about Final Cut Pro Basics
If you are looking for the best websites to learn Final Cut Pro basics, then you can visit the following web pages:
1.FCP.co

FCP.co is dedicated to all things video on the Mac, focusing on Final Cut Pro X video editing techniques and lessons. They’re continuously updated on the latest FCPX third-party plugins and filters (including many free effects). Unlike Apple’s FCPX user forum, this one is quite active and updated frequently.
2.Apple Support Center

On Apple’s official website, the FCPX support community is active. If you have a specific query regarding the application, this is an excellent resource. The emphasis here is less on editing style, and skill since most content focuses on more technical FCPX software/hardware concerns. It’s worth mentioning that if you contribute to the community by assisting other users with their problems rather than just asking questions, your editing karma will skyrocket!
3.Reddit

If you want to ask a specific question related to Final Cut Pro, you can post it on Reddit. The active community on Reddit will answer it. You can also read the questions posted by other users to increase your knowledge.
4.FCPX.tv

FCPX.tv, with its motto “all things Final Cut Pro X,” is a one-stop shop for the most up-to-date advice and news on this software. An endless list of Final Cut Pro X requests (for future versions and upgrades), FCPX editing lessons, and documentation of known FCPX issues are just a few of the highlights. If you’re an FCPX power editor, this is a must-visit website.
Part3: Is Paid Class of FCPX Worth For Beginners?
The last thing you want to do with your hectic schedule is sitting through hours of aimless video lessons. Buying Final Cut Pro lessons gives you the feel of having a personal trainer working alongside you. You can enroll in FCPX paid courses on Udemy and Coursera. Often a certificate of completion is available for download at the end of the course.
However, if you are a beginner, we won’t recommend you buy paid courses. There is unlimited free content related to Final Cut Pro available on YouTube and other websites that you can access without spending a penny.
When you have to spend too much money and energy on an editing tool, consider if it’s really worth it. Rather, you can always choose a much easier yet still powerful editor like Filmora to save your time for better editing.
Haven’t got FCPX yet? Get your 90-day free trial here or click below to download Filmora for a try.
Wondershare Filmora
Get started easily with Filmora’s powerful performance, intuitive interface, and countless effects!
Try It Free Try It Free Try It Free Learn More >

Videos have become a vital part of any marketing strategy. You need video material to stay alive digitally, whether you’re a freelance filmmaker, a blogger, a YouTuber, or a member of a full-time agency. However, if you think making movies and editing them in post-production isn’t challenging, you haven’t done it with Final Cut Pro X.
Video editing is a pain. Mastering non-linear editing software like Final Cut Pro is one of the most challenging, soul-crushing, and time-consuming tasks you can do. But that’s why you have us and our comprehensive guide to help you find the best tutorial course on using Final Cut Pro like a pro. After learning from these lessons, you will master the basics and advanced techniques of Final Cut Pro X. Let’s get started, beginners and pros!
In this article
01 The Best Video Courses For Final Cut Pro in YouTube
02 The Best Websites to Learn Final Cut Pro Basics
03 Is Paid Class of FCPX Worth For Beginners?
Part1: The Best Video Courses For Final Cut Pro in YouTube
Finding good Final Cut Pro X tutorials on YouTube may be like looking for a needle in a haystack. Millions of videos on the internet promise to teach Final Cut tips and tricks, but only a handful of them deliver the degree of training you require.
Even if you discover competent video editing teachers on YouTube, there’s a high chance they won’t teach you how to use the particular program function you need. It’s incredibly aggravating to spend so much time looking for what you need!
But don’t lose heart just yet. You can discover a professional video editing instructor that offers a variety of free lessons, tips, and tools for beginners and professionals with a bit of assistance.
Check out our top 5 Recommendations to learn Final Cut Pro on YouTube before you waste hours scanning through dozens of videos:
1.FCPX Tour – Final Cut Pro Tips from Basic to Advance
This isn’t a regular tutorial; instead, it’s a presentation. On the other hand, this channel physically walks you through capturing footage, transferring it to your timeline, and then starting to edit it. Everything from music to speech to light color grading to a quick exporting procedure is covered in this video. After seeing this tutorial, there’s no chance you won’t grasp how to edit a video. It’s just good, reliable information.
Why recommend this channle?
• Learn basic to advanced level techniques.
• Unique workflow gives subscribers a clear understading about the tutorial.
• Practical approach for subscribers to reproduce the work instantly.
2.Shutterstock Tutorials – Learn Tips For Beginners
It takes some time to become familiar with Final Cut Pro X. However, after you’ve mastered the fundamentals, you’ll be able to complete tasks faster than ever before. Follow this channel for a comprehensive explanation of the best beginner techniques for editing in Final Cut Pro X, whether you’re new to editing or need a refresher course.
There are a few essential interface explanations as well as some tips and tricks for using the tools. Enjoy!
Why recommend this channle?
• Informative and easy. Best tips for people who are beginners in Final Cut Pro.
3.Marcos Rocha – A Heaven for Advanced Techniques
Having mastered the basics, let’s move on to some advanced workflow ideas. It takes some time to become comfortable enough (when editing) to experiment with keyboard shortcuts and workflow shortcuts. This is the beauty of editing. Watching lessons on this channel will assist you in putting some of these advanced concepts, shortcuts, and tips into practice as they become second nature to you.
Why recommend this channle?
• Great for shortcuts, tips, and advanced concepts of FCPX.
• Efficient workflow and easy-to-understand videos.
• Even beginners can benefit from these tutorials.
4.Brad and Donna – Game-Changing Plugins
Everyone needs and appreciates free things, whether they’re new to FCPX or a professional editor. Your budget will not always be sufficient, and you will frequently find yourselves at a fork in the road when the funds are few. So, the good news for FCPX editors is that there is a slew of free plugins, including overlays, LUTs, flares, and titles, that are very excellent (and don’t seem like your dingus friend produced them). You can watch the tutorial course if you want to learn more about these free and paid plugins in all price ranges.
Why recommend this channle?
• Informative FCPX videos.
• Tips about various effects, color grading, graphics, keyframes, etc.
• Posts new content every week.
5.Totally Exposed – Complete Guide for Beginners
Are you new to Final Cut Pro X and don’t know where to start? If you’re new to FCPX and want to get started with video editing, you can join this FREE hour-long in-depth training that will get you up and running in no time!
When you’re learning from a seasoned expert, it’s easy to feel left behind as they go through tools and features you’ve never heard of. On the other hand, the Totally Exposed channel puts such concerns to rest with one-of-a-kind lessons in which we learn with Neil, a novice who has never used FCP X before.
Importing, basic terminologies, cutting clips, and adding music, as well as adding effects, titles, and exporting the finished material, are all covered in this video. It’s more of a trawling movie than a fast instruction at over one hour long. However, it’s ideal for novice users who want to take things a little more slowly and absorb knowledge over time.
Why recommend this channle?
• Extensive yet still very well-paced for beginners.
• Amazing teaching skills.
However, all the video tutorials are quite long because FCPX is powerful but not easy to get started with. You can always choose Wondershare Filmora to boost your editing.
For Win 7 or later (64-bit)
For macOS 10.12 or later
Part2: The Best Websites to Read about Final Cut Pro Basics
If you are looking for the best websites to learn Final Cut Pro basics, then you can visit the following web pages:
1.FCP.co
FCP.co is dedicated to all things video on the Mac, focusing on Final Cut Pro X video editing techniques and lessons. They’re continuously updated on the latest FCPX third-party plugins and filters (including many free effects). Unlike Apple’s FCPX user forum, this one is quite active and updated frequently.
2.Apple Support Center
On Apple’s official website, the FCPX support community is active. If you have a specific query regarding the application, this is an excellent resource. The emphasis here is less on editing style, and skill since most content focuses on more technical FCPX software/hardware concerns. It’s worth mentioning that if you contribute to the community by assisting other users with their problems rather than just asking questions, your editing karma will skyrocket!
3.Reddit
If you want to ask a specific question related to Final Cut Pro, you can post it on Reddit. The active community on Reddit will answer it. You can also read the questions posted by other users to increase your knowledge.
4.FCPX.tv
FCPX.tv, with its motto “all things Final Cut Pro X,” is a one-stop shop for the most up-to-date advice and news on this software. An endless list of Final Cut Pro X requests (for future versions and upgrades), FCPX editing lessons, and documentation of known FCPX issues are just a few of the highlights. If you’re an FCPX power editor, this is a must-visit website.
Part3: Is Paid Class of FCPX Worth For Beginners?
The last thing you want to do with your hectic schedule is sitting through hours of aimless video lessons. Buying Final Cut Pro lessons gives you the feel of having a personal trainer working alongside you. You can enroll in FCPX paid courses on Udemy and Coursera. Often a certificate of completion is available for download at the end of the course.
However, if you are a beginner, we won’t recommend you buy paid courses. There is unlimited free content related to Final Cut Pro available on YouTube and other websites that you can access without spending a penny.
When you have to spend too much money and energy on an editing tool, consider if it’s really worth it. Rather, you can always choose a much easier yet still powerful editor like Filmora to save your time for better editing.
Haven’t got FCPX yet? Get your 90-day free trial here or click below to download Filmora for a try.
Wondershare Filmora
Get started easily with Filmora’s powerful performance, intuitive interface, and countless effects!
Try It Free Try It Free Try It Free Learn More >
Where to Find Free Images for Commercial Purposes
Did you know that some of the world’s most iconic advertisements use stock images for commercial use? For example, AlamapBBDO, a Brazilian ad agency, used stock photos from Getty Images to create their Endless Possibilities campaign in 2016. The advertising campaign combined photos of random people’s faces to recreate portraits of famous people such as the Dalai Lama and Pope Francis.

Most creative agencies prefer altering stock images in most of their work. This is because it allows them to create campaigns for different companies much faster at affordable costs. Keep reading to find out how to get free images for commercial use in your next project.
Part 1: Download images in loyalty-free sites
Several sites offer free images for commercial use as part of their services. In addition, you do not need to register an account to download the images. The sites typically rely on user contributions and content teams to ensure their databases are fresh and maintain consistent quality. Furthermore, all creative assets they offer fall under the creative commons zero license or a variation of it. Here are some of the sites that offer you images for commercial use for free.
1. Pexels

Pexels.com is a free-to-use provider of high-resolution photos and videos for aspiring creators. The German-based website was started in 2014 by two brothers and has been under the Canva umbrella since 2018.
Currently, the website hosts over 3.2 million images and videos from over 250,000 active contributors. In addition, all the material you find in its library is under the Pexels license, which slightly varies from the creative commons zero license model. Some of the restrictions it enforces include:
- You can only use pexels images for commercial use after making alterations to the original image. For example, you can use part of an image to create a collage for your commercial branding.
- Furthermore, you cannot use any of the website’s content to promote political ideologies and explicit content, especially if the images contain identifiable subjects.
Pexels is available through the following channels:
- Your web browser by typing the URL pexels.com.
- The Android and iOS app.
- A plugin for other content creation software such as Google Slides and MS Office.
- An extension on your Chrome browser.
- You can also access the database using the official Canva app.
2. Unsplash

Another website that offers free images for commercial use is Unsplash, a subsidiary of Getty Images since 2021. The website is a favorite among creators boasting over 16 billion photo impressions monthly. In addition, the database consists of over 3.48 million photos from more than 265,000 unique contributors, all under the Unsplash license.
The Unsplash license restricts the sale of its creative assets without incorporating new creative elements, including using them in print media and physical goods such as mugs and caps.
You can access Unsplash from your web browser or request API integration for your application from the site’s owners. In addition, the site also hosts photo walks across different cities, where Unsplash guides show you the best photo locations around the city and the best camera techniques for your work. Some cities to host the event include Boston, Montreal, Tokyo, and Toronto.
3. Freerange

Freerange Stock is an online resource for photos, illustrations, and textures you can download and use for commercial and non-commercial purposes. Since 2007, the site has continued to provide high-quality images to its community of over 800,000 registered users.
Unlike the previous examples, all content on Freerange falls under the website’s Equalicense. It grants you broad commercial rights of its stock images while allowing the contributors to retain control of their copyright, image resale, and distribution. As such, you cannot use the images for bulk distribution or print-on-demand works.
Freerange Stock maintains its steady supply of images for commercial use via the following methods:
- It has an in-house team of professional photographers who upload images across the different categories on the website.
- Freerange Stock also purchases image rights or directly commissions photos from independent creators.
- You can also contribute to the website’s library by voluntarily submitting your work to the platform. Kindly note that you will need a verified account to enable this function.
- The website also works directly with photographers through a licensing and distribution model, providing them extra exposure on the site.
- Finally, Freerange stock aggregates public domain images from other sources, including similar sites and government institutions. It does so by acknowledging the image owner and sometimes lists the image source when the owner is unknown.
Freerange Stock is accessible through your web browser or as an API integration on your app.
4. Vecteezy

Vecteezy is an extensive online library of free stock images for commercial use. Some of the site’s highlight features include the following:
- A best-in-class search engine that incorporates multiple filters to ensure your results are extremely accurate. For example, you can sort images by color, style, number of people, and age of the subjects, something other free stock websites do not provide.
- All images, videos, and vector illustrations are free for personal and commercial uses. It does so through a property sign and release model with its extensive network of contributors, which protects users from any legal liabilities.
- Finally, it employs a content team that manually reviews each photo submission to ensure consistent quality standards for its offerings.
In addition, you can also purchase design resource bundles by subscribing to its Vecteezy pro for as little as $9 monthly. Some of the resources available include the Ultimate Text Effects Layer Styles Bundle for Photoshop, which costs $39 stand-alone or $4.50 when you subscribe to pro.
Part 2: Buy from stock providers
Another way to get images for commercial use is by buying them from stock providers. Some of the benefits of buying images from stock providers include:
- You get a wide selection of unique photos from top-tier photographers. Stock providers always seek collaborations with the industry’s finest to edge out the competition.
- You receive exemplary customer service with your purchase. Selecting the right image can be confusing for amateur creators. As such, stock image providers have customer support channels to help you throughout your creative process.
- Stock images reduce your delivery times significantly. Buying images from a stock provider eliminates the need to invest in photography equipment and the time you need for post-production. As such, you can deliver projects in a fast and cost-effective way.
Despite the above positive, here are some challenges that buying stock images may present:
- Not all stock image providers will have the creative assets you need.
- Image overuse is likely since every creator will rush for the most popular contributor.
Below are some of the stock image providers you should consider.
1. iStock
iStockphoto.com is an online database of creative resources, including royalty-free photos, videos, audio, illustrations, and clip art you can use in your creations. The website is a Getty Images subsidiary based in Calgary, Canada. In addition, contributors earn royalties depending on how often users download their content.
2. Alamy.com
Alamy.com is a British-owned stock image provider with contributions from photographers and agencies in 173 countries. It compensates its contributors by offering higher than average payouts every time users download their creations. Some popular brands to use Alamy’s services include M&C Saatchi, Microsoft, and The Economist.
Part 3: Shot a Photo by yourself or create one with editing tools
Alternatively, you can get images for commercial use by shooting them yourself or creating them with editing tools such as Figma and Wondershare’s Filmstock. Here are some benefits of using this method:
- You get exactly what you want, provided you have the required skills and equipment. Sometimes, getting the right image for your commercial purpose can be challenging. As such, shooting an original photo may be the only option.
- You have full ownership of the image.
Unlike obtaining images from stock photography websites, you are free to use the image in whatever capacity you please without any restrictions. For example, sites such as Unsplash do not allow you to use their images in political statements, a restriction you can bypass when using your own creations.
However, you should also consider the following factors when using this method.
It requires a substantial investment
Getting high-quality images for commercial purposes requires specialist equipment. For example, the Panasonic LUMIX GH6 camera, which has 4K resolution capability, costs $2,197 on Amazon. This makes it extremely expensive for amateur creators.
There is a steep learning curve
Becoming a professional photographer takes time and effort. Unless you are creating as a hobby, it will be a while before you can start generating income from your creations.
Part 4: FAQs
1. Do you need a contributor account to get images for commercial use?
Not necessarily. Stock image sites like pexels.com allow you to download images from their website without creating an account. You will only need one if you want to showcase your work on the platform.
2. Can you use your smartphone to get images for commercial use?
Yes. Most stock image providers have device-specific apps that allow you to access their databases from your mobile device. For example, UnsplashPhotoPicker allows you access to the Unsplash library from your Android device.
Free Download For Win 7 or later(64-bit)
Free Download For macOS 10.14 or later
Free Download For macOS 10.14 or later
Top 15 Free Video Editing Software for Beginners [Easy to Use]
Top 15 Free Video Editing Software for Beginners [Very Easy to Use]

Ollie Mattison
Mar 27, 2024• Proven solutions
If you are not a video-making expert, own a video studio, or have a video specialist to trim and shoot video features, then don’t worry!
We are here to take you on the tour of the easiest video editing software that would promise a professional-looking end-product despite being absolutely inexperienced!
In my opinion, an ideal video editing software should be easy for everyone to get started. It could be simple video editing software, but it at least contains all the basic features you want. My recommendation is Wondershare Filmora, which compromises usability and capability to the best. It not only comes with all common video editing tools at your fingertips but also features you may need to bring your videos to the next level.
- 15 Best Easy Video Editing Software
- Basic Features You Need in an Easy Video Editing Software
- Why Video Editing Matters Nowadays?
- Basic Video Editing Terms You Should Know
Watch Video to Take a Quick View of the 18 Best Video Editors
Filmora Video Editor is an expert in creating and editing videos with outstanding functions and features. The easy-to-use interface will help you much! It offers versions for Windows, Mac, Android and iOS! Worth to have a try!
Try Free Video Editor Try Free Video Editor Try Free Video Editor Learn More >
15 Best Easy Video Editing Software
Below are the brief detail of easy video editors for PC, giving you more editing scalability than mobile-based editing apps. So if you are seeking easy video editing software for YouTube or website then look no further!
1. Wondershare Filmora - Easy Video Editing Software, Unlimited Video Sharing
Compatibility: Windows, Mac, Android, iPhone and iPad.
Wondershare Filmora paves the way to share videos instantly with family and friends, whatever it’s on YouTube, computer, mobile devices, or TV, you’ll choose your way.
For Win 7 or later (64-bit)
 Secure Download
For macOS 10.14 or later
Secure Download
You can directly upload the video to YouTube, as well as an optional message sending to Facebook and Twitter.
Preset profiles are included in output videos for playing on mobile devices like iPhone, iPad, iPod, PSP, etc. No further conversion required. A build-in DVD tool allows you to burn video to a high-quality DVD for watching on TV with your home DVD player.
Filmstock Stock Media Library ](https://filmstock.wondershare.com/creative-theme-tutorial?spm=rs.filmora%5Fweb&source%5Fchannel=seo%5Farticle )
Download the free trial version of Wondershare Filmora for your Mac/Windows version below, start to make your stunning home movies today!
2. Blender
Compatibility: Windows, Mac, and Linux.
This is free and open-source software, originally designed as a 3D animation suite but also has a use video editor. This editor lets you carry out basic actions like video cutting and video splicing. Hence, it is an easy video cutter and easy video joiner. It can also perform more advanced tasks such as video masking.
3. Lightworks
Compatibility: Windows, Mac, and Linux.
Lightworks is a free easy to use video editing software that comes with High precision video trimming, 720p video export for YouTube, Multicam support, and support of a large range of video formats. Its free version has ample features enough for most of the users. Although the paid pro version costs $25 a month.
4. Shotcut
Compatibility: Windows, Mac, and Linux.
Shotcut is a free, open-source video editing software, packed with ample features with wide range video formats support, timeline editing, 4K HD resolution support, and have several tutorials video.
Wondershare Filmora Video Editor
Filmora - No Watermark Video Editing Software
• Easily edit and export video files without watermark
• offers popular effects and filters for making your video professional
• Cross-platform supported - (Windows, Mac, iOS, Android)
Try Video Editor without Watermark Try Video Editor without Watermark Try Video Editor without Watermark Learn More >
5. VSDC
Compatibility: Windows
VSDC, an easy video editing software for windows, is a free video editing software, having an easy-to-learn powerful suite of features including audio editing and color correction. Although a paid version, pro, costs $19.99, having visual waveform, image stabilization and voice over support.
6. Machete Lite
Compatibility: Windows
Machete Lite is a free yet the simplest video editing software perfect for simple editing tasks. Only AVI and WMV files are supported in its free version. Its full version costs $19.95 having audio editing and more file type support, unlike the free version.
7. Avidemux
Compatibility: Windows, Mac, and Linux
Avoided is the simplest video editing software, perfect for beginners. It allows performing simple editing features like Encoding, simple cutting, and filtering with an easy-to-use interface.
8. Hitfilm Express
Compatibility: Windows and Mac
HitFilm Express is a free video editing software with features ranging from basic editing features like trimming, audio editing, and slicing to advance tools and features. Its free version supports over 180 special effects. There’s a built-in YouTube uploading.
Finding a Way to Edit Video for Free? Try This Out!
Filmora Video Editor brings you all the convenience of editing videos with handy functions. You can make your creative ideas into realize! More importantly, your edited video can export without a watermark!
Try It Free Try It Free Try It Free Learn More >
9. iMovie
Compatibility: Mac
If you are a beginner and searching for a good video editing software to get your hands clean on editing then iMovie editor is perfect for you. It is an easy video editing software for mac having an easy drag and drop interface. Features like Video trimming, split-screen, audio editing, pre-made transitions library, and 4K resolution support.
10. Openshot
Compatibility: Windows, Mac, and Linux
It is a free open source video editing software with an easy-to-use interface. Features like unlimited layers and tracks, time-mapping, real-time previews, trimming, snapping, clip resizing, curve-based keyframe animations etc. It offers more than enough features for free software.
11. Movie Maker
Compatibility: Windows
It is an easy video maker and editing software for beginners which can be downloaded from any third-party and use it to make and share high-quality movies.
12. Lumen5
Compatibility: Windows and Mac
It’s a perfect web-based video editing tool, best for Social Media promotion Campaigns with an easy drag-and-drop interface.
![]()
A cross-platform for making videos anywhere for all creators

Why your video editing isn’t good enough? How about some creative inspo?
- 100 Million+ Users
- 150+ Countries and Regions
- 4 Million+ Social Media Followers
- 5 Million+ Stock Media for Use
* Secure Download

13. Adobe Spark
Compatibility: Windows and Mac
Adobe Sparks is also a web-based easy video editor, similar to Lumen5. It offers an easy user interface but is a little restricted when it comes to offering a bank of images and footage to use.
14. Videopad
Compatibility: Windows
VideoPad is a simple video editing software for beginners, maybe not suitable for professional use. It has features like 3D Video Editing, Sound Effects and pre-made transitions Library, Reduce Camera Shakes and Multiple Resolutions export support.
15. Freemake
Compatibility: Windows
Freemake is a free video converter that is used to convert and alter videos that can modify and convert videos, embed videos to websites, and extract audio from video clips simply and fast. It supports above 500 video file formats and is compatible with multiple audio and image file formats for slideshows and video clip creation.
Basic Features You Need in an Easy Video Editing Software
A software having:
- Easy montage maker
- Easy video cutter
- Easy video joiner
- Compositing multiple elements together
- Color grading
- Motion tracking
- Stabilization
- Titles
- Background replacement
- Basic color correction
- Cross dissolves and fade-to-black transitions
- Audio crossfades
- Audio level adjustment using keyframes
- Auto synchronization of additional audio tracks
- Image position adjustment using keyframes
- Footage speed adjustments
- Basic color correction
- Footage bins for roughly organizing imported footage
Why Video Editing Matters Nowadays?
If videos aren’t a primary focus of your content marketing plan, the probability is it’s soon going to be certain! Every next production is turning into video-based content, be it content marketers or SEOs.
Around 50% of the content marketers are using Facebook and YouTube channels for the sake of video distribution since online activity spent on watching videos is 50%.
Moreover, by 2021, video is going to be projected to account for more than 80% out of all internet traffic.
Therefore, it has become a need to focus on video content if you are looking to grow the organic traffic of your publications.

Filmora Free Video Editor
Create AI-Generated Video with Filmora
Filmora Free video editor offers a ChatGPT plug-in and AI tools to enhance your creative vision. Make your idea into reality.
Try It Free Try It Free Try It Free Learn More >
Basic Video Editing Terms You Should Know
Below are some of the important yet basic terms that you should know related to videography in general and video editing in specific as well, whether you are a beginner or professional.
Aspect ratio:
The aspect ratio is the ratio of width and height of a video. Examples of the most used aspect ratios are: 4:3, 16:9, 1.85:1.
Refer to the image given below for a better understanding.

B-roll:
B-roll facilities one with the flexibility, when editing, to the video editing rules as it is an add-on picture that makes a previously incoherent scene seamless.
As shown in the image below, B-roll is used to insert which can make the transition easy to look on the eyes.
Bit rate:
Bit rate, also known as data rate, refers to the amount of data used for every second within the video. It is most commonly expressed in kilobits per second (kbps).
Close up:
Close-up refers to the shots that frame to subject tightly.
For instance, if it is a person, then the close-up covers solely his face.
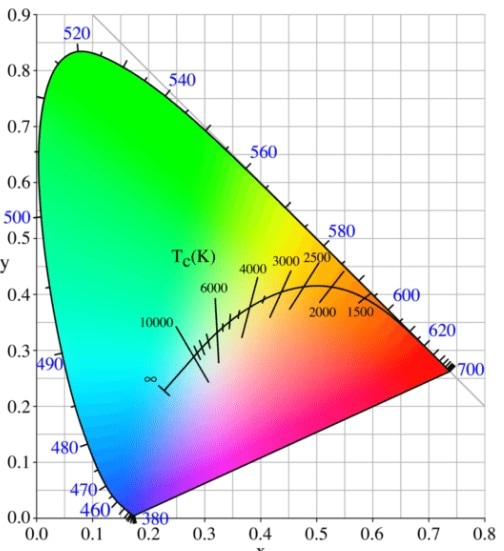
Color temperature:
Color temperature refers to the light visibility in a shot. Color temperature is expressed in Kelvin. The scale of color temperature ranges from cool to warm.
Composition:
Composition entails the process of combining multiple footages using video editing software.
Compression:
Compression is the process of minimizing the quantity of data utilized in a video file. It helps make in the process of uploading and downloading quite faster. This also leaves you with ample space for more of your publications.
Crop factor:
Crop factor refers to a number that expresses the ratio of the imaging area of a sensor to a full-frame sensor. It typically ranges from 1.3 to 2.0.
Cut-in
Cut-in refers to showing a specific part of a subject in order to emphasize a certain aspect or emotion. For instance, hand gestures may show nervousness, enthusiasm, agitation, etc.
Foley:
Often times the original sound of the scene captured in the video is not captured as naturally as they were supposed to sound like in reality. Hence, Foley is when you reproduce those sounds for that video.
Frame rate:
Frame rate refers to the video capturing by a shutter in a second or shutter cycling rate through opening and closing. Some of the common frame rates are 24, 25, 29.97, 30, etc. The frame rate is expressed in frames per second (fps).
High definition media interface:
HDMI is the connectors that digitally transfer audio and HD video to a television. This is helpful if you intend to work on a bigger screen or wish to share some of your productions.
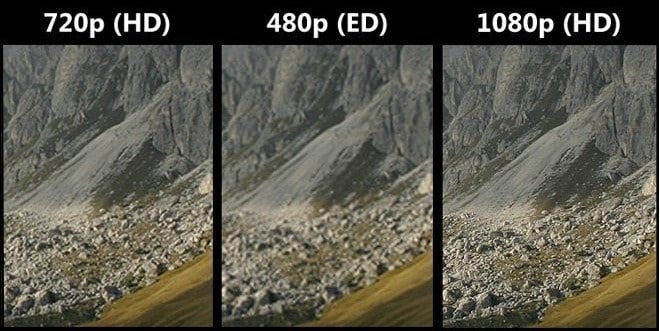
Resolution:
Resolution refers to the horizontal and vertical pixels of your video. For instance 640×480 for SD and 1280×720 for HD. Sometimes resolution refers only to the number of pixels that paper vertically. For example 480p, 720p, and 1080p respectively.
J-Cut:
J-cut refers to the editing technique in which the audio from a next scene is overlapped with the image from the previous scene, such that the audio segment of the next scene begins playing prior to its picture.
Jumpcut:
Jumpcut editing techniques refer to an abrupt transition between the two consecutive frames. The entity in the video containing jump cuts appears to jump along with the scene from one place to another. This looks disruptive to the audience.
L-Cut:
L-cut is exactly opposite to J-cut where the audio from the next scene overlays the image from the next scene to play the audio after an image has been displayed in the video.
Lower third:
As the name suggests, the lower third is derived from the rule of third which refers to the type of title, mostly used by vloggers, broadcasters, interviewers, and you tubers.
Memory bank:
You can understand the term by thinking of a memory box where we keep certain things as a memory of the events in someone’s life. Memory bank serves the same purpose through the use of video. It often uses natural sounds, document travel or merely store moments in routine life.
Press kit:
Press kit is used to provide information regarding your productions to the press for promotional purposes. Such information is often background including synopsis, crew, cast’s bios Q&A with the director, production stills and its reviews.
Shot list:
The shot list refers to the checklist related to the shots that a videographer plans to include in his/her content. This may help you save time and gear with efficient planning and handling. This gives a sense of direction to your production.
Storyboard:
A storyboard is a drawing to illustrate the scenes in the video. This gives a direct and organized way to visualize the needs for the shots or animation.

Sync:
Synchronization, aka sync, refers to the alignment of audio with video imaging.
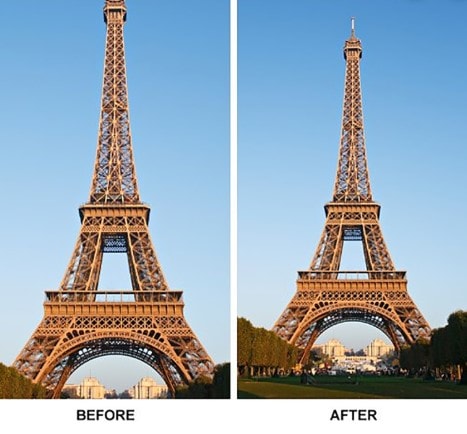
Rule of thirds:
The rule of third is a grid that helps you to compose interesting and balanced shots to make your productions aesthetically pleasing. The grid is similar to a tic-tac-toe board since it segregates the picture into 9 segments. It helps bring points of interest to be aligned with the lines or intersection given in the grid.

Three-point lighting:
This helps one to diminish the shadows for image balancing and provides an appealing contrast. These three lights are commonly known as fill, key, and backlight.

Tilts:
Tilts refer to the vertical transitions that your camera. This is the opposite of pans.

Pans:
Pans refer to the horizontal movements of your camera. This is exactly contrary to tilts.
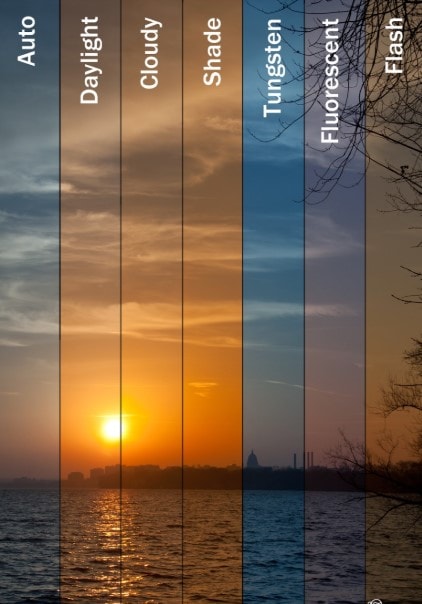
White balance:
White balance refers to the process where the unrealistic color casts are removed in order to render a white object to be actually white in your photo, and not have other tints.
Wide-angle:
A wide-angel lens refers to a short focal length of a lens. This brings more of a subject rather than a subject being captured by a normal lens at equal distances.
Non-linear editing:
NLEs is a non-destructive editing technique that allows one to access any frame in a video clip regardless of the sequence in the clip. It gives you the freedom to easily include effects, transitions, fades, etc. which cannot be achieved with linear editing
Pixel aspect ratio:
Pixels are several tiny squares that build up an image in a video. Whereas, aspect ratio refers to the ratio of width to height of a video. Hence, the pixel aspect ratio (PAR) is the ratio of width to height of the pixels.
Conclusion
Be it Instagram stories, YouTube product testimonials, or Facebook ads, using these easy-to-use video editing software will elevate your content into a professional and slick look.
So, I hope you are now ready to get started.
Lights, camera, action!
For Win 7 or later (64-bit)
Secure Download
For macOS 10.14 or later
Secure Download
Click here to get Filmora for PC by email
or Try Filmora App for mobile >>>
download filmora app for ios ](https://app.adjust.com/b0k9hf2%5F4bsu85t ) download filmora app for android ](https://app.adjust.com/b0k9hf2%5F4bsu85t )
Ollie Mattison
Ollie Mattison is a writer and a lover of all things video.
Follow @Ollie Mattison
Ollie Mattison
Mar 27, 2024• Proven solutions
If you are not a video-making expert, own a video studio, or have a video specialist to trim and shoot video features, then don’t worry!
We are here to take you on the tour of the easiest video editing software that would promise a professional-looking end-product despite being absolutely inexperienced!
In my opinion, an ideal video editing software should be easy for everyone to get started. It could be simple video editing software, but it at least contains all the basic features you want. My recommendation is Wondershare Filmora, which compromises usability and capability to the best. It not only comes with all common video editing tools at your fingertips but also features you may need to bring your videos to the next level.
- 15 Best Easy Video Editing Software
- Basic Features You Need in an Easy Video Editing Software
- Why Video Editing Matters Nowadays?
- Basic Video Editing Terms You Should Know
Watch Video to Take a Quick View of the 18 Best Video Editors
Filmora Video Editor is an expert in creating and editing videos with outstanding functions and features. The easy-to-use interface will help you much! It offers versions for Windows, Mac, Android and iOS! Worth to have a try!
Try Free Video Editor Try Free Video Editor Try Free Video Editor Learn More >
15 Best Easy Video Editing Software
Below are the brief detail of easy video editors for PC, giving you more editing scalability than mobile-based editing apps. So if you are seeking easy video editing software for YouTube or website then look no further!
1. Wondershare Filmora - Easy Video Editing Software, Unlimited Video Sharing
Compatibility: Windows, Mac, Android, iPhone and iPad.
Wondershare Filmora paves the way to share videos instantly with family and friends, whatever it’s on YouTube, computer, mobile devices, or TV, you’ll choose your way.
For Win 7 or later (64-bit)
Secure Download
For macOS 10.14 or later
Secure Download
You can directly upload the video to YouTube, as well as an optional message sending to Facebook and Twitter.
Preset profiles are included in output videos for playing on mobile devices like iPhone, iPad, iPod, PSP, etc. No further conversion required. A build-in DVD tool allows you to burn video to a high-quality DVD for watching on TV with your home DVD player.
Filmstock Stock Media Library ](https://filmstock.wondershare.com/creative-theme-tutorial?spm=rs.filmora%5Fweb&source%5Fchannel=seo%5Farticle )
Download the free trial version of Wondershare Filmora for your Mac/Windows version below, start to make your stunning home movies today!
2. Blender
Compatibility: Windows, Mac, and Linux.
This is free and open-source software, originally designed as a 3D animation suite but also has a use video editor. This editor lets you carry out basic actions like video cutting and video splicing. Hence, it is an easy video cutter and easy video joiner. It can also perform more advanced tasks such as video masking.
3. Lightworks
Compatibility: Windows, Mac, and Linux.
Lightworks is a free easy to use video editing software that comes with High precision video trimming, 720p video export for YouTube, Multicam support, and support of a large range of video formats. Its free version has ample features enough for most of the users. Although the paid pro version costs $25 a month.
4. Shotcut
Compatibility: Windows, Mac, and Linux.
Shotcut is a free, open-source video editing software, packed with ample features with wide range video formats support, timeline editing, 4K HD resolution support, and have several tutorials video.
Wondershare Filmora Video Editor
Filmora - No Watermark Video Editing Software
• Easily edit and export video files without watermark
• offers popular effects and filters for making your video professional
• Cross-platform supported - (Windows, Mac, iOS, Android)
Try Video Editor without Watermark Try Video Editor without Watermark Try Video Editor without Watermark Learn More >
5. VSDC
Compatibility: Windows
VSDC, an easy video editing software for windows, is a free video editing software, having an easy-to-learn powerful suite of features including audio editing and color correction. Although a paid version, pro, costs $19.99, having visual waveform, image stabilization and voice over support.
6. Machete Lite
Compatibility: Windows
Machete Lite is a free yet the simplest video editing software perfect for simple editing tasks. Only AVI and WMV files are supported in its free version. Its full version costs $19.95 having audio editing and more file type support, unlike the free version.
7. Avidemux
Compatibility: Windows, Mac, and Linux
Avoided is the simplest video editing software, perfect for beginners. It allows performing simple editing features like Encoding, simple cutting, and filtering with an easy-to-use interface.
8. Hitfilm Express
Compatibility: Windows and Mac
HitFilm Express is a free video editing software with features ranging from basic editing features like trimming, audio editing, and slicing to advance tools and features. Its free version supports over 180 special effects. There’s a built-in YouTube uploading.
Finding a Way to Edit Video for Free? Try This Out!
Filmora Video Editor brings you all the convenience of editing videos with handy functions. You can make your creative ideas into realize! More importantly, your edited video can export without a watermark!
Try It Free Try It Free Try It Free Learn More >
9. iMovie
Compatibility: Mac
If you are a beginner and searching for a good video editing software to get your hands clean on editing then iMovie editor is perfect for you. It is an easy video editing software for mac having an easy drag and drop interface. Features like Video trimming, split-screen, audio editing, pre-made transitions library, and 4K resolution support.
10. Openshot
Compatibility: Windows, Mac, and Linux
It is a free open source video editing software with an easy-to-use interface. Features like unlimited layers and tracks, time-mapping, real-time previews, trimming, snapping, clip resizing, curve-based keyframe animations etc. It offers more than enough features for free software.
11. Movie Maker
Compatibility: Windows
It is an easy video maker and editing software for beginners which can be downloaded from any third-party and use it to make and share high-quality movies.
12. Lumen5
Compatibility: Windows and Mac
It’s a perfect web-based video editing tool, best for Social Media promotion Campaigns with an easy drag-and-drop interface.
![]()
A cross-platform for making videos anywhere for all creators
Why your video editing isn’t good enough? How about some creative inspo?
- 100 Million+ Users
- 150+ Countries and Regions
- 4 Million+ Social Media Followers
- 5 Million+ Stock Media for Use
* Secure Download
13. Adobe Spark
Compatibility: Windows and Mac
Adobe Sparks is also a web-based easy video editor, similar to Lumen5. It offers an easy user interface but is a little restricted when it comes to offering a bank of images and footage to use.
14. Videopad
Compatibility: Windows
VideoPad is a simple video editing software for beginners, maybe not suitable for professional use. It has features like 3D Video Editing, Sound Effects and pre-made transitions Library, Reduce Camera Shakes and Multiple Resolutions export support.
15. Freemake
Compatibility: Windows
Freemake is a free video converter that is used to convert and alter videos that can modify and convert videos, embed videos to websites, and extract audio from video clips simply and fast. It supports above 500 video file formats and is compatible with multiple audio and image file formats for slideshows and video clip creation.
Basic Features You Need in an Easy Video Editing Software
A software having:
- Easy montage maker
- Easy video cutter
- Easy video joiner
- Compositing multiple elements together
- Color grading
- Motion tracking
- Stabilization
- Titles
- Background replacement
- Basic color correction
- Cross dissolves and fade-to-black transitions
- Audio crossfades
- Audio level adjustment using keyframes
- Auto synchronization of additional audio tracks
- Image position adjustment using keyframes
- Footage speed adjustments
- Basic color correction
- Footage bins for roughly organizing imported footage
Why Video Editing Matters Nowadays?
If videos aren’t a primary focus of your content marketing plan, the probability is it’s soon going to be certain! Every next production is turning into video-based content, be it content marketers or SEOs.
Around 50% of the content marketers are using Facebook and YouTube channels for the sake of video distribution since online activity spent on watching videos is 50%.
Moreover, by 2021, video is going to be projected to account for more than 80% out of all internet traffic.
Therefore, it has become a need to focus on video content if you are looking to grow the organic traffic of your publications.
Filmora Free Video Editor
Create AI-Generated Video with Filmora
Filmora Free video editor offers a ChatGPT plug-in and AI tools to enhance your creative vision. Make your idea into reality.
Try It Free Try It Free Try It Free Learn More >
Basic Video Editing Terms You Should Know
Below are some of the important yet basic terms that you should know related to videography in general and video editing in specific as well, whether you are a beginner or professional.
Aspect ratio:
The aspect ratio is the ratio of width and height of a video. Examples of the most used aspect ratios are: 4:3, 16:9, 1.85:1.
Refer to the image given below for a better understanding.
B-roll:
B-roll facilities one with the flexibility, when editing, to the video editing rules as it is an add-on picture that makes a previously incoherent scene seamless.
As shown in the image below, B-roll is used to insert which can make the transition easy to look on the eyes.
Bit rate:
Bit rate, also known as data rate, refers to the amount of data used for every second within the video. It is most commonly expressed in kilobits per second (kbps).
Close up:
Close-up refers to the shots that frame to subject tightly.
For instance, if it is a person, then the close-up covers solely his face.
Color temperature:
Color temperature refers to the light visibility in a shot. Color temperature is expressed in Kelvin. The scale of color temperature ranges from cool to warm.
Composition:
Composition entails the process of combining multiple footages using video editing software.
Compression:
Compression is the process of minimizing the quantity of data utilized in a video file. It helps make in the process of uploading and downloading quite faster. This also leaves you with ample space for more of your publications.
Crop factor:
Crop factor refers to a number that expresses the ratio of the imaging area of a sensor to a full-frame sensor. It typically ranges from 1.3 to 2.0.
Cut-in
Cut-in refers to showing a specific part of a subject in order to emphasize a certain aspect or emotion. For instance, hand gestures may show nervousness, enthusiasm, agitation, etc.
Foley:
Often times the original sound of the scene captured in the video is not captured as naturally as they were supposed to sound like in reality. Hence, Foley is when you reproduce those sounds for that video.
Frame rate:
Frame rate refers to the video capturing by a shutter in a second or shutter cycling rate through opening and closing. Some of the common frame rates are 24, 25, 29.97, 30, etc. The frame rate is expressed in frames per second (fps).
High definition media interface:
HDMI is the connectors that digitally transfer audio and HD video to a television. This is helpful if you intend to work on a bigger screen or wish to share some of your productions.
Resolution:
Resolution refers to the horizontal and vertical pixels of your video. For instance 640×480 for SD and 1280×720 for HD. Sometimes resolution refers only to the number of pixels that paper vertically. For example 480p, 720p, and 1080p respectively.
J-Cut:
J-cut refers to the editing technique in which the audio from a next scene is overlapped with the image from the previous scene, such that the audio segment of the next scene begins playing prior to its picture.
Jumpcut:
Jumpcut editing techniques refer to an abrupt transition between the two consecutive frames. The entity in the video containing jump cuts appears to jump along with the scene from one place to another. This looks disruptive to the audience.
L-Cut:
L-cut is exactly opposite to J-cut where the audio from the next scene overlays the image from the next scene to play the audio after an image has been displayed in the video.
Lower third:
As the name suggests, the lower third is derived from the rule of third which refers to the type of title, mostly used by vloggers, broadcasters, interviewers, and you tubers.
Memory bank:
You can understand the term by thinking of a memory box where we keep certain things as a memory of the events in someone’s life. Memory bank serves the same purpose through the use of video. It often uses natural sounds, document travel or merely store moments in routine life.
Press kit:
Press kit is used to provide information regarding your productions to the press for promotional purposes. Such information is often background including synopsis, crew, cast’s bios Q&A with the director, production stills and its reviews.
Shot list:
The shot list refers to the checklist related to the shots that a videographer plans to include in his/her content. This may help you save time and gear with efficient planning and handling. This gives a sense of direction to your production.
Storyboard:
A storyboard is a drawing to illustrate the scenes in the video. This gives a direct and organized way to visualize the needs for the shots or animation.
Sync:
Synchronization, aka sync, refers to the alignment of audio with video imaging.
Rule of thirds:
The rule of third is a grid that helps you to compose interesting and balanced shots to make your productions aesthetically pleasing. The grid is similar to a tic-tac-toe board since it segregates the picture into 9 segments. It helps bring points of interest to be aligned with the lines or intersection given in the grid.
Three-point lighting:
This helps one to diminish the shadows for image balancing and provides an appealing contrast. These three lights are commonly known as fill, key, and backlight.
Tilts:
Tilts refer to the vertical transitions that your camera. This is the opposite of pans.
Pans:
Pans refer to the horizontal movements of your camera. This is exactly contrary to tilts.
White balance:
White balance refers to the process where the unrealistic color casts are removed in order to render a white object to be actually white in your photo, and not have other tints.
Wide-angle:
A wide-angel lens refers to a short focal length of a lens. This brings more of a subject rather than a subject being captured by a normal lens at equal distances.
Non-linear editing:
NLEs is a non-destructive editing technique that allows one to access any frame in a video clip regardless of the sequence in the clip. It gives you the freedom to easily include effects, transitions, fades, etc. which cannot be achieved with linear editing
Pixel aspect ratio:
Pixels are several tiny squares that build up an image in a video. Whereas, aspect ratio refers to the ratio of width to height of a video. Hence, the pixel aspect ratio (PAR) is the ratio of width to height of the pixels.
Conclusion
Be it Instagram stories, YouTube product testimonials, or Facebook ads, using these easy-to-use video editing software will elevate your content into a professional and slick look.
So, I hope you are now ready to get started.
Lights, camera, action!
For Win 7 or later (64-bit)
Secure Download
For macOS 10.14 or later
Secure Download
Click here to get Filmora for PC by email
or Try Filmora App for mobile >>>
download filmora app for ios ](https://app.adjust.com/b0k9hf2%5F4bsu85t ) download filmora app for android ](https://app.adjust.com/b0k9hf2%5F4bsu85t )
Ollie Mattison
Ollie Mattison is a writer and a lover of all things video.
Follow @Ollie Mattison
Free Video Stabilization Software to Enhance Your Clips
Are you having issues regarding your video quality and looking for a video stabilizer to improve it? Guess what? You can create high-quality videos through free video stabilization software, either for your professional or personal use.
It helps to remove the shakiness you get on videos recorded on handheld devices such as mobile phones. It makes your clips and home movies look more stable and standard. Why upload the same boring and shady videos all the time when you can stabilize them and look more professional? This article takes you through some of the best video stabilization software to stabilize your videos and stand out.
Top 10 Best Free Video Stabilization Software for Windows and Mac
1. iMovie
iMovie is a video editing software available exclusively for iOS and macOS users. It is a complete video editing software that enables users to make professional cinematic movies. Additionally, it allows you to smooth out the shaky footage and create high-quality videos. You also get access to a handful of themes and templates that you can use to customize your videos.
iMovie’s user-friendly interface does not require you to be tech-savvy to operate it. It allows any ordinary user to stabilize videos and yield elegant videos.
Key features:
- It enables easy sharing of movies across mobile devices.
- You can freely adjust the levels of your audio clip.
- Easy green-screen control
- It essentializes professional movie creation
Steps to stabilize shaky clips on iMovie
Step 1: Import the video you want to stabilize into the iMovie application on Mac computer;
Step 2: In the adjustment tab, click on the Stabilization button and turn on Stabilize Shaky Video tool.

Step 3: To adjust the amount of stabilization, click and drag the stabilize shaky video slider.
2. Windows movie maker
Windows Movie Maker is another video stabilizer available exclusively for Windows users. It allows you to make personalized movies and incorporate video, still images, background music, and narration. It is also beneficial for stabilizing videos, adding titles and transactions.
Key features:
- It enables you to add special effects to your videos.
- Options for extensive audio track selection.
- Timeline narration options.
If you are using Windows 7, you are lucky to use Windows Movie Maker to stabilize the shaky videos easily. Watch the video tutorial to find out how.
Steps to stabilize shaky clips on Windows Movie Maker
Step 1: Open the app and click on the Add videos and photos icon, and select the video clip you want to stabilize.
Step 2: Select the portion of the clip that you want to stabilize. You can do this by selecting the shaky video selection option on the right side of the software’s windows.
Step 3: Click on the Edit tab to access the Video stabilization feature.
Step 4: Under the video stabilization feature, you will see three options, namely Anti-shake, Anti-shake and wobble correction- low, Anti-shake and wobble correction- high. Select the most suitable option.

3. HitFilm express
The HitFilm Express is one of the best video stabilization software. It is available for both macOS and Windows. It is an all-in-one video editing software that allows you to import clips and add visual effects and audio to the videos. You can also import your 3D model and create themes like star wars or other animation themes.
Key features:-
- Advance tracking
- Lighting effects
- Muzzle flash effects
- Masking and layering technique
- Screen simulation
Steps to stabilize shaky clips on HitFilm Express
Step 1: Import the clip you want to stabilize and navigate to the control panel.
Step 2: Under the control panel menu, select the track option, and locate your tracking points.
Step 3: It will provide you with two options under the type menu, Single-point position only and double-point position scale/rotation. Select the most appropriate option.
Step 4: Under the purpose-tab, select stabilize options and hit apply.
4. FilmForth
FilmForth is a new name in the video editing industry but it allows you to create videos easily with powerful features. If you are looking for free video stabilization software, FilmForth might be one of them for you. It is compact with powerful and easy-to-apply features.
You can edit video, add filters and transitions, titles, record voiceover, or add background music to video. What’s more, it allows you to save the video without watermark.
Key features:-
- Slideshow maker with photos, videos, music, and effects;
- Change the video background or make the logo transparent;
Steps to stabilize videos using FilmForth
Step 1: Select the stabilize video option under the quick tool menu.
Step 2: Select the video file that you want to stabilize.
Step 3: Manually fill the video resolution, video quality, and frame rate settings.
Step 4: Give the file an output name, and choose the video to save the video file.
5. Video DeShake
Video DeShake is solely developed for video stabilization. You can easily download it from av2video.com. It is an effective solution for video stabilization. However, it does not provide you with fancy video editing features, but if you are looking for an instant solution for video stabilization, it is one of the best options.
Steps to stabilize videos using video Deshake:
Step 1: Download and install video Deshake software from av2video.com.
Step 2: Select the plus icon from the left-aligned menu bar.
Step 3: Select the video file that you want to stabilize.
Step 4: Select your preferred format for the output video, and click on the stabilize option present at the bottom of the interface.
6. Shotcut
Shotcut is a free video stabilizer. You don’t need to sign up or log in to begin. There is no sales funnel waiting for you once you get addicted to using it. Another reason for its popularity is beginner-focused design. It is easy to learn and use. However, it lacks advanced editing features like iMovie or HitFilm Express.
Key features:-
- It can load videos recorded in high resolution or above 60 fps.
- Single frame image extraction options.
- Video stabilization feature
- Blurring effect
Steps to stabilize videos using Shotcut:-
Step 1: Drag the video file you want to stabilize into the software interface. Select the timeline feature to select the portion of the video clip that you want to stabilize.
Step 2: Select the filter tab and follow by selecting the plus button. Under the plus icon, select the monitor option and find the stabilize option under the menu.
Step 3: Customize the stabilizations options according to your specific needs and click on analyze to monitor the stabilization. After stabilization is complete, select the file option and click on save to save the video.
7. Blender
The Blender is free and one of the best video editing software for professionals . Besides video editing, it provides you with 3D modeling, rigging animation, simulation, and motion tracking features . It allows you to perform basic actions like video cuts and splicing and complex tasks like video masking or color grading.
Key features:-
- Live preview, chroma vectorscope, and histogram displays.
- Scrubbing and waveform visualization.
- Audion mixing and syncing.
- Speed control, adjustment layers, transitions, and keyframe options.
Steps to stabilize videos using Blender
Step 1: Begin by going to the motion tracking workspace.
Step 2: Click on open and select the video file you want to stabilize.
Step 3: Select the tracking option from the toolbar and click on the movie to set tracking points.
Step 4: Set the tracking point size and press the right arrow to start tracking.
Step 5: Select the file menu and navigate the save option to save the stabilized video.
8. AVS video stabilizer
AVS video editor is suitable for both beginners and professionals. It enables you to create videos of any resolution and length. It allows you to cut, trim, join, and rotate videos. It also amazes you with the freedom of using over 300 effects. With AVS video editor, you can edit VHS videos and convert them into digital format.
Key features:-
- Audio capture
- Brand overlay
- Customizable templates
- Easy to use interface with drag and drop features
- Multimedia format support
Steps to stabilize videos using AVS video editor:
Step 1: Click on the import option under the media library tab and import the video you want to stabilize.
Step 2: Press the video stabilization button present over the timeline.
Step 3: Under the stabilization video, drag the compensation bar to adjust the degree of stabilization.
Step 4: Click on the ok button at the bottom of the stabilization menu to save the changes.
9. VSDC
VSDC is a free video stabilizer that allows you to stabilize and edit videos of any complexity. It is compact with advanced features to cut and merge video files and apply visual and audio effects to make a slideshow and add appropriate soundtracks. It also facilitates easy video conversion for playback on specific media devices.
Key features:-
- Side by side and split-screen videos
- Videos in the text effects
- Green screen removal
- Double exposure
Steps to stabilize videos using VSDC
Step 1: Open the VSDC video editor, and navigate to the video stabilization feature from the Tools tab.
Step2: Select the open file option and export the video file you want to stabilize.
Step 3: In the stabilization, tab adjust the settings that best suit your specific requirements.
Step 4: Complete the process by clicking on the export project to view the outcome.
10. Openshot
OpenShot video editor is an easy-to-use video stabilization and edition software. It is helping professionals around the world with its excellent video editing features. Another factor that makes it different from other software is its compatibility with multiple operating software. It goes with Mac, Linux and Windows and is easily downloadable from its website.
Key features:-
- Compatible with multiple operating systems (Linux, Mac, and Windows)
- It supports a handful of video audio and image formats.
- Video transition along with the real-time preview.
- Options for creating title and sub-title creation
- Titles formation with 3D animation
Steps to stabilize videos using Openshot
Step 1: Open the video you want to stabilize using the project file tab.
Step 2: Drag the video timeline tab and locate the shaky part of the video you want to stabilize.
Step 3: Select the effects tab and navigate the stabilizer feature from the menu.
Step 4: Drag the stabilizer feature to your video clip in the timeline.
Step 5: You will see the stabilizer: initialize effect window. Select the degree of percentage as per your specific requirements.
Step 6: Select the process effects option.
Bonus: Stabilize shaky videos using Filmora video editor
Filmora video editor is a powerful video stabilizing software filled with powerful editing features. Unlike other editing software, Filmora is compatible with both Windows and Mac.
Some of the above video stabilizers are complex and require expertise. On the other hand, Wondershare Filmora video editor provides you with an easy-to-use interface and easy navigation options.
Key features:
- Modern and intuitive interface.
- Video stabilization in one click.
- Powerful edition features.
- Rich effects and templates.
Steps to stabilize videos using Wondershare Filmora video editor
For Win 7 or later (64-bit)
For macOS 10.12 or later
Step 1: Drag shaky videos into the Filmora video editor timeline.
Step 2: Click on the edit option in the toolbar to access the editing panel.
Step 3: Select the stabilization option from the editing panel.
Step 4: Click the play button to preview the stabilized video clip. It also allows you to stabilize the smooth level to obtain better results.
Conclusion
Videos are the most popular types of content. They instantly convey the message and engage the consumers. However, the quality of your video is crucial from your business perspective. Video stabilizing software provides stability to videos and makes them look professional and smooth.
Even if you don’t use video stabilizers for stabilizing videos for your business purposes, they can still come in handy while stabilizing your private videos.
Steps to stabilize shaky clips on iMovie
Step 1: Import the video you want to stabilize into the iMovie application on Mac computer;
Step 2: In the adjustment tab, click on the Stabilization button and turn on Stabilize Shaky Video tool.
Step 3: To adjust the amount of stabilization, click and drag the stabilize shaky video slider.
2. Windows movie maker
Windows Movie Maker is another video stabilizer available exclusively for Windows users. It allows you to make personalized movies and incorporate video, still images, background music, and narration. It is also beneficial for stabilizing videos, adding titles and transactions.
Key features:
- It enables you to add special effects to your videos.
- Options for extensive audio track selection.
- Timeline narration options.
If you are using Windows 7, you are lucky to use Windows Movie Maker to stabilize the shaky videos easily. Watch the video tutorial to find out how.
Steps to stabilize shaky clips on Windows Movie Maker
Step 1: Open the app and click on the Add videos and photos icon, and select the video clip you want to stabilize.
Step 2: Select the portion of the clip that you want to stabilize. You can do this by selecting the shaky video selection option on the right side of the software’s windows.
Step 3: Click on the Edit tab to access the Video stabilization feature.
Step 4: Under the video stabilization feature, you will see three options, namely Anti-shake, Anti-shake and wobble correction- low, Anti-shake and wobble correction- high. Select the most suitable option.
3. HitFilm express
The HitFilm Express is one of the best video stabilization software. It is available for both macOS and Windows. It is an all-in-one video editing software that allows you to import clips and add visual effects and audio to the videos. You can also import your 3D model and create themes like star wars or other animation themes.
Key features:-
- Advance tracking
- Lighting effects
- Muzzle flash effects
- Masking and layering technique
- Screen simulation
Steps to stabilize shaky clips on HitFilm Express
Step 1: Import the clip you want to stabilize and navigate to the control panel.
Step 2: Under the control panel menu, select the track option, and locate your tracking points.
Step 3: It will provide you with two options under the type menu, Single-point position only and double-point position scale/rotation. Select the most appropriate option.
Step 4: Under the purpose-tab, select stabilize options and hit apply.
4. FilmForth
FilmForth is a new name in the video editing industry but it allows you to create videos easily with powerful features. If you are looking for free video stabilization software, FilmForth might be one of them for you. It is compact with powerful and easy-to-apply features.
You can edit video, add filters and transitions, titles, record voiceover, or add background music to video. What’s more, it allows you to save the video without watermark.
Key features:-
- Slideshow maker with photos, videos, music, and effects;
- Change the video background or make the logo transparent;
Steps to stabilize videos using FilmForth
Step 1: Select the stabilize video option under the quick tool menu.
Step 2: Select the video file that you want to stabilize.
Step 3: Manually fill the video resolution, video quality, and frame rate settings.
Step 4: Give the file an output name, and choose the video to save the video file.
5. Video DeShake
Video DeShake is solely developed for video stabilization. You can easily download it from av2video.com. It is an effective solution for video stabilization. However, it does not provide you with fancy video editing features, but if you are looking for an instant solution for video stabilization, it is one of the best options.
Steps to stabilize videos using video Deshake:
Step 1: Download and install video Deshake software from av2video.com.
Step 2: Select the plus icon from the left-aligned menu bar.
Step 3: Select the video file that you want to stabilize.
Step 4: Select your preferred format for the output video, and click on the stabilize option present at the bottom of the interface.
6. Shotcut
Shotcut is a free video stabilizer. You don’t need to sign up or log in to begin. There is no sales funnel waiting for you once you get addicted to using it. Another reason for its popularity is beginner-focused design. It is easy to learn and use. However, it lacks advanced editing features like iMovie or HitFilm Express.
Key features:-
- It can load videos recorded in high resolution or above 60 fps.
- Single frame image extraction options.
- Video stabilization feature
- Blurring effect
Steps to stabilize videos using Shotcut:-
Step 1: Drag the video file you want to stabilize into the software interface. Select the timeline feature to select the portion of the video clip that you want to stabilize.
Step 2: Select the filter tab and follow by selecting the plus button. Under the plus icon, select the monitor option and find the stabilize option under the menu.
Step 3: Customize the stabilizations options according to your specific needs and click on analyze to monitor the stabilization. After stabilization is complete, select the file option and click on save to save the video.
7. Blender
The Blender is free and one of the best video editing software for professionals . Besides video editing, it provides you with 3D modeling, rigging animation, simulation, and motion tracking features . It allows you to perform basic actions like video cuts and splicing and complex tasks like video masking or color grading.
Key features:-
- Live preview, chroma vectorscope, and histogram displays.
- Scrubbing and waveform visualization.
- Audion mixing and syncing.
- Speed control, adjustment layers, transitions, and keyframe options.
Steps to stabilize videos using Blender
Step 1: Begin by going to the motion tracking workspace.
Step 2: Click on open and select the video file you want to stabilize.
Step 3: Select the tracking option from the toolbar and click on the movie to set tracking points.
Step 4: Set the tracking point size and press the right arrow to start tracking.
Step 5: Select the file menu and navigate the save option to save the stabilized video.
8. AVS video stabilizer
AVS video editor is suitable for both beginners and professionals. It enables you to create videos of any resolution and length. It allows you to cut, trim, join, and rotate videos. It also amazes you with the freedom of using over 300 effects. With AVS video editor, you can edit VHS videos and convert them into digital format.
Key features:-
- Audio capture
- Brand overlay
- Customizable templates
- Easy to use interface with drag and drop features
- Multimedia format support
Steps to stabilize videos using AVS video editor:
Step 1: Click on the import option under the media library tab and import the video you want to stabilize.
Step 2: Press the video stabilization button present over the timeline.
Step 3: Under the stabilization video, drag the compensation bar to adjust the degree of stabilization.
Step 4: Click on the ok button at the bottom of the stabilization menu to save the changes.
9. VSDC
VSDC is a free video stabilizer that allows you to stabilize and edit videos of any complexity. It is compact with advanced features to cut and merge video files and apply visual and audio effects to make a slideshow and add appropriate soundtracks. It also facilitates easy video conversion for playback on specific media devices.
Key features:-
- Side by side and split-screen videos
- Videos in the text effects
- Green screen removal
- Double exposure
Steps to stabilize videos using VSDC
Step 1: Open the VSDC video editor, and navigate to the video stabilization feature from the Tools tab.
Step2: Select the open file option and export the video file you want to stabilize.
Step 3: In the stabilization, tab adjust the settings that best suit your specific requirements.
Step 4: Complete the process by clicking on the export project to view the outcome.
10. Openshot
OpenShot video editor is an easy-to-use video stabilization and edition software. It is helping professionals around the world with its excellent video editing features. Another factor that makes it different from other software is its compatibility with multiple operating software. It goes with Mac, Linux and Windows and is easily downloadable from its website.
Key features:-
- Compatible with multiple operating systems (Linux, Mac, and Windows)
- It supports a handful of video audio and image formats.
- Video transition along with the real-time preview.
- Options for creating title and sub-title creation
- Titles formation with 3D animation
Steps to stabilize videos using Openshot
Step 1: Open the video you want to stabilize using the project file tab.
Step 2: Drag the video timeline tab and locate the shaky part of the video you want to stabilize.
Step 3: Select the effects tab and navigate the stabilizer feature from the menu.
Step 4: Drag the stabilizer feature to your video clip in the timeline.
Step 5: You will see the stabilizer: initialize effect window. Select the degree of percentage as per your specific requirements.
Step 6: Select the process effects option.
Bonus: Stabilize shaky videos using Filmora video editor
Filmora video editor is a powerful video stabilizing software filled with powerful editing features. Unlike other editing software, Filmora is compatible with both Windows and Mac.
Some of the above video stabilizers are complex and require expertise. On the other hand, Wondershare Filmora video editor provides you with an easy-to-use interface and easy navigation options.
Key features:
- Modern and intuitive interface.
- Video stabilization in one click.
- Powerful edition features.
- Rich effects and templates.
Steps to stabilize videos using Wondershare Filmora video editor
For Win 7 or later (64-bit)
For macOS 10.12 or later
Step 1: Drag shaky videos into the Filmora video editor timeline.
Step 2: Click on the edit option in the toolbar to access the editing panel.
Step 3: Select the stabilization option from the editing panel.
Step 4: Click the play button to preview the stabilized video clip. It also allows you to stabilize the smooth level to obtain better results.
Conclusion
Videos are the most popular types of content. They instantly convey the message and engage the consumers. However, the quality of your video is crucial from your business perspective. Video stabilizing software provides stability to videos and makes them look professional and smooth.
Even if you don’t use video stabilizers for stabilizing videos for your business purposes, they can still come in handy while stabilizing your private videos.
Also read:
- Updated In 2024, Create Engaging Videos with Final Cut Pros Picture-in-Picture Feature
- Unleash Your Inner Animator Top Animation Software for Every Skill Level for 2024
- Updated In 2024, Save Space Compress MPEG2 Videos Using VirtualDub Software
- In 2024, The Ultimate OS X Mavericks Video Editors Handbook
- 2024 Approved Retro Revival Simple Steps to Achieve VHS Style in FCP
- New Make a Splash with These Top 10 Gaming Intro Generators for Windows and Mac
- New 2024 Approved Get Moving with Motion Blur A Beginners Guide to Final Cut Pro Effects
- Updated In 2024, WhatsApp Status Pro Top Apps for Eye-Catching Content
- Updated 2024 Approved MacOS Video Editing Solution AVS Video Editor
- New 2024 Approved Love in Motion How to Create a Heartwarming Valentines Day Video for Your Significant Other
- Updated 2024 Approved The Ultimate Guide Best Android Video Editor Apps for Chromebook
- Updated 2024 Approved Top 5 Best Free WMV Video Joiners
- Updated Revolutionize Your Video Content High-Quality Made Simple
- Updated In 2024, Unlock Vertical Video Potential Top Editing Apps for iOS and Android
- In 2024, Optimize Your Video YouTube Thumbnail Dimensions and Strategies
- Updated 2024 Approved Animate in the Cloud Stop Motion Software Features, Guidelines, and Alternatives Compared
- New 2024 Approved Elevate Your Video Experience Free Online Quality Enhancement Tools
- Updated The Cream of the Crop Top Android Apps
- New In 2024, The Best of the Best Video Editing Programs Compared
- Updated In 2024, Understanding HD Video Resolution A Step-by-Step Guide
- In 2024, Supercharge Your Content How to Convert Text to Audio Like a Pro
- In 2024, Pokemon Go No GPS Signal? Heres Every Possible Solution On Samsung Galaxy XCover 7 | Dr.fone
- Simple ways to get lost videos back from Hot 30 5G
- Video Fixer Software for all Corrupt Videos of Motorola Moto G73 5G
- How To Factory Unlock Your Telstra iPhone 14 Plus
- How do I reset my Honor 100 Pro Phone without technical knowledge? | Dr.fone
- How to Transfer Photos from Nokia 105 Classic to Laptop Without USB | Dr.fone
- In 2024, CatchEmAll Celebrate National Pokémon Day with Virtual Location On Motorola Edge 40 Pro | Dr.fone
- Use Device Manager to identify some outdated hardware drivers in Windows 11/10/7
- New 2024 Approved A Comprehensive List of The Top SpongeBob Voice Generators
- Preparation to Beat Giovani in Pokemon Go For Nokia C32 | Dr.fone
- Title: Updated In 2024, Mastering FCPX Made Easy Best Online Tutorials and Guides
- Author: Ava
- Created at : 2024-04-29 13:19:31
- Updated at : 2024-04-30 13:19:31
- Link: https://video-content-creator.techidaily.com/updated-in-2024-mastering-fcpx-made-easy-best-online-tutorials-and-guides/
- License: This work is licensed under CC BY-NC-SA 4.0.
