
:max_bytes(150000):strip_icc():format(webp)/is-kindle-unlimited-worth-it-fda01dceb923406a8524c64d2b72693e.jpg)
Updated From Still to Motion How to Achieve the Ken Burns Effect for 2024
From Still to Motion: How to Achieve the Ken Burns Effect
How to Make Ken Burns Effect in Final Cut Pro?

Liza Brown
Mar 27, 2024• Proven solutions
Ken Burns Effect is an advanced feature of Final Cut Pro that allows users to add creative animations to their videos and images within minutes. You just need to select your picture, add movements to the clip, and choose the start and the end position to produce high-resolution stills. Besides, you can do a tilt, zoom in, a pan, or a combination of these three moves on a single image. This way, you can use the Ken Burns Effect to highlight the stimulating features in your photograph and save your memories in the form of innovative and high-definition animated clips.
This article introduces the readers to Final Cut Pro and explains how to add the Ken Burns Effect in 8 simple steps.
- Part 1: How to Make a Ken Burns Effect in Final Cut Pro?[detaied steps]
- Part 2: How to add the Ken Burns Effect to Multiple Camera Movements?
- Extensive Reading: Why Ken Burns Effect is Named after Ken Burns?
Part 1: How to Make a Ken Burns Effect in Final Cut Pro?
Final Cut Pro is user-friendly software and makes it easy for you to create a Ken Burns Effect without having advanced skills and expertise. So, are you interested in knowing the best part? Given below are a few simple steps to create Ken Burns Effect and make your pictures and videos look adorable.
Step 1: Add Images to the Timeline
First of all, you should specify a name for your project and add photos to the timeline in Final Cut Pro. For this purpose, select multiple photos and press E. A clip will be added to the timeline as shown in figure 1.

Step 2: Check Your Settings
As you can see, our timeline has no other video clip. Hence, Final Cut Pro will not recognize the clip until you adjust the video properties such as format, resolution, and rate, etc. For this purpose, click OK to use your preferred settings and press Shift + Z to fit the picture to your timeline window. Once you’re done it’s time to apply the Ken Burns Effect.

Step 3: Add the Ken Burns Effect
The Ken Burns Effect is used to focus on specific parts of an image and bring motionless content in to provoke emotional reactions. Follow these steps to add the Ken Burns Effect:
- Select the clip or picture;
- See the lower left of the viewer;
- Go to the Viewer window using the drop-down menu;
- Tap on the pop-up menu located in the bottom left-hand corner;
- Choose the Crop option from the menu or press Shift + C;
- Press the Ken Burns button in the Crop onscreen controls to add the effect; and
- Finally, notice the start frame and the end frame controls.

Step 4: Customize Your Effect
In the Ken Burns display, you can see the controls for adjusting the panning and zooms effects by changing the size and position of two-colored rectangles overlaying on the clip. To customize the Ken Burns effect:
- Adjust the green rectangle’s size and position to set the start position;
- Adjust the red rectangle’s size and position to set the end position;
- The arrow depicts the direction of camera position between start and end position;
- In the top left-hand corner, click on the Swap button to exchange the two positions as per your requirements;
- You can see the preview of the animation on the screen.

Step 5: Add a Freeze Frame
You’re not done yet because you need to hold your picture at the end of the animation. For this purpose, you should create a freezing frame at the end of the clip to make Ken Burns do this. Here’s the deal:
- Press the Down arrow followed by the Left arrow to go to the last frame;
- Press Option-F to add a freeze-frame;
- Make sure that your added frame matches the ending frame of the Ken Burns Effect.

Step 6: Adjust the Duration of the Freeze Frame
The users can also adjust the speed of the animation and the duration of the freeze-frame by trimming your clip. For this purpose, trim the length as per your requirement and it will optimize the speed as shown in figure 6.

Step 7: Swap the Start and End Frame
Now, swap the start and ending frame as per your preference for the Ken Burns animation. Here’s how you can do this:
- Click on the Swap button;
- The start frame will match the still frame (previous one);
- Grab the end frame and move it to your desired position;
- Apply enough zoom in to make the black areas disappear;
- Preview to see how your animation looks.

Step 8: Play/Preview Looping
After you have optimized the speed of the Ken Burns Effect by trimming the clip’s length and have widened the shot to include everyone, it’s time to preview the changes you have made. Given below are simple steps:
- Press the Play Loop button;
- Tap on the Pause icon and return to editing;
- Click Done and enjoy your animation.
Seems a little complicated? Filmora allows users to do Ken Burns effect, or pan and zoom effect, in much easier steps, click to download and have a try!


Part 2: How to add the Ken Burns Effect to Multiple Camera Movements?
Although you can apply a single Ken Burns movement to your image, you can still give the impression of multiple movements being used. This means the Ken Burns Effect can be added to multiple camera movements by duplicating the photo and building numerous movements in sequence.
- Add the first camera movement to your image;
- Duplicate the clip by click and drag option or copy and paste option;
- Press the Swap button in the Ken Burns settings to reverse the start and end positions;
- Verify if multiple camera movements have been added.
Extensive Reading: Why Ken Burns Effect is Named after Ken Burns?
What is the Ken Burns Effect?
The Ken Burns Effect is a feature in Final Cut Pro to create a pan and zoom effect by using your predefined start and end positions. Basically, it is a crop effect with one crop at the start of the clip while the other at the end. Ken Burns Effect can be further customized by adjusting the smoothness of the animation. While creating a Ken Burns Effect, the motion applied to the video clips gets automatically smoothed to accelerate and decelerate the movement slowly at the start and the end of the animation.
Why the Effect is named after Ken Burns?
Now, as you have learned the purpose of the Ken Burns Effect, you must be curious about its name. It is named after American documentarian Ken Burns, who is known for his instantly recognizable and highly influential visual aesthetic. Surprisingly, Ken Burns did not invent this Ken Burns Effect; rather, it has existed for decades. You might be wondering why the technique was then named after Ken Burns. This was due to the persistent and adroit use of this technique that it is now known as the Ken Burns Effect.

What are the Applications of Ken Burns Effect?
Primarily, the Ken Burns Effect is used due to the unavailability of a film or video. The technique gives action to still photographs to glorify the subjects of interest like couples in wedding photography. It gets better and better as you apply simulated parallax with Ken Burns Effect to make your 2D images appear as 3D plus advanced zooming visuals. You can also use the Ken Burns effect to make a video of your graduation ceremony pictures or memorable moments of reunion. Ken Burns Effect is also used in documentaries by professional filmmakers and editors.
Conclusion
Adding animated effects to your pictures and videos makes them look gorgeous. This is crazy, isn’t it, when you impress your peers with your editing skills. So, what’s the bottom line of this whole discussion? Try adding the Ken Burns Effect with Final Cut Pro to create a pan and zoom effect on your pictures and clips get the output in your desired format.
Liza Brown
Liza Brown is a writer and a lover of all things video.
Follow @Liza Brown
Liza Brown
Mar 27, 2024• Proven solutions
Ken Burns Effect is an advanced feature of Final Cut Pro that allows users to add creative animations to their videos and images within minutes. You just need to select your picture, add movements to the clip, and choose the start and the end position to produce high-resolution stills. Besides, you can do a tilt, zoom in, a pan, or a combination of these three moves on a single image. This way, you can use the Ken Burns Effect to highlight the stimulating features in your photograph and save your memories in the form of innovative and high-definition animated clips.
This article introduces the readers to Final Cut Pro and explains how to add the Ken Burns Effect in 8 simple steps.
- Part 1: How to Make a Ken Burns Effect in Final Cut Pro?[detaied steps]
- Part 2: How to add the Ken Burns Effect to Multiple Camera Movements?
- Extensive Reading: Why Ken Burns Effect is Named after Ken Burns?
Part 1: How to Make a Ken Burns Effect in Final Cut Pro?
Final Cut Pro is user-friendly software and makes it easy for you to create a Ken Burns Effect without having advanced skills and expertise. So, are you interested in knowing the best part? Given below are a few simple steps to create Ken Burns Effect and make your pictures and videos look adorable.
Step 1: Add Images to the Timeline
First of all, you should specify a name for your project and add photos to the timeline in Final Cut Pro. For this purpose, select multiple photos and press E. A clip will be added to the timeline as shown in figure 1.
Step 2: Check Your Settings
As you can see, our timeline has no other video clip. Hence, Final Cut Pro will not recognize the clip until you adjust the video properties such as format, resolution, and rate, etc. For this purpose, click OK to use your preferred settings and press Shift + Z to fit the picture to your timeline window. Once you’re done it’s time to apply the Ken Burns Effect.
Step 3: Add the Ken Burns Effect
The Ken Burns Effect is used to focus on specific parts of an image and bring motionless content in to provoke emotional reactions. Follow these steps to add the Ken Burns Effect:
- Select the clip or picture;
- See the lower left of the viewer;
- Go to the Viewer window using the drop-down menu;
- Tap on the pop-up menu located in the bottom left-hand corner;
- Choose the Crop option from the menu or press Shift + C;
- Press the Ken Burns button in the Crop onscreen controls to add the effect; and
- Finally, notice the start frame and the end frame controls.
Step 4: Customize Your Effect
In the Ken Burns display, you can see the controls for adjusting the panning and zooms effects by changing the size and position of two-colored rectangles overlaying on the clip. To customize the Ken Burns effect:
- Adjust the green rectangle’s size and position to set the start position;
- Adjust the red rectangle’s size and position to set the end position;
- The arrow depicts the direction of camera position between start and end position;
- In the top left-hand corner, click on the Swap button to exchange the two positions as per your requirements;
- You can see the preview of the animation on the screen.
Step 5: Add a Freeze Frame
You’re not done yet because you need to hold your picture at the end of the animation. For this purpose, you should create a freezing frame at the end of the clip to make Ken Burns do this. Here’s the deal:
- Press the Down arrow followed by the Left arrow to go to the last frame;
- Press Option-F to add a freeze-frame;
- Make sure that your added frame matches the ending frame of the Ken Burns Effect.
Step 6: Adjust the Duration of the Freeze Frame
The users can also adjust the speed of the animation and the duration of the freeze-frame by trimming your clip. For this purpose, trim the length as per your requirement and it will optimize the speed as shown in figure 6.
Step 7: Swap the Start and End Frame
Now, swap the start and ending frame as per your preference for the Ken Burns animation. Here’s how you can do this:
- Click on the Swap button;
- The start frame will match the still frame (previous one);
- Grab the end frame and move it to your desired position;
- Apply enough zoom in to make the black areas disappear;
- Preview to see how your animation looks.
Step 8: Play/Preview Looping
After you have optimized the speed of the Ken Burns Effect by trimming the clip’s length and have widened the shot to include everyone, it’s time to preview the changes you have made. Given below are simple steps:
- Press the Play Loop button;
- Tap on the Pause icon and return to editing;
- Click Done and enjoy your animation.
Seems a little complicated? Filmora allows users to do Ken Burns effect, or pan and zoom effect, in much easier steps, click to download and have a try!
Part 2: How to add the Ken Burns Effect to Multiple Camera Movements?
Although you can apply a single Ken Burns movement to your image, you can still give the impression of multiple movements being used. This means the Ken Burns Effect can be added to multiple camera movements by duplicating the photo and building numerous movements in sequence.
- Add the first camera movement to your image;
- Duplicate the clip by click and drag option or copy and paste option;
- Press the Swap button in the Ken Burns settings to reverse the start and end positions;
- Verify if multiple camera movements have been added.
Extensive Reading: Why Ken Burns Effect is Named after Ken Burns?
What is the Ken Burns Effect?
The Ken Burns Effect is a feature in Final Cut Pro to create a pan and zoom effect by using your predefined start and end positions. Basically, it is a crop effect with one crop at the start of the clip while the other at the end. Ken Burns Effect can be further customized by adjusting the smoothness of the animation. While creating a Ken Burns Effect, the motion applied to the video clips gets automatically smoothed to accelerate and decelerate the movement slowly at the start and the end of the animation.
Why the Effect is named after Ken Burns?
Now, as you have learned the purpose of the Ken Burns Effect, you must be curious about its name. It is named after American documentarian Ken Burns, who is known for his instantly recognizable and highly influential visual aesthetic. Surprisingly, Ken Burns did not invent this Ken Burns Effect; rather, it has existed for decades. You might be wondering why the technique was then named after Ken Burns. This was due to the persistent and adroit use of this technique that it is now known as the Ken Burns Effect.
What are the Applications of Ken Burns Effect?
Primarily, the Ken Burns Effect is used due to the unavailability of a film or video. The technique gives action to still photographs to glorify the subjects of interest like couples in wedding photography. It gets better and better as you apply simulated parallax with Ken Burns Effect to make your 2D images appear as 3D plus advanced zooming visuals. You can also use the Ken Burns effect to make a video of your graduation ceremony pictures or memorable moments of reunion. Ken Burns Effect is also used in documentaries by professional filmmakers and editors.
Conclusion
Adding animated effects to your pictures and videos makes them look gorgeous. This is crazy, isn’t it, when you impress your peers with your editing skills. So, what’s the bottom line of this whole discussion? Try adding the Ken Burns Effect with Final Cut Pro to create a pan and zoom effect on your pictures and clips get the output in your desired format.
Liza Brown
Liza Brown is a writer and a lover of all things video.
Follow @Liza Brown
10 Best Webcam Recording Software for Windows 10
10 Best Webcam Recording Software for Windows 10

Richard Bennett
Mar 27, 2024• Proven solutions
Which webcam softwarehave you installed on your laptop or desktop? Using the right webcam software to live stream videos, screen record videos, or chat on Skype results in high-quality images, smooth streaming, and high-quality images and videos.
There is a huge number of free webcam software with advanced features yet free for you to download, and use on your PC.
But how would you determine the best webcam software to use?
Before you mounted that webcam on your desktop or laptop, you had a reason. It’s your webcam features and purpose that should guide you to select the right software for the webcam camera.
In this article, we will show you 10 webcam software for Windows in this guide. Included are the most useful factors to consider as you make your choice – complexity of use, free/paid, integrations, editing tools, and more. You will learn:
- Part 1: The Best Webcam & Screen Recorder for Windows and Mac [Video Tutorial]
- Part 2: Top 10 Best Free Webcam Software for Windows
First take a quick look of the 10 best webcam software that is available on your Windows from a video:
For Win 7 or later (64-bit)
 Secure Download
For macOS 10.14 or later
Secure Download
Part 1: The Best Webcam & Screen Recorder for Computer
You need a sound and webcam recorder to record your video tutorials, streaming videos, presentations, or any other type of video. Wondershare Filmora is the software to use. Other than its most admired friendly intuitive interface, it’s simple and easy to use-suitable for both beginners and professionals.
For Win 7 or later (64-bit)
Secure Download
For macOS 10.14 or later
Secure Download
Among the outstanding features, you’ll find in Filmora include,
- Fast-paced recording speed of up to 120 fps
- Adverse professional editing tools that are easy to use
- Simultaneous recording from both webcam and computer screen
- Compatible with 50+ different file formats
- Rich title text and tutorial features
It’s free to download. Have a try now! Join in the Wondershare Video Community and get some inspiration from other Filomora users.
Part 2: Top 10 Best Free Webcam Software for Windows
To help you evaluate which webcam software best suits your needs, I’ve featured the strengths, shortcomings, and support services in each software review.
This is the list of the best free webcam software for Windows 10.
| 1 - Logitech Capture | 2 - CyberLink Youcam |
|---|---|
| 3 - ManyCam | 4 - SplitCam |
| 5 - Bandicam | 6 - NCH - Video Capture Software |
| 7 - YAWCAM | 8 - Windows Camera |
| 9 - Fake Webcam | 10 - IP Camera Viewer |
1. Logitech Capture
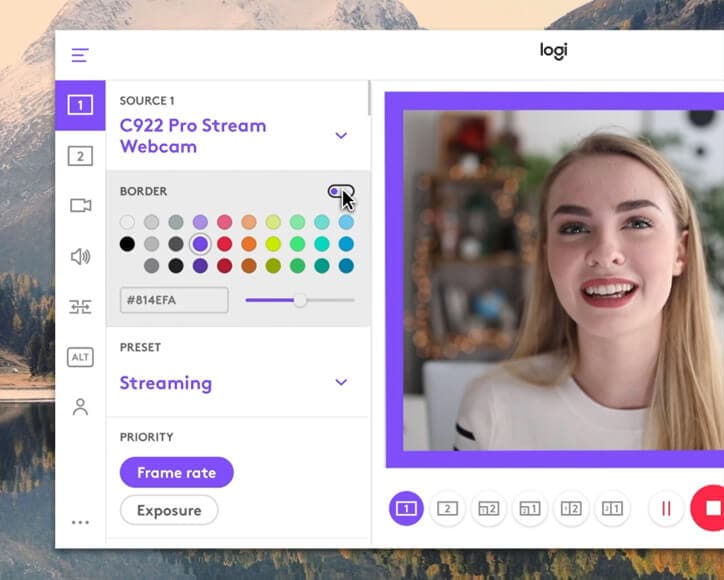
The multiple source recording feature and direct streaming app are the key strengths of this software. According to its mission statement- All-In-One Content Creation- you can use this software to record, edit, customize, and stream to your favorite channel.
Operating systems: Windows 10/8/7
Price: Free
Supported webcams: 1080P PRO STREAM, BRIO STREAM, C920s HD PRO, C922 PRO STREAM
Logitech Capture is among the few free webcam recording software for Windows 10 with studio controls applicable during recording. You can use this feature to adjust your image, create frames, adjust focus and transitions, and enable ChromaKey as you record.
In case you want to create a picture-in-picture presentation, this software allows you to use two webcams simultaneously. With the source switching and the auto-focus features, you can record the best tutorials or guides that show all dimensions and your image.
Pros
- Rich in transitions and effects
- Portrait optimization for mobile devices
- Its Capture app offers direct streaming to YouTube
- You can take passports or still images
Cons
- Limited to YouTube channel
- Account registration is mandatory
2. CyberLink Youcam
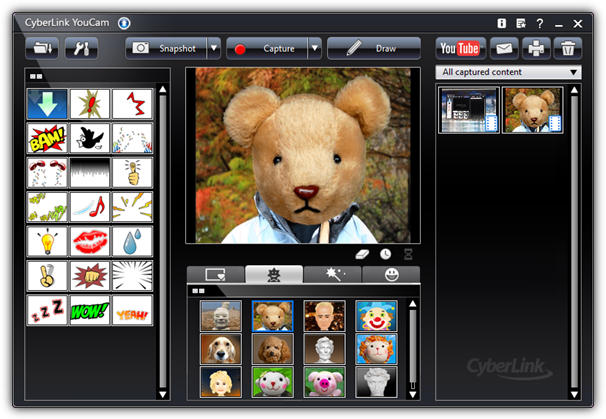
If you are used to video chatting and video recording, then, you’ll have 200+ fun effects to make your real-time videos as interesting as possible. In fact, the seamless app integration feature will keep your live streaming chats without buffering for long.
Operating systems: Windows 10/8/1.8/7
Price: Free/ Paid
Supported file formats: WMV, MP4, AVI
YouCam is the best free webcam software Windows 10 for YouTubers, business professionals, Streamers, home users, and Vloggers. It seamlessly integrates with live streaming media channels like Twitch, Wirecast, OBS Studio, Facebook Live, Xsplit, and YouTube Live.
The YouCam’s AR technology is one of its hidden treasures that will lighten up your skin by applying a natural-looking makeup. If your room is badly light, use the Live Skin Smoothing feature. Just below it is the TrueTheater Enhancement option to help you automatically adjust your facial sharpness and lighting.
Pros
- Hundreds of animated emojis
- Suitable for video conferencing services
- Plenty of interactive colorful particles and distortions
- Availability of face beautification tool
Cons
- Only limited to the Windows operating system
- Very few features for the free plan
3. ManyCam
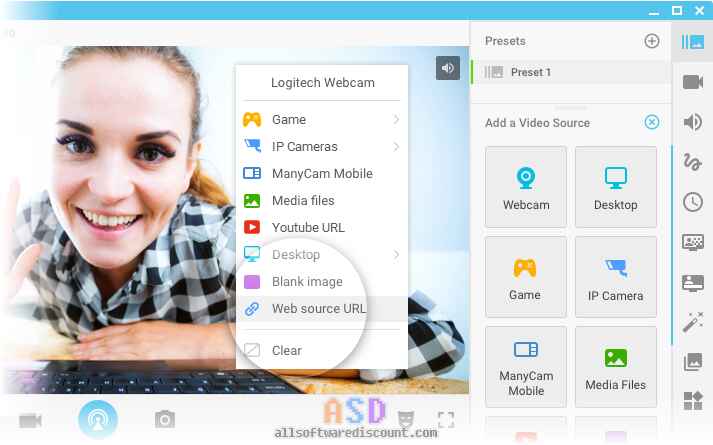
Downloading this webcam software guarantees you smooth streaming and effortless recording of videos. Also, this software will help you during game steaming, online education, mobile live streaming, and live telehealth communication.
Operating systems: Windows 10/8/7 and macOS X
Price: Free /Paid
Supported file formats: MJPEG, IP, MP4, AVI, MPEG, MOV
ManyCam is a free webcam recording software for windows 10 . It’s among the most widely used software internationally-not for many reasons, but because of its friendly intuitive user interface and live streaming tools for lessons and lecturers.
So, if you are a lecturer/teacher, you can use the Software Development Kit (SDK) to integrate the webcam with any online teaching platform. Among the features designed to facilitate better online teaching include the picture in picture, Chroma Key, multiple video sources, and screen sharing.
Pro
- Ability to stream 4K videos
- Real-time camera control settings
- No watermark even on the free plan
- Screencasting and screen recording feature
- Real-time drop and drag effects
Cons
- Expensive business subscription plans
- No Light enhancement features
- Most features are manual as opposed to being automatic

Filmora WebCame & Screen Recorder
Filmora - WebCame & Screen Recorder
• No-time delay to record webcam and screen while live streaming or gaming
• Edit recording video for marketing replay or adding game commentary
• Cross-platform supported - (Windows, Mac, iOS, Android)
Start Webcam & Screen Record Start Webcam & Screen Record Start Webcam & Screen Record Learn More >
4. SplitCam
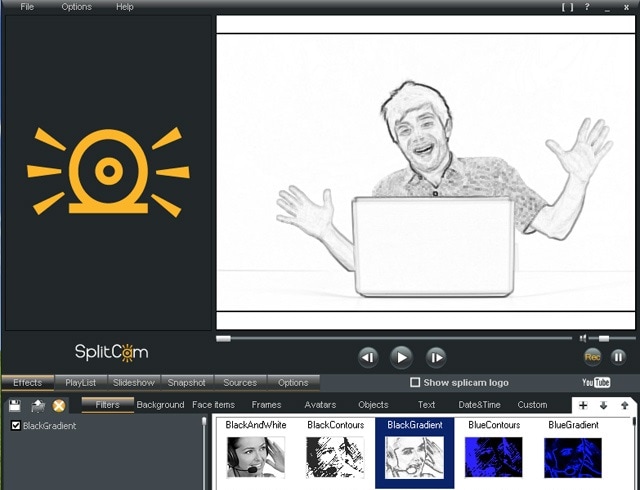
To stream your desktop/laptop screen SplitCam is the most appropriate software. With only the inbuilt virtual webcam, you can share your screen videos to media channels and IMS. Other uses of this software are recording webcam chatting , streaming live videos, and messaging.
Operating systems: Windows 10/8/7
Price: Free
SplitCam is not as popular as the other free webcam software windows 10 like ManyCam and YouCam. This is because it doesn’t integrate with some of the world’s renowned social media platforms- Facebook and Instagram. However, you can use this software to stream, take snapshots, and record videos for YouTube, Skype, Justin.tv, Gtalk, and Windows Live Messenger.
SplitCam is rich in fantastic webcam effects. Haven’t you been surprised to see someone appear to be streaming from the ocean or the Amazon Mountain? This is what you can do with SplitCam. Other cool effects are frames, texts on videos, filters, and facial items like masks and fake face glasses.
Pros
- Open and simple interface
- Integratable with the messaging apps
- Supports a wide range of resolutions ( between 320x180 and 2048x1536)
Cons
- Applicable to a small number of channels
- Supported file formats not defined
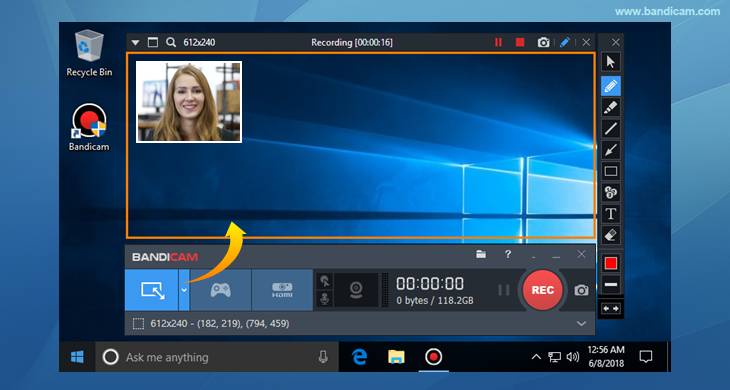
5. Bandicam
Do you want a recorder for screen recording, recording your gameplay, or capturing videos from devices like smartphones and PlayStation? Look for no other software but BandiCam. You can also merge two or more video files, remove unwanted parts, and select the only part to screen record.
Operating systems: Windows Vista, 10/8/7
Price: Free/paid
Supported file format: AVI, MP4, JPEG, TIF, GIF, PNG
Supported graphics cards: Nvidia NVENC, Nvidia NVENC (),
BandiCam is another HD webcam software Windows 10 with the capability of capturing high compression videos and games on your PC screen videos without compromising the video quality. Don’t forget to record all webinars aired in your niche.
Netflix is becoming more popular each day due to the thrilling videos. With the BandiCam screen recorder, you can record live-streamed videos on Netflix for over 24hrs. These are the tools to edit your recorded video: real-time drawing tool, webcam overlay, sound mixer, and Chroma Key.
Pros
- No hidden features
- Widescreen capture
- Can record 2D/3D videos in HD mode
- Can capture fast-paced videos of up to 144 FPS
Cons
- Not suitable for beginners
- Cannot be used to live stream videos
6. NCH - Video Capture Software

Of all the listed webcam software in this review, this software has the most diverse functions. You can record streaming videos, record your computer screen, record from external devices, and record from a webcam. It’s also perfect for recording audios and simultaneous recording from screen and webcam.
Operating systems: Windows 10, 8, 8.1, 7, XP, Vista 64 bit and Mac OS X 10.5 and above
Price: Free/paid
Supported file formats: MP4, WMV, AVI, MPG, FLV, MOV
Debut Video Capture is the only free webcam recording software for Windows 10 believed to capture or record videos from any external source. It has also preset settings for HD and TV with pre-production enhancement features like color adjustment settings, overlay buttons and frame rate, aspect ratio, and resolution settings.
If you always think of becoming rich, the Express Burn Disc Burner is the tool that will help you make money. Record the most trending videos and use this tool to burn DVDs and CDs.
Pros
- Can record videos for any social media platform
- Supports a wide range of audio and video file formats
- All features are open and easy to use
- Availability of video editing software
Cons
- Only monthly subscriptions for paid plans
- Watermark for the free download
- Difficult to record a full-screen movie
Try Filmora to Smoothly Record WebCame and Screen!
Filmora Web Camera & Screen Recorder can capture any area of the PC screen and webcam. It’s perfect to capture and record while making a live gaming match, marketing promotion, guiding a tour, and more. Plus, you can edit the recording video files in Filmora directly! Worth to have a try!
Start Webcam & Screen Recording Start Webcam & Screen Recording Start Webcam & Screen Recording Learn More >
7. YAWCAM
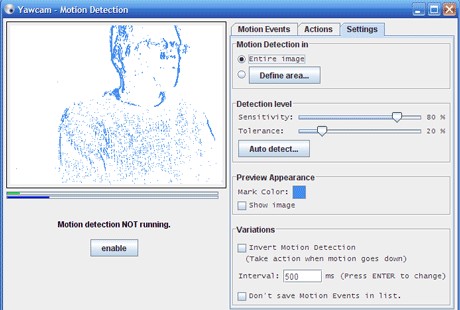
This webcam software can be referred to as the simplest for all beginners with the will to start streaming and recording videos for personal or home use.
Supported file formats: PNG, JPG, MJPEG, GIF, JavaScript
Price: Free
Supported operating systems: Windows 2000/10/8/7/ Vista and XP
YAWCAM is an absolutely free webcam software windows 10. Why is it the simplest software to use? Just download and you will find all features on one page. Simple language commands aligned in a drop-down menu ready to be used with only one click.
Some of the best features include overlay texts and images, scheduler, motion detection, and an inbuilt webserver. For you to use this webcam software, use these supported devices; DirectX compatible webcams, DV-camera, or video capture devices.
Pros
- No watermark
- Easy to use
- Friendly user interface
Cons
- Few transitions and effects
8. Windows Camera
We all trust any app or software by Microsoft over others! If you also do, then you can download Windows Camera and use it to record videos, take snapshots and shoot videos.
Operating system: Windows 10
Price: Free
Supported devices: Xbox One, Windows, mobile
Windows Camera is among the best free webcam software for Windows 10. This is because of the software’s few but easy-to-use and effective features that are expertly designed for PCs and tablets installed with Windows 10.
The automatic photo back combined with the photo-shoot timer makes it perfect for taking selfies and passports. Using the panorama feature, you can take photos of the best scenes and share them on media platforms.
Pros
- Simplicity is its main strength
- Supports resolutions above 1080p
- Good for photographers
Cons
- Has no built-in virtual webcam
- Requires a camera to support 4K videos
9. Fake Webcam

Supported file formats: AVI, MPEG, DVD, VCD, WMV, 3GP, MP4, SVCD, MOV, ASF,
Price: Free /paid
Operating systems: Windows 7/8/10 (32/64 bit)
Fake Webcam is a free webcam software Windows 10 whose name is creatively used to suggest it almost functions like a webcam. This doesn’t fall far from the truth! You can truly use this software to broadcast, add effects and filters, record on full screen, and fake your voice.
To share or stream your photos and videos on Skype, YIM, or Gtalk, using the screen recorder would give the best results. What makes Fake Webcam stand out is the free video converter and the free video toolkit.
Pros
- Free support tools
- Supports all video and audio formats
- Can convert file formats and stream to any channel
- Availability of the screen recorder
- Integratable with almost all instant messengers
Cons
- Major tools not free(Fake Webcam and Screen recorder)
10. IP Camera Viewer
Do you run a supermarket store, mall or you’ve installed security surveillance cameras in your compound? IP Camera Viewer is the most effective webcam software for video monitoring systems.
Supported file formats: JPEG, MPEG-4, MJPEG, and
Price: Free
Operating systems: Windows 10 / 8 / 7 /2012 /Vista and XP
IP Camera Viewer is the most used free webcam recording software for windows 10 as its compatible with almost all IP camera models like Panasonic, Toshiba, Canon, D-Link, Sony, and more the 2000 others. With the capability of viewing and controlling 4 camera feeds at once, you can use this software to monitor your entire compound.
Some of the important advanced IP Camera Viewer functions include listening to webcam audios, adjust image settings, zoom or tilt images, schedule monitoring times, and detect motions.
Pros
- Automatically uploads recorded videos and photos to a server
- Compatible with almost all IP camera models
- Simple and easy to use
Cons
- No inbuilt media player
- Cannot adjust the image or video quality
You may also want to read >>> 10 Best Webcams | A Buyer’s Guide
![]()
A cross-platform for making videos anywhere for all creators

Why your video editing isn’t good enough? How about some creative inspo?
- 100 Million+ Users
- 150+ Countries and Regions
- 4 Million+ Social Media Followers
- 5 Million+ Stock Media for Use
* Secure Download

FAQs about Webcam Software for Windows
1. What is Webcam Software?
A webcam is a video camera that feeds or streams images or video in real-time to or over a computer network. And webcam software enables users to record video or stream video over the Internet.
Webcam software is an application that allows you to capture video from your laptop/desktop webcam and record or stream video over the Internet. You can use them to deliver professional videos, streaming, and online courses easily.
2. Does Windows have built-in webcam software?
Windows 10 has an in-built webcam app called Camera that lets you record videos and take pictures with your webcam. This is definitely better than downloading 3rd party webcam recording software where spyware/malware is rampant.
3. Does a webcam need software?
Yes, if the camera hardware offers depth, low-light support, night vision, etc. If you use any software on the camera, these functions are only available if the driver is installed.
Conclusion
After a keen of all the webcam software above, it’s evident that every developer had an intended purpose. You cannot therefore just randomly wake up and download any without considering its functions, supported devices, file formats, and the auxiliary apps available. All this information is contained herein.
According to some users, there are free webcam software Windows 10 that more often would not show any video images but the audio is absolutely clear. To help your fellow user, what bad experience have you ever had after recording a game using webcam software ? Kindly share your comment or suggestion on our social media platforms.
Richard Bennett
Richard Bennett is a writer and a lover of all things video.
Follow @Richard Bennett
Richard Bennett
Mar 27, 2024• Proven solutions
Which webcam softwarehave you installed on your laptop or desktop? Using the right webcam software to live stream videos, screen record videos, or chat on Skype results in high-quality images, smooth streaming, and high-quality images and videos.
There is a huge number of free webcam software with advanced features yet free for you to download, and use on your PC.
But how would you determine the best webcam software to use?
Before you mounted that webcam on your desktop or laptop, you had a reason. It’s your webcam features and purpose that should guide you to select the right software for the webcam camera.
In this article, we will show you 10 webcam software for Windows in this guide. Included are the most useful factors to consider as you make your choice – complexity of use, free/paid, integrations, editing tools, and more. You will learn:
- Part 1: The Best Webcam & Screen Recorder for Windows and Mac [Video Tutorial]
- Part 2: Top 10 Best Free Webcam Software for Windows
First take a quick look of the 10 best webcam software that is available on your Windows from a video:
For Win 7 or later (64-bit)
Secure Download
For macOS 10.14 or later
Secure Download
Part 1: The Best Webcam & Screen Recorder for Computer
You need a sound and webcam recorder to record your video tutorials, streaming videos, presentations, or any other type of video. Wondershare Filmora is the software to use. Other than its most admired friendly intuitive interface, it’s simple and easy to use-suitable for both beginners and professionals.
For Win 7 or later (64-bit)
Secure Download
For macOS 10.14 or later
Secure Download
Among the outstanding features, you’ll find in Filmora include,
- Fast-paced recording speed of up to 120 fps
- Adverse professional editing tools that are easy to use
- Simultaneous recording from both webcam and computer screen
- Compatible with 50+ different file formats
- Rich title text and tutorial features
It’s free to download. Have a try now! Join in the Wondershare Video Community and get some inspiration from other Filomora users.
Part 2: Top 10 Best Free Webcam Software for Windows
To help you evaluate which webcam software best suits your needs, I’ve featured the strengths, shortcomings, and support services in each software review.
This is the list of the best free webcam software for Windows 10.
| 1 - Logitech Capture | 2 - CyberLink Youcam |
|---|---|
| 3 - ManyCam | 4 - SplitCam |
| 5 - Bandicam | 6 - NCH - Video Capture Software |
| 7 - YAWCAM | 8 - Windows Camera |
| 9 - Fake Webcam | 10 - IP Camera Viewer |
1. Logitech Capture
The multiple source recording feature and direct streaming app are the key strengths of this software. According to its mission statement- All-In-One Content Creation- you can use this software to record, edit, customize, and stream to your favorite channel.
Operating systems: Windows 10/8/7
Price: Free
Supported webcams: 1080P PRO STREAM, BRIO STREAM, C920s HD PRO, C922 PRO STREAM
Logitech Capture is among the few free webcam recording software for Windows 10 with studio controls applicable during recording. You can use this feature to adjust your image, create frames, adjust focus and transitions, and enable ChromaKey as you record.
In case you want to create a picture-in-picture presentation, this software allows you to use two webcams simultaneously. With the source switching and the auto-focus features, you can record the best tutorials or guides that show all dimensions and your image.
Pros
- Rich in transitions and effects
- Portrait optimization for mobile devices
- Its Capture app offers direct streaming to YouTube
- You can take passports or still images
Cons
- Limited to YouTube channel
- Account registration is mandatory
2. CyberLink Youcam
If you are used to video chatting and video recording, then, you’ll have 200+ fun effects to make your real-time videos as interesting as possible. In fact, the seamless app integration feature will keep your live streaming chats without buffering for long.
Operating systems: Windows 10/8/1.8/7
Price: Free/ Paid
Supported file formats: WMV, MP4, AVI
YouCam is the best free webcam software Windows 10 for YouTubers, business professionals, Streamers, home users, and Vloggers. It seamlessly integrates with live streaming media channels like Twitch, Wirecast, OBS Studio, Facebook Live, Xsplit, and YouTube Live.
The YouCam’s AR technology is one of its hidden treasures that will lighten up your skin by applying a natural-looking makeup. If your room is badly light, use the Live Skin Smoothing feature. Just below it is the TrueTheater Enhancement option to help you automatically adjust your facial sharpness and lighting.
Pros
- Hundreds of animated emojis
- Suitable for video conferencing services
- Plenty of interactive colorful particles and distortions
- Availability of face beautification tool
Cons
- Only limited to the Windows operating system
- Very few features for the free plan
3. ManyCam
Downloading this webcam software guarantees you smooth streaming and effortless recording of videos. Also, this software will help you during game steaming, online education, mobile live streaming, and live telehealth communication.
Operating systems: Windows 10/8/7 and macOS X
Price: Free /Paid
Supported file formats: MJPEG, IP, MP4, AVI, MPEG, MOV
ManyCam is a free webcam recording software for windows 10 . It’s among the most widely used software internationally-not for many reasons, but because of its friendly intuitive user interface and live streaming tools for lessons and lecturers.
So, if you are a lecturer/teacher, you can use the Software Development Kit (SDK) to integrate the webcam with any online teaching platform. Among the features designed to facilitate better online teaching include the picture in picture, Chroma Key, multiple video sources, and screen sharing.
Pro
- Ability to stream 4K videos
- Real-time camera control settings
- No watermark even on the free plan
- Screencasting and screen recording feature
- Real-time drop and drag effects
Cons
- Expensive business subscription plans
- No Light enhancement features
- Most features are manual as opposed to being automatic
Filmora WebCame & Screen Recorder
Filmora - WebCame & Screen Recorder
• No-time delay to record webcam and screen while live streaming or gaming
• Edit recording video for marketing replay or adding game commentary
• Cross-platform supported - (Windows, Mac, iOS, Android)
Start Webcam & Screen Record Start Webcam & Screen Record Start Webcam & Screen Record Learn More >
4. SplitCam
To stream your desktop/laptop screen SplitCam is the most appropriate software. With only the inbuilt virtual webcam, you can share your screen videos to media channels and IMS. Other uses of this software are recording webcam chatting , streaming live videos, and messaging.
Operating systems: Windows 10/8/7
Price: Free
SplitCam is not as popular as the other free webcam software windows 10 like ManyCam and YouCam. This is because it doesn’t integrate with some of the world’s renowned social media platforms- Facebook and Instagram. However, you can use this software to stream, take snapshots, and record videos for YouTube, Skype, Justin.tv, Gtalk, and Windows Live Messenger.
SplitCam is rich in fantastic webcam effects. Haven’t you been surprised to see someone appear to be streaming from the ocean or the Amazon Mountain? This is what you can do with SplitCam. Other cool effects are frames, texts on videos, filters, and facial items like masks and fake face glasses.
Pros
- Open and simple interface
- Integratable with the messaging apps
- Supports a wide range of resolutions ( between 320x180 and 2048x1536)
Cons
- Applicable to a small number of channels
- Supported file formats not defined
5. Bandicam
Do you want a recorder for screen recording, recording your gameplay, or capturing videos from devices like smartphones and PlayStation? Look for no other software but BandiCam. You can also merge two or more video files, remove unwanted parts, and select the only part to screen record.
Operating systems: Windows Vista, 10/8/7
Price: Free/paid
Supported file format: AVI, MP4, JPEG, TIF, GIF, PNG
Supported graphics cards: Nvidia NVENC, Nvidia NVENC (),
BandiCam is another HD webcam software Windows 10 with the capability of capturing high compression videos and games on your PC screen videos without compromising the video quality. Don’t forget to record all webinars aired in your niche.
Netflix is becoming more popular each day due to the thrilling videos. With the BandiCam screen recorder, you can record live-streamed videos on Netflix for over 24hrs. These are the tools to edit your recorded video: real-time drawing tool, webcam overlay, sound mixer, and Chroma Key.
Pros
- No hidden features
- Widescreen capture
- Can record 2D/3D videos in HD mode
- Can capture fast-paced videos of up to 144 FPS
Cons
- Not suitable for beginners
- Cannot be used to live stream videos
6. NCH - Video Capture Software
Of all the listed webcam software in this review, this software has the most diverse functions. You can record streaming videos, record your computer screen, record from external devices, and record from a webcam. It’s also perfect for recording audios and simultaneous recording from screen and webcam.
Operating systems: Windows 10, 8, 8.1, 7, XP, Vista 64 bit and Mac OS X 10.5 and above
Price: Free/paid
Supported file formats: MP4, WMV, AVI, MPG, FLV, MOV
Debut Video Capture is the only free webcam recording software for Windows 10 believed to capture or record videos from any external source. It has also preset settings for HD and TV with pre-production enhancement features like color adjustment settings, overlay buttons and frame rate, aspect ratio, and resolution settings.
If you always think of becoming rich, the Express Burn Disc Burner is the tool that will help you make money. Record the most trending videos and use this tool to burn DVDs and CDs.
Pros
- Can record videos for any social media platform
- Supports a wide range of audio and video file formats
- All features are open and easy to use
- Availability of video editing software
Cons
- Only monthly subscriptions for paid plans
- Watermark for the free download
- Difficult to record a full-screen movie
Try Filmora to Smoothly Record WebCame and Screen!
Filmora Web Camera & Screen Recorder can capture any area of the PC screen and webcam. It’s perfect to capture and record while making a live gaming match, marketing promotion, guiding a tour, and more. Plus, you can edit the recording video files in Filmora directly! Worth to have a try!
Start Webcam & Screen Recording Start Webcam & Screen Recording Start Webcam & Screen Recording Learn More >
7. YAWCAM
This webcam software can be referred to as the simplest for all beginners with the will to start streaming and recording videos for personal or home use.
Supported file formats: PNG, JPG, MJPEG, GIF, JavaScript
Price: Free
Supported operating systems: Windows 2000/10/8/7/ Vista and XP
YAWCAM is an absolutely free webcam software windows 10. Why is it the simplest software to use? Just download and you will find all features on one page. Simple language commands aligned in a drop-down menu ready to be used with only one click.
Some of the best features include overlay texts and images, scheduler, motion detection, and an inbuilt webserver. For you to use this webcam software, use these supported devices; DirectX compatible webcams, DV-camera, or video capture devices.
Pros
- No watermark
- Easy to use
- Friendly user interface
Cons
- Few transitions and effects
8. Windows Camera
We all trust any app or software by Microsoft over others! If you also do, then you can download Windows Camera and use it to record videos, take snapshots and shoot videos.
Operating system: Windows 10
Price: Free
Supported devices: Xbox One, Windows, mobile
Windows Camera is among the best free webcam software for Windows 10. This is because of the software’s few but easy-to-use and effective features that are expertly designed for PCs and tablets installed with Windows 10.
The automatic photo back combined with the photo-shoot timer makes it perfect for taking selfies and passports. Using the panorama feature, you can take photos of the best scenes and share them on media platforms.
Pros
- Simplicity is its main strength
- Supports resolutions above 1080p
- Good for photographers
Cons
- Has no built-in virtual webcam
- Requires a camera to support 4K videos
9. Fake Webcam
Supported file formats: AVI, MPEG, DVD, VCD, WMV, 3GP, MP4, SVCD, MOV, ASF,
Price: Free /paid
Operating systems: Windows 7/8/10 (32/64 bit)
Fake Webcam is a free webcam software Windows 10 whose name is creatively used to suggest it almost functions like a webcam. This doesn’t fall far from the truth! You can truly use this software to broadcast, add effects and filters, record on full screen, and fake your voice.
To share or stream your photos and videos on Skype, YIM, or Gtalk, using the screen recorder would give the best results. What makes Fake Webcam stand out is the free video converter and the free video toolkit.
Pros
- Free support tools
- Supports all video and audio formats
- Can convert file formats and stream to any channel
- Availability of the screen recorder
- Integratable with almost all instant messengers
Cons
- Major tools not free(Fake Webcam and Screen recorder)
10. IP Camera Viewer
Do you run a supermarket store, mall or you’ve installed security surveillance cameras in your compound? IP Camera Viewer is the most effective webcam software for video monitoring systems.
Supported file formats: JPEG, MPEG-4, MJPEG, and
Price: Free
Operating systems: Windows 10 / 8 / 7 /2012 /Vista and XP
IP Camera Viewer is the most used free webcam recording software for windows 10 as its compatible with almost all IP camera models like Panasonic, Toshiba, Canon, D-Link, Sony, and more the 2000 others. With the capability of viewing and controlling 4 camera feeds at once, you can use this software to monitor your entire compound.
Some of the important advanced IP Camera Viewer functions include listening to webcam audios, adjust image settings, zoom or tilt images, schedule monitoring times, and detect motions.
Pros
- Automatically uploads recorded videos and photos to a server
- Compatible with almost all IP camera models
- Simple and easy to use
Cons
- No inbuilt media player
- Cannot adjust the image or video quality
You may also want to read >>> 10 Best Webcams | A Buyer’s Guide
![]()
A cross-platform for making videos anywhere for all creators
Why your video editing isn’t good enough? How about some creative inspo?
- 100 Million+ Users
- 150+ Countries and Regions
- 4 Million+ Social Media Followers
- 5 Million+ Stock Media for Use
* Secure Download
FAQs about Webcam Software for Windows
1. What is Webcam Software?
A webcam is a video camera that feeds or streams images or video in real-time to or over a computer network. And webcam software enables users to record video or stream video over the Internet.
Webcam software is an application that allows you to capture video from your laptop/desktop webcam and record or stream video over the Internet. You can use them to deliver professional videos, streaming, and online courses easily.
2. Does Windows have built-in webcam software?
Windows 10 has an in-built webcam app called Camera that lets you record videos and take pictures with your webcam. This is definitely better than downloading 3rd party webcam recording software where spyware/malware is rampant.
3. Does a webcam need software?
Yes, if the camera hardware offers depth, low-light support, night vision, etc. If you use any software on the camera, these functions are only available if the driver is installed.
Conclusion
After a keen of all the webcam software above, it’s evident that every developer had an intended purpose. You cannot therefore just randomly wake up and download any without considering its functions, supported devices, file formats, and the auxiliary apps available. All this information is contained herein.
According to some users, there are free webcam software Windows 10 that more often would not show any video images but the audio is absolutely clear. To help your fellow user, what bad experience have you ever had after recording a game using webcam software ? Kindly share your comment or suggestion on our social media platforms.
Richard Bennett
Richard Bennett is a writer and a lover of all things video.
Follow @Richard Bennett
Final Cut Pro X Subtitle Editing: Tips and Tricks
How to Add Subtitles/Captions in Final Cut Pro X?

Benjamin Arango
Oct 26, 2023• Proven solutions
Adding Final Cut Pro subtitles and captions is a great thing to expand your audience base, and thus the trend of adding captions and subtitles is becoming relevant day by day. There is a whole process to add Final Cut Pro captions and subtitles, which we are going to discuss below.
Let’s check if there is any difference between captions and subtitles used in FCPX. Even though both these texts tend to appear at the bottom of the video screen, they have different purposes.
As we all know, subtitles depict foreign languages other than the language shown in the actual video. So, they are used to appearing on-screen frequently as the speaker speaks.
On the other hand, the captions display every kind of audio information, including sound effects, music, and background noises (see how to remove background noise in FCPX here) . Every Caption represents that viewer hasn’t any audio clues and thus displays them over the video.
You may also want to see this: What Makes the Best Lower Thirds in Final Cut Pro X?
Part 1: How to Add Subtitles/Captions in Final Cut Pro X?
Before you study the steps required to add subtitles to Final Cut Pro, here are some quick facts about the format of captions supported by FCPX.
- ITT (iTunes Timed Text)
It is required to deliver the contents of Caption to the iTunes store.
- CEA-608 (SCC)
It is a standard caption format for web videos and broadcasts.
- SRT (SubRip)
It is a simple and popular format used in online videos.
Steps to Add Subtitles or Captions in FCPX
Step 1: Create Caption Roles
You need first to create caption roles to start adding captions to the timeline. Go to Modify > Edit Roles and then select Captions. Then, select CEA-608, choose your language, and hit the Apply button.
Step 2: Add Captions
Position the playhead to where you have to set the Caption in the timeline. You need to hit the Edit tab and then select Captions > Add Caption.
Select the drop-down menu across the language and select CEA-608.
Now, you can add captions in the preview window or the Captions Text given alongside.
Also, you can adjust the duration of the Caption by dragging it in the timeline.
Step 3: Export a Caption Role
Press Command + E or go to File > Export to open the Export preview window. Now, you can select the name and save your video in standard export options. Hit the Roles tab given at the top.
Then, click the small Captions icon to reveal the menu. Select the subtitles or captions to import alongside the Burn in Captions tab. Hit the OK button and proceed with export as usual.
Thus, similar steps are required even if you want to add subtitles.
Too many steps? Then try a beginner-friendly editing tool, Filmora!
Part 2: Free Subtitles Plugins for Final Cut Pro X
Let’s list some incredibly efficient and free subtitles tools that you can use for Final Cut Pro X.
Veed is one of the best video editing tools if you are looking for something like automatic subtitles. You are only required to upload your audio or video into this online software and hit the Subtitles tab to get quick captions. Thus, you will only need to import those subtitles or captions and save your time from manual typing.
The Quick Caption is another free tool available in Mac App Store to automatically transcribe your audio or video clips. It quickly creates FCPXML and SRT format captions. It also records the ending and starting timestamp for every Caption for further reference. You also get the facility to customize these subtitles based on shadow, font, style, and face color in the Style Editor.
It is the go-to free plugin by Stupid Raisins to display the text in animated templates. It generally depicts different kinds of paragraph titles, which you can edit as per the subtitles. It is one of the ideal plugins to impart professionalism into your videos with catchy descriptions. There are lots of templates available to select among them. Also, the simple drag and drop feature won’t let you down in any scenario of adding subtitles or captions effectively.
Part 3: Tips for adding Subtitles/Captions in Final Cut Pro X
Given below are some quick tips to add Final Cut Pro captions or subtitles.
- Use YouTube
You can use the transcriptions feature of YouTube to import captions file into your footage quickly. It will also save lots of time typing the same text. You need to upload footage on YouTube as a private video and then download it as a .srt file. Now, you can use this file as a base to correct and adjust your captions.
- Exporting
Every Caption set must export individually in Final Cut Pro X. However; there is a shortcut to it using the Compressor feature. Send your captions to Compressor by clicking the File> Send to Compressor.

Some may wonder, what is Compressor exactly? Click here to learn how to use the Compressor in FCPX.
- Use the keyboard shortcut keys
You can use various keyboard shortcut keys to add the subtitles and captions into the video quickly. There are shortcut keys available at each step of adding these captions or subtitles in Final Cut Pro X.
Click here for some best shortcuts we summarised for you!
Conclusion
So, this is all about adding Final Cut Pro subtitles and captions via the step-by-step guide. Captions and Subtitles are an excellent way to expand your audience base across all regions globally since it removes the limitations or boundaries set by one language.
Benjamin Arango
Benjamin Arango is a writer and a lover of all things video.
Follow @Benjamin Arango
Benjamin Arango
Oct 26, 2023• Proven solutions
Adding Final Cut Pro subtitles and captions is a great thing to expand your audience base, and thus the trend of adding captions and subtitles is becoming relevant day by day. There is a whole process to add Final Cut Pro captions and subtitles, which we are going to discuss below.
Let’s check if there is any difference between captions and subtitles used in FCPX. Even though both these texts tend to appear at the bottom of the video screen, they have different purposes.
As we all know, subtitles depict foreign languages other than the language shown in the actual video. So, they are used to appearing on-screen frequently as the speaker speaks.
On the other hand, the captions display every kind of audio information, including sound effects, music, and background noises (see how to remove background noise in FCPX here) . Every Caption represents that viewer hasn’t any audio clues and thus displays them over the video.
You may also want to see this: What Makes the Best Lower Thirds in Final Cut Pro X?
Part 1: How to Add Subtitles/Captions in Final Cut Pro X?
Before you study the steps required to add subtitles to Final Cut Pro, here are some quick facts about the format of captions supported by FCPX.
- ITT (iTunes Timed Text)
It is required to deliver the contents of Caption to the iTunes store.
- CEA-608 (SCC)
It is a standard caption format for web videos and broadcasts.
- SRT (SubRip)
It is a simple and popular format used in online videos.
Steps to Add Subtitles or Captions in FCPX
Step 1: Create Caption Roles
You need first to create caption roles to start adding captions to the timeline. Go to Modify > Edit Roles and then select Captions. Then, select CEA-608, choose your language, and hit the Apply button.
Step 2: Add Captions
Position the playhead to where you have to set the Caption in the timeline. You need to hit the Edit tab and then select Captions > Add Caption.
Select the drop-down menu across the language and select CEA-608.
Now, you can add captions in the preview window or the Captions Text given alongside.
Also, you can adjust the duration of the Caption by dragging it in the timeline.
Step 3: Export a Caption Role
Press Command + E or go to File > Export to open the Export preview window. Now, you can select the name and save your video in standard export options. Hit the Roles tab given at the top.
Then, click the small Captions icon to reveal the menu. Select the subtitles or captions to import alongside the Burn in Captions tab. Hit the OK button and proceed with export as usual.
Thus, similar steps are required even if you want to add subtitles.
Too many steps? Then try a beginner-friendly editing tool, Filmora!
Part 2: Free Subtitles Plugins for Final Cut Pro X
Let’s list some incredibly efficient and free subtitles tools that you can use for Final Cut Pro X.
Veed is one of the best video editing tools if you are looking for something like automatic subtitles. You are only required to upload your audio or video into this online software and hit the Subtitles tab to get quick captions. Thus, you will only need to import those subtitles or captions and save your time from manual typing.
The Quick Caption is another free tool available in Mac App Store to automatically transcribe your audio or video clips. It quickly creates FCPXML and SRT format captions. It also records the ending and starting timestamp for every Caption for further reference. You also get the facility to customize these subtitles based on shadow, font, style, and face color in the Style Editor.
It is the go-to free plugin by Stupid Raisins to display the text in animated templates. It generally depicts different kinds of paragraph titles, which you can edit as per the subtitles. It is one of the ideal plugins to impart professionalism into your videos with catchy descriptions. There are lots of templates available to select among them. Also, the simple drag and drop feature won’t let you down in any scenario of adding subtitles or captions effectively.
Part 3: Tips for adding Subtitles/Captions in Final Cut Pro X
Given below are some quick tips to add Final Cut Pro captions or subtitles.
- Use YouTube
You can use the transcriptions feature of YouTube to import captions file into your footage quickly. It will also save lots of time typing the same text. You need to upload footage on YouTube as a private video and then download it as a .srt file. Now, you can use this file as a base to correct and adjust your captions.
- Exporting
Every Caption set must export individually in Final Cut Pro X. However; there is a shortcut to it using the Compressor feature. Send your captions to Compressor by clicking the File> Send to Compressor.
Some may wonder, what is Compressor exactly? Click here to learn how to use the Compressor in FCPX.
- Use the keyboard shortcut keys
You can use various keyboard shortcut keys to add the subtitles and captions into the video quickly. There are shortcut keys available at each step of adding these captions or subtitles in Final Cut Pro X.
Click here for some best shortcuts we summarised for you!
Conclusion
So, this is all about adding Final Cut Pro subtitles and captions via the step-by-step guide. Captions and Subtitles are an excellent way to expand your audience base across all regions globally since it removes the limitations or boundaries set by one language.
Benjamin Arango
Benjamin Arango is a writer and a lover of all things video.
Follow @Benjamin Arango
The Top-Rated Lego Animation Teams
Best Lego Stop Motion Maker

Ollie Mattison
Mar 27, 2024• Proven solutions
Brickfilms, the cool name for Lego stop-motion animations, is a raging success on YouTube and other video streaming sites. No longer are you limited to build and play with your Lego sets. You can now use apps to bring a story alive. Drag those bricks down from the attic or pull them out of the kids’ box, as you could have a potential goldmine in your home.
Preparation Tips for Shooting Lego Stop Motion Movies
Before you select your stop-motion movie maker , you need to secure some of the essential props to make your film-making a success. You only need a basic set of Lego bricks and your smartphone or iPad if you want to keep it simple. You could use a desk lamp for lighting or a professional camera to add some professionalism should you wish.
Start by setting up your scene. You need a flat and stable surface. It needs to be at a height where you will be comfortable working for an extended period. If you set it up on your floor, you could regret this when the aches in your knees and back kick in. Keep your set in place by using masking tape, so it doesn’t move if you accidentally bump into it.

Now you are ready to start. Lego movies are painstaking. It will take a while to get into a rhythm and to get something of value to be watched by others. Don’t be discouraged. You will get quicker and better with practice. You just need to get started.
With everything in place, as well as a realistic mindset, it is time to choose the stop motion app that will help you produce the best Lego movies.
You might also like:
Best Stop Motion App for Lego Movie
1. I Can Animate
- Cost of app: $2.99 on Apple Store or $4.99 per item on Google Play
- For children 4+
- Unique feature – the timeline allows for simple reordering and editing

I Can Animate is a way to produce movies quickly and with little need for that much tech knowledge. You can use your iOS device, whether tablet or phone, to create and then share your videos. This app is produced by Kudlian Software Ltd and retails on different prices on Apple Store and Google Play.
I Can Animate is unique in its simplicity. You use the camera on your iOS device, and the app will show you the differences between frames, so you can check your progress. This is called onion skinning and is essential to the success of your animation.
There are some basic editing features. These features include an ability to view the images on a timeline and duplicate or reorder these. You can also change the exposure, balance and focus settings to ensure there is a replication of conditions between photographs.

A useful option is the ability to connect a Bluetooth keyboard and capture your images without returning to your device. This means you can secure your phone or tablet and avoid knocking or changing the angle by tapping on the screen. Also helpful for streamlining the filming process is the inbuilt time-lapse feature. You can automatically capture images one after another without having to return to the camera.
You can then share these movies by exporting them to Facebook, YouTube or Dropbox.
2. Stop Motion Studio
- Free basic package with in-app purchases
- Pro version costing $9.99 on Apple Store and $4.99 on Google Play
- For children 4+
- Unique feature – the ability to add and edit audio

Stop Motion Studio, produced by Cateater, is an app offered for people age 4 and over and is available on iOS and Android – for your phone or your tablet. There is also a full-featured movie editing software that you can buy for your PC and Mac.
The app is free to download, with some free features. However, there are in-App purchases for some of the better features. You can purchase the Stop Motion Studio Pro app at the cost of $4.99 for Android devices, which then opens all the advanced features in the app.
The advanced features include a function to add and adjust audio, importing and cropping images as well as 4K Ultra HD and much more. The Green Screen function is particularly smart, as this allows you to include a background, which is preloaded onto the phone.
Reviews are positive. Most note that the product appears simple to use – and you can get high-quality Lego movies without feeling daunted. However, the intuitive nature of the app design belies the smart tools available for your movie production. You can add in text, speech bubbles and titles. You can add facial expressions to your Lego figures. The eraser tool is wonderful, as you can delete unwanted objects from your images.
3. The Lego Movie 2™ Movie Maker
- Free
- For children 8+
- Unique feature – a chance to be part of a Lego moviemaking community

This branded movie maker is free on iOS and Android . It is suitable for children aged 8 and above, so a little more advanced than the more basic I Can Animate – but it is designed only to be used on your phone, using the in-built camera. There is the option to add sounds and visual effects to the live footage, as well as edit material within the app. There is no save facility, which means your project needs to be sensible for the time you have before sharing to the site.
You will need to set up an account to be able to share your movies. However, for parents, this adds a reassuring level of moderation and support. Every video is moderated before it is shared. The set-up of the account is not too arduous. You are asked for your home country, your email address and your date of birth. All your videos will be anonymised as part of a stringent adherence to GDPR and safeguarding policies. The strength of this app is the infrastructure of a large brand that understands how to protect children. Be aware, your movie will become the property of the Lego group when uploaded.
Probably the most attractive selling point of this app is that there is no third-party advertising. Consequently, there are hours of uninterrupted fun offered.
4. LifeLapse Stop Motion Maker
- Free for the basic package
- PRO subscription plan, after a 7-day trial
- Pro Monthly $7.99/ Pro Yearly $39.99 on App Store
- For users 12+ with a focus on B2B adult target market
- Unique feature – professional-level design features – with Instagram cropping guidelines
Created by Bolandia Creative Inc., Life Lapse Stop Motion Maker is designed for a more sophisticated audience. It is available on iOS and Android . It is aimed at users 12 and above, and there is a definite feel of a professional design package. The interface is a clean white with simple black icons for the function buttons. Essentially, the company is aiming the app at other businesses looking to produce marketing material.
This is not to say that the app cannot be used by Lego movie makers. The app has an intuitive interface, with simple icons that make it clear how the features can be used. There is the option to adjust the brightness, contrast, saturation and warmth of each image. You can also change the speed and size of images.

The apparent marketing leaning of this app is evident in the offer of Instagram crop guidelines, which will allow businesses to upload the stop-motion animations to the site. However, the in-app tutorials are excellent for helping younger people compose the Lego movies with a degree of sophistication that the other apps don’t provide. There is the option of an exposure lock, so the conditions stay the same for each photograph. You can use the ghosted image overlay, which allows you to check the difference from one frame to another.
Particularly useful, the grids allow you to clearly map the changes from one image to the next. This stop motion maker app helps you to track your stop-motion animation with some accuracy and it’s quite popular for making Instagram Stop Motion Videos .
5. Onion Cam2
- Free
- For children aged 4+
- Unique feature – simplicity and the onion skin feature allowing you to easily track the stop motion effect

From the developers Yosuke Seki, this StopMotion camera is a simple tool for taking a series of images to produce your Lego movie and then play it back. You can now store the images within the app, which is new from Onion Cam1, which means you can come back to your movies and continue your work. You can also export your video with OnionCam 2.
The “onion” in the title comes from the onion-skin function which allows you to check the lapse between photographs. There is a translucent display of the picture you took last time – allowing you to gradually build up your time-lapse movie.
The guidelines are also a useful way to measure the changes you are making.
If you want an app that allows you to create a simple movie without too many bells and whistles, then this is the app for you. There are not too many advanced features, only the changing order function stands out. However, your young child should be able to use this app without much intervention from you.
Basic Tips for Improving Lego stop motion videos
The essential ingredients for the best Lego movies include creativity and patience. If you have both vital qualities, read on to understand how to maximise the effects in your film.
1. Get your timing right
If you want your characters to move quickly, then you need fewer images and movements per second. If you’re going to slow the characters down, you need to take more pictures with more actions. Getting this right is a matter of trial and error, to begin with.
However, you can make this easier for yourself by planning a little. If you have a shooting rate of 15-frames per second, then you will need to plan out 15 images to fill a second of film. Each action in your movie that would last a second will need 15 pictures with gradual changes per image.
2. Making your characters’ movements natural
If you are not careful, your characters will move around in a jerky fashion. In real life, we ease in and ease out of actions. We start and finish an action slowly. Therefore, when taking images, use more pictures at the start and end of a movement, giving the impression of easing in and out of actions.
3. Master the walk cycle
A great place to start your Lego movie-making is in the perfection of the walk. Your characters will go through 4 movements in a walk.
- One leg will step forward, heel down, and toe up.
- The toe on this foot then descends
- The other leg passes the standing leg
- The passing leg heel hits the floor
This movement will likely take about 20 frames. When moving the arms, make sure the opposite arms move with the leg – so the left arm swings as the right leg is moving forward.
4. Practice and perfect
Finally, watch how people move in real life. Notice how the heads, arms, and legs move together. Then, try to recreate this with your Lego characters. Watch your material, reflect on what could be improved, and try again. The only way to become a great Lego movie maker is to practice, practice, and practice some more!
Conclusion
Finding ways to produce content that stands out on social media is becoming increasingly difficult as video content is growing more popular. Online stop motion makers provide a simple way to use photos and videos to create attention-grabbing videos.
Ollie Mattison
Ollie Mattison is a writer and a lover of all things video.
Follow @Ollie Mattison
Ollie Mattison
Mar 27, 2024• Proven solutions
Brickfilms, the cool name for Lego stop-motion animations, is a raging success on YouTube and other video streaming sites. No longer are you limited to build and play with your Lego sets. You can now use apps to bring a story alive. Drag those bricks down from the attic or pull them out of the kids’ box, as you could have a potential goldmine in your home.
Preparation Tips for Shooting Lego Stop Motion Movies
Before you select your stop-motion movie maker , you need to secure some of the essential props to make your film-making a success. You only need a basic set of Lego bricks and your smartphone or iPad if you want to keep it simple. You could use a desk lamp for lighting or a professional camera to add some professionalism should you wish.
Start by setting up your scene. You need a flat and stable surface. It needs to be at a height where you will be comfortable working for an extended period. If you set it up on your floor, you could regret this when the aches in your knees and back kick in. Keep your set in place by using masking tape, so it doesn’t move if you accidentally bump into it.
Now you are ready to start. Lego movies are painstaking. It will take a while to get into a rhythm and to get something of value to be watched by others. Don’t be discouraged. You will get quicker and better with practice. You just need to get started.
With everything in place, as well as a realistic mindset, it is time to choose the stop motion app that will help you produce the best Lego movies.
You might also like:
Best Stop Motion App for Lego Movie
1. I Can Animate
- Cost of app: $2.99 on Apple Store or $4.99 per item on Google Play
- For children 4+
- Unique feature – the timeline allows for simple reordering and editing
I Can Animate is a way to produce movies quickly and with little need for that much tech knowledge. You can use your iOS device, whether tablet or phone, to create and then share your videos. This app is produced by Kudlian Software Ltd and retails on different prices on Apple Store and Google Play.
I Can Animate is unique in its simplicity. You use the camera on your iOS device, and the app will show you the differences between frames, so you can check your progress. This is called onion skinning and is essential to the success of your animation.
There are some basic editing features. These features include an ability to view the images on a timeline and duplicate or reorder these. You can also change the exposure, balance and focus settings to ensure there is a replication of conditions between photographs.
A useful option is the ability to connect a Bluetooth keyboard and capture your images without returning to your device. This means you can secure your phone or tablet and avoid knocking or changing the angle by tapping on the screen. Also helpful for streamlining the filming process is the inbuilt time-lapse feature. You can automatically capture images one after another without having to return to the camera.
You can then share these movies by exporting them to Facebook, YouTube or Dropbox.
2. Stop Motion Studio
- Free basic package with in-app purchases
- Pro version costing $9.99 on Apple Store and $4.99 on Google Play
- For children 4+
- Unique feature – the ability to add and edit audio
Stop Motion Studio, produced by Cateater, is an app offered for people age 4 and over and is available on iOS and Android – for your phone or your tablet. There is also a full-featured movie editing software that you can buy for your PC and Mac.
The app is free to download, with some free features. However, there are in-App purchases for some of the better features. You can purchase the Stop Motion Studio Pro app at the cost of $4.99 for Android devices, which then opens all the advanced features in the app.
The advanced features include a function to add and adjust audio, importing and cropping images as well as 4K Ultra HD and much more. The Green Screen function is particularly smart, as this allows you to include a background, which is preloaded onto the phone.
Reviews are positive. Most note that the product appears simple to use – and you can get high-quality Lego movies without feeling daunted. However, the intuitive nature of the app design belies the smart tools available for your movie production. You can add in text, speech bubbles and titles. You can add facial expressions to your Lego figures. The eraser tool is wonderful, as you can delete unwanted objects from your images.
3. The Lego Movie 2™ Movie Maker
- Free
- For children 8+
- Unique feature – a chance to be part of a Lego moviemaking community
This branded movie maker is free on iOS and Android . It is suitable for children aged 8 and above, so a little more advanced than the more basic I Can Animate – but it is designed only to be used on your phone, using the in-built camera. There is the option to add sounds and visual effects to the live footage, as well as edit material within the app. There is no save facility, which means your project needs to be sensible for the time you have before sharing to the site.
You will need to set up an account to be able to share your movies. However, for parents, this adds a reassuring level of moderation and support. Every video is moderated before it is shared. The set-up of the account is not too arduous. You are asked for your home country, your email address and your date of birth. All your videos will be anonymised as part of a stringent adherence to GDPR and safeguarding policies. The strength of this app is the infrastructure of a large brand that understands how to protect children. Be aware, your movie will become the property of the Lego group when uploaded.
Probably the most attractive selling point of this app is that there is no third-party advertising. Consequently, there are hours of uninterrupted fun offered.
4. LifeLapse Stop Motion Maker
- Free for the basic package
- PRO subscription plan, after a 7-day trial
- Pro Monthly $7.99/ Pro Yearly $39.99 on App Store
- For users 12+ with a focus on B2B adult target market
- Unique feature – professional-level design features – with Instagram cropping guidelines
Created by Bolandia Creative Inc., Life Lapse Stop Motion Maker is designed for a more sophisticated audience. It is available on iOS and Android . It is aimed at users 12 and above, and there is a definite feel of a professional design package. The interface is a clean white with simple black icons for the function buttons. Essentially, the company is aiming the app at other businesses looking to produce marketing material.
This is not to say that the app cannot be used by Lego movie makers. The app has an intuitive interface, with simple icons that make it clear how the features can be used. There is the option to adjust the brightness, contrast, saturation and warmth of each image. You can also change the speed and size of images.
The apparent marketing leaning of this app is evident in the offer of Instagram crop guidelines, which will allow businesses to upload the stop-motion animations to the site. However, the in-app tutorials are excellent for helping younger people compose the Lego movies with a degree of sophistication that the other apps don’t provide. There is the option of an exposure lock, so the conditions stay the same for each photograph. You can use the ghosted image overlay, which allows you to check the difference from one frame to another.
Particularly useful, the grids allow you to clearly map the changes from one image to the next. This stop motion maker app helps you to track your stop-motion animation with some accuracy and it’s quite popular for making Instagram Stop Motion Videos .
5. Onion Cam2
- Free
- For children aged 4+
- Unique feature – simplicity and the onion skin feature allowing you to easily track the stop motion effect
From the developers Yosuke Seki, this StopMotion camera is a simple tool for taking a series of images to produce your Lego movie and then play it back. You can now store the images within the app, which is new from Onion Cam1, which means you can come back to your movies and continue your work. You can also export your video with OnionCam 2.
The “onion” in the title comes from the onion-skin function which allows you to check the lapse between photographs. There is a translucent display of the picture you took last time – allowing you to gradually build up your time-lapse movie.
The guidelines are also a useful way to measure the changes you are making.
If you want an app that allows you to create a simple movie without too many bells and whistles, then this is the app for you. There are not too many advanced features, only the changing order function stands out. However, your young child should be able to use this app without much intervention from you.
Basic Tips for Improving Lego stop motion videos
The essential ingredients for the best Lego movies include creativity and patience. If you have both vital qualities, read on to understand how to maximise the effects in your film.
1. Get your timing right
If you want your characters to move quickly, then you need fewer images and movements per second. If you’re going to slow the characters down, you need to take more pictures with more actions. Getting this right is a matter of trial and error, to begin with.
However, you can make this easier for yourself by planning a little. If you have a shooting rate of 15-frames per second, then you will need to plan out 15 images to fill a second of film. Each action in your movie that would last a second will need 15 pictures with gradual changes per image.
2. Making your characters’ movements natural
If you are not careful, your characters will move around in a jerky fashion. In real life, we ease in and ease out of actions. We start and finish an action slowly. Therefore, when taking images, use more pictures at the start and end of a movement, giving the impression of easing in and out of actions.
3. Master the walk cycle
A great place to start your Lego movie-making is in the perfection of the walk. Your characters will go through 4 movements in a walk.
- One leg will step forward, heel down, and toe up.
- The toe on this foot then descends
- The other leg passes the standing leg
- The passing leg heel hits the floor
This movement will likely take about 20 frames. When moving the arms, make sure the opposite arms move with the leg – so the left arm swings as the right leg is moving forward.
4. Practice and perfect
Finally, watch how people move in real life. Notice how the heads, arms, and legs move together. Then, try to recreate this with your Lego characters. Watch your material, reflect on what could be improved, and try again. The only way to become a great Lego movie maker is to practice, practice, and practice some more!
Conclusion
Finding ways to produce content that stands out on social media is becoming increasingly difficult as video content is growing more popular. Online stop motion makers provide a simple way to use photos and videos to create attention-grabbing videos.
Ollie Mattison
Ollie Mattison is a writer and a lover of all things video.
Follow @Ollie Mattison
Also read:
- New In 2024, Transform Your Photos Into Breathtaking Videos with These 5 Tools
- Updated 2024 Approved Beyond Adobe Top 4 Video Editing Solutions You Need to Know
- Updated In 2024, Best Free Video Stabilizer Websites Smooth Out Your Footage
- New In 2024, Effortless Video Transfer How to Import and Export in Adobe Premiere 2023
- New 2024 Approved Top Mac Video Editors Similar to VSDC
- The Best of Both Worlds VN Video Editor for Mac and Its Alternatives for 2024
- Updated Top 10 Free Video Orientation Changers for Windows and Mac
- Updated The Best TikTok Watermark Removers for Creators on a Budget
- The Ultimate Guide to Producing Polished, Professional-Looking Videos for 2024
- 2024 Approved Understanding HD Video Resolution A Beginners Handbook
- The Ultimate Guide 3 Easy Video Game Recording Solutions for 2024
- New 2024 Approved The Ultimate Guide to Video Invitation Apps for Mobile
- Updated 2024 Approved Free Security Camera Software Reviews Top 10
- New In 2024, Natural-Looking Skin in FCPX No Plugins Required
- Updated 2024 Approved Unlock Perfect Facebook Videos A Beginners Guide to Aspect Ratios
- New 2024 Approved Intro Maker Tools for PC Top Picks Online and Offline
- Smartphone Storytelling Best Practices for Vertical Video for 2024
- New The Best Video Editing Apps for Vloggers Top Picks for iOS & Android
- New In 2024, Movie Maker Software Offers a Wide Array of Tools Such as Auto Movie Options, Timeline Narration, and Transition Overlays. Check Our List of Top 8 Video Editing Tools and Make an Informed Decision
- New Loop It! Best Free GIF Makers for Endless Animation for 2024
- New Lossless Conversion Extracting MP3 From Videos without Sacrificing Sound for 2024
- New In 2024, Face Off The Top Face Swap Apps for iPhone and Android Users
- New 2024 Approved Mac Video Editing Made Easy Download Splice
- Updated In 2024, Crack the Code 7 Secret Ways to Get Filmora Coupons
- New The Ultimate Guide to iMovie Alternatives for Windows 11/10 Users for 2024
- New No Budget? No Problem! Top Free WMV Video Editors for 2024
- New The Best Free Online Movie Editing Solutions for 2024
- New In 2024, Online Video Editing 101 From Download to Final Cut
- Updated Unlock Animation Magic Top 8 Photo Animation Tools
- New 2024 Approved Best Free WMV Video Combining Software
- Updated Say Goodbye to Physical Media Converting DVDs to Digital Files
- New The Verdict on VN Video Editor Pro Is It a Top-Tier Video Editor for 2024
- New 2024 Approved S Hottest Adobe Premiere Intro Templates Top 20 Free Downloads
- New How to Make a Video with Photos and Music for 2024
- 2024 Approved Time Manipulation in Final Cut Pro X A Step-by-Step Guide
- Updated Best Free MOV File Joining Solutions for 2024
- New The XML Blueprint A Step-by-Step Guide to FCPX Success for 2024
- Updated In 2024, No Plugins How to Add a Skin Smoother Effect with FCPX
- New Updated 10 Best 2D Animation Software Free/Paid for 2024
- Updated Top 5 Free WMV Video Merging Solutions for 2024
- Updated Ratio Rebellion Learn to Resize Images with Ease for 2024
- 2024 Approved Top 28 Video to GIF Converters You Need
- New 2024 Approved Master 1080P Video Editing Expert-Approved Software
- New 2024 Approved Convert with Ease The 6 Most Reliable Audio Converter Tools
- Full Guide to Unlock Your Vivo Y28 5G
- Unlocking iPhone 11 Pro Max Lock Screen 3 Foolproof Methods that Actually Work
- How to Change Lock Screen Wallpaper on Samsung
- Which Pokémon can Evolve with a Moon Stone For Apple iPhone SE? | Dr.fone
- In 2024, How To Unlock Stolen Apple iPhone SE (2020) In Different Conditionsin
- 2024 Approved Want to Have Slow Zoom Effect in Your Video? We Will Illustrate How to Apply Slow Zoom Effect to Your Video on Your Smartphone, Computer, and TikTok
- Top 15 Apps To Hack WiFi Password On Vivo Y100i
- In 2024, How to Show Wi-Fi Password on Oppo A59 5G
- 2024 Approved The Ultimate List of Live Chat Apps for Shopify
- In 2024, From Live-Action to Animated Video to Cartoon Conversion Made Easy
- Universal Unlock Pattern for Samsung Galaxy A24
- In 2024, Best 3 Software to Transfer Files to/from Your Honor X8b via a USB Cable | Dr.fone
- How Can Lava Yuva 3 ProMirror Share to PC? | Dr.fone
- All You Need To Know About Mega Greninja For Vivo V29 | Dr.fone
- How To Restore Missing Pictures Files from Oppo F23 5G.
- Updated 2024 Approved Take Your Videos to the Next Level 12 Best Online Animation Platforms
- In 2024, How To Track IMEI Number Of Nokia C32 Through Google Earth?
- How to Unlock Apple ID Activation Lock On iPhone 12 Pro?
- In 2024, Top 10 Best Spy Watches For your Realme GT 3 | Dr.fone
- In 2024, How To Change Your Apple ID on Apple iPhone 6 Plus With or Without Password | Dr.fone
- In 2024, Learn 3D Logo Animation and Templates
- Remove the Lock Screen Fingerprint Of Your Xiaomi Redmi Note 12 4G
- In 2024, Best Practical Tips to Improve Your Lighting in the Sun
- In 2024, Easiest Guide How to Clone Realme V30T Phone? | Dr.fone
- A Quick Guide to OnePlus Ace 2V FRP Bypass Instantly
- In 2024, 8 Best Apps for Screen Mirroring Vivo X100 PC | Dr.fone
- Updated Why These 10 Top Text Motion Templates Are Worth Your Attention for 2024
- Unlock Your Vivo Y36i Phone with Ease The 3 Best Lock Screen Removal Tools
- In 2024, Proven Ways in How To Hide Location on Life360 For Oppo Find N3 | Dr.fone
- Best Ways on How to Unlock/Bypass/Swipe/Remove Poco F5 Pro 5G Fingerprint Lock
- In 2024, How to Use Pokémon Emerald Master Ball Cheat On Vivo X100 Pro | Dr.fone
- In 2024, Top 10 AirPlay Apps in Oppo Reno 11F 5G for Streaming | Dr.fone
- Updated In 2024, Step-by-Step Guide How to Translate Twitter Video Easily
- Play MKV movies on Galaxy A25 5G, is it possible?
- Title: Updated From Still to Motion How to Achieve the Ken Burns Effect for 2024
- Author: Ava
- Created at : 2024-04-29 13:15:48
- Updated at : 2024-04-30 13:15:48
- Link: https://video-content-creator.techidaily.com/updated-from-still-to-motion-how-to-achieve-the-ken-burns-effect-for-2024/
- License: This work is licensed under CC BY-NC-SA 4.0.
