
:max_bytes(150000):strip_icc():format(webp)/GettyImages-1135364530-dec5678c0c2c427ba18ae21452ff6326.jpg)
Updated Audio Fade Ins and Outs Made Easy 2 Final Cut Pro Techniques for 2024
Audio Fade Ins and Outs Made Easy: 2 Final Cut Pro Techniques
Two Ways to Fade In/Out Audio in Final Cut Pro

Benjamin Arango
Mar 27, 2024• Proven solutions
Creating a fade in or out effect in Final Cut Pro will make your audio amazing. However, as Final Cut Pro is for pros, not every user knows how to make fade in/out audio. In fact, it is very easy to fade audio in Final Cut Pro. This tutorial will show you how to apply effects like fade-in, fade-out, and crossfade to your audio clips using Final Cut Pro in two ways.
Part 1: Use the Modify Menu to Fade In/Out Audio
Part 2: Use Fade Handles to Fade In/Out Audio
This tutorial offers only the basics of the audio fading techniques in Apple Final Cut Pro X, which is a specialized video editing software used by professionals worldwide. If you are an amateur who is new to video editing, we suggest you begin with Wondershare Filmora for Mac (originally Wondershare Video Editor for Mac). It is a powerful yet easy-to-use software that is ideal for beginners. You can download the free trial version of Wondershare Filmora below.
 Download Mac Version ](https://tools.techidaily.com/wondershare/filmora/download/ )
With this modern and extremely user-friendly tool, you’ll find that applying effects like fade-in, fade-out, or crossfade to your audio clips is very easy.
Before we get started, you can firstly detach the audio from video to better edit it. Locate your audio clip in the timeline, highlight the desired audio/video clip, right click on it, and choose Detach audio to unlink your audio from your video to edit them as separate elements.
Check more articles here, if you are also interested in other audio editing tips in Final Cut Pro or want to know how to record a voice over with FCP.
Part 1: How to Fade Audio by using the Modify Menu
You can go to the Modify menu and easily apply fade-in or fade-outs to the audio clip you are editing. The Final Cut Pro preferences also allow you to adjust the fade duration.
Step 1 : First, you have to select the audio or the video clips with audio in the timeline.

Step 2 : Select Modify> Adjust Volume> Apply Fades.

You should remember that the fades appear at the beginning and the end of each clip. The default duration of the fade is one half-second. If you want to modify that duration, you just have to drag the fade handle up to the point where your fade is supposed to begin or end.

Step 3: If you want to remove the fades, choose Modify > Adjust Volume > Remove Fades.
See more details on how to fade audio in Final Cut Pro from the following video.
Part 2: How to Fade Music by using Fade Handles
You have already learned how to find the fade handles on the screen. Now, you just have to manually drag the handle to the exact point from which you want the fade to begin or end. Just keep in mid this simple rule: fade handles at the beginning of a clip produce fade-in effects, whereas fade handles at the end give fade-out effects.
You can manually fade-in or out a portion of the audio clip on your timeline by using the fade handles. Place the pointer over the clip and you can see the fade handles appearing in the top left and right corners of the waveform. To change the sound of the fade, you’ll have to modify the shape of the fade by selecting one of the several preconfigured choices.
Using the fade handles to create crossfades:
Step 1 : To create a crossfade, first you have to select two adjacent clips in the timeline. After that choose Clip> Expand Audio (or press Control-S). You can see the waveforms on your screen expanding.
Step 2 : To overlap the audio parts of the two clips on your timeline, just drag the end point of the first clip and the start point of the second clip.
Step 3 : Now, you’ll have to drag the fade handles of each clip to the exact points where you want the fade to start and finish.

Tips: How to change fade shapes while using the fade handle
You can easily change the sound of your fades by modifying the default fade shape. For this, you’ll have to control-click a fade handle and select one of the fade preferences from the list.

- Linear: The rate of change is constant over the length of the fade.
- S-curve: Eases in and out of the fade with the midpoint at 0 dB.
- +3dB: Picks up quickly and then gradually peters out toward the end. This is the considered to be the most useful mode while choosing a quick fade.
- –3dB: Begins slowly and then toward the end picks up fast. This setting allows you to maintain a perfectly natural volume while crossfading two clips.
- Linear: Maintains a constant rate of change over the length of the fade.
- S-curve: Eases in and out of the fade with the midpoint at 0 dB.
- +3dB: Starts quickly and then slowly tapers off toward the end. This is the most useful setting for quick fades.
- –3dB: Starts slowly and then moves quickly toward the end. This is the default setting and is best for maintaining a natural volume when crossfading between two adjacent clips.
Benjamin Arango
Benjamin Arango is a writer and a lover of all things video.
Follow @Benjamin Arango
Benjamin Arango
Mar 27, 2024• Proven solutions
Creating a fade in or out effect in Final Cut Pro will make your audio amazing. However, as Final Cut Pro is for pros, not every user knows how to make fade in/out audio. In fact, it is very easy to fade audio in Final Cut Pro. This tutorial will show you how to apply effects like fade-in, fade-out, and crossfade to your audio clips using Final Cut Pro in two ways.
Part 1: Use the Modify Menu to Fade In/Out Audio
Part 2: Use Fade Handles to Fade In/Out Audio
This tutorial offers only the basics of the audio fading techniques in Apple Final Cut Pro X, which is a specialized video editing software used by professionals worldwide. If you are an amateur who is new to video editing, we suggest you begin with Wondershare Filmora for Mac (originally Wondershare Video Editor for Mac). It is a powerful yet easy-to-use software that is ideal for beginners. You can download the free trial version of Wondershare Filmora below.
Download Mac Version ](https://tools.techidaily.com/wondershare/filmora/download/ )
With this modern and extremely user-friendly tool, you’ll find that applying effects like fade-in, fade-out, or crossfade to your audio clips is very easy.
Before we get started, you can firstly detach the audio from video to better edit it. Locate your audio clip in the timeline, highlight the desired audio/video clip, right click on it, and choose Detach audio to unlink your audio from your video to edit them as separate elements.
Check more articles here, if you are also interested in other audio editing tips in Final Cut Pro or want to know how to record a voice over with FCP.
Part 1: How to Fade Audio by using the Modify Menu
You can go to the Modify menu and easily apply fade-in or fade-outs to the audio clip you are editing. The Final Cut Pro preferences also allow you to adjust the fade duration.
Step 1 : First, you have to select the audio or the video clips with audio in the timeline.
Step 2 : Select Modify> Adjust Volume> Apply Fades.
You should remember that the fades appear at the beginning and the end of each clip. The default duration of the fade is one half-second. If you want to modify that duration, you just have to drag the fade handle up to the point where your fade is supposed to begin or end.
Step 3: If you want to remove the fades, choose Modify > Adjust Volume > Remove Fades.
See more details on how to fade audio in Final Cut Pro from the following video.
Part 2: How to Fade Music by using Fade Handles
You have already learned how to find the fade handles on the screen. Now, you just have to manually drag the handle to the exact point from which you want the fade to begin or end. Just keep in mid this simple rule: fade handles at the beginning of a clip produce fade-in effects, whereas fade handles at the end give fade-out effects.
You can manually fade-in or out a portion of the audio clip on your timeline by using the fade handles. Place the pointer over the clip and you can see the fade handles appearing in the top left and right corners of the waveform. To change the sound of the fade, you’ll have to modify the shape of the fade by selecting one of the several preconfigured choices.
Using the fade handles to create crossfades:
Step 1 : To create a crossfade, first you have to select two adjacent clips in the timeline. After that choose Clip> Expand Audio (or press Control-S). You can see the waveforms on your screen expanding.
Step 2 : To overlap the audio parts of the two clips on your timeline, just drag the end point of the first clip and the start point of the second clip.
Step 3 : Now, you’ll have to drag the fade handles of each clip to the exact points where you want the fade to start and finish.
Tips: How to change fade shapes while using the fade handle
You can easily change the sound of your fades by modifying the default fade shape. For this, you’ll have to control-click a fade handle and select one of the fade preferences from the list.
- Linear: The rate of change is constant over the length of the fade.
- S-curve: Eases in and out of the fade with the midpoint at 0 dB.
- +3dB: Picks up quickly and then gradually peters out toward the end. This is the considered to be the most useful mode while choosing a quick fade.
- –3dB: Begins slowly and then toward the end picks up fast. This setting allows you to maintain a perfectly natural volume while crossfading two clips.
- Linear: Maintains a constant rate of change over the length of the fade.
- S-curve: Eases in and out of the fade with the midpoint at 0 dB.
- +3dB: Starts quickly and then slowly tapers off toward the end. This is the most useful setting for quick fades.
- –3dB: Starts slowly and then moves quickly toward the end. This is the default setting and is best for maintaining a natural volume when crossfading between two adjacent clips.
Benjamin Arango
Benjamin Arango is a writer and a lover of all things video.
Follow @Benjamin Arango
Top Lego Animation Creators
Best Lego Stop Motion Maker

Ollie Mattison
Mar 27, 2024• Proven solutions
Brickfilms, the cool name for Lego stop-motion animations, is a raging success on YouTube and other video streaming sites. No longer are you limited to build and play with your Lego sets. You can now use apps to bring a story alive. Drag those bricks down from the attic or pull them out of the kids’ box, as you could have a potential goldmine in your home.
Preparation Tips for Shooting Lego Stop Motion Movies
Before you select your stop-motion movie maker , you need to secure some of the essential props to make your film-making a success. You only need a basic set of Lego bricks and your smartphone or iPad if you want to keep it simple. You could use a desk lamp for lighting or a professional camera to add some professionalism should you wish.
Start by setting up your scene. You need a flat and stable surface. It needs to be at a height where you will be comfortable working for an extended period. If you set it up on your floor, you could regret this when the aches in your knees and back kick in. Keep your set in place by using masking tape, so it doesn’t move if you accidentally bump into it.

Now you are ready to start. Lego movies are painstaking. It will take a while to get into a rhythm and to get something of value to be watched by others. Don’t be discouraged. You will get quicker and better with practice. You just need to get started.
With everything in place, as well as a realistic mindset, it is time to choose the stop motion app that will help you produce the best Lego movies.
You might also like:
Best Stop Motion App for Lego Movie
1. I Can Animate
- Cost of app: $2.99 on Apple Store or $4.99 per item on Google Play
- For children 4+
- Unique feature – the timeline allows for simple reordering and editing

I Can Animate is a way to produce movies quickly and with little need for that much tech knowledge. You can use your iOS device, whether tablet or phone, to create and then share your videos. This app is produced by Kudlian Software Ltd and retails on different prices on Apple Store and Google Play.
I Can Animate is unique in its simplicity. You use the camera on your iOS device, and the app will show you the differences between frames, so you can check your progress. This is called onion skinning and is essential to the success of your animation.
There are some basic editing features. These features include an ability to view the images on a timeline and duplicate or reorder these. You can also change the exposure, balance and focus settings to ensure there is a replication of conditions between photographs.

A useful option is the ability to connect a Bluetooth keyboard and capture your images without returning to your device. This means you can secure your phone or tablet and avoid knocking or changing the angle by tapping on the screen. Also helpful for streamlining the filming process is the inbuilt time-lapse feature. You can automatically capture images one after another without having to return to the camera.
You can then share these movies by exporting them to Facebook, YouTube or Dropbox.
2. Stop Motion Studio
- Free basic package with in-app purchases
- Pro version costing $9.99 on Apple Store and $4.99 on Google Play
- For children 4+
- Unique feature – the ability to add and edit audio

Stop Motion Studio, produced by Cateater, is an app offered for people age 4 and over and is available on iOS and Android – for your phone or your tablet. There is also a full-featured movie editing software that you can buy for your PC and Mac.
The app is free to download, with some free features. However, there are in-App purchases for some of the better features. You can purchase the Stop Motion Studio Pro app at the cost of $4.99 for Android devices, which then opens all the advanced features in the app.
The advanced features include a function to add and adjust audio, importing and cropping images as well as 4K Ultra HD and much more. The Green Screen function is particularly smart, as this allows you to include a background, which is preloaded onto the phone.
Reviews are positive. Most note that the product appears simple to use – and you can get high-quality Lego movies without feeling daunted. However, the intuitive nature of the app design belies the smart tools available for your movie production. You can add in text, speech bubbles and titles. You can add facial expressions to your Lego figures. The eraser tool is wonderful, as you can delete unwanted objects from your images.
3. The Lego Movie 2™ Movie Maker
- Free
- For children 8+
- Unique feature – a chance to be part of a Lego moviemaking community

This branded movie maker is free on iOS and Android . It is suitable for children aged 8 and above, so a little more advanced than the more basic I Can Animate – but it is designed only to be used on your phone, using the in-built camera. There is the option to add sounds and visual effects to the live footage, as well as edit material within the app. There is no save facility, which means your project needs to be sensible for the time you have before sharing to the site.
You will need to set up an account to be able to share your movies. However, for parents, this adds a reassuring level of moderation and support. Every video is moderated before it is shared. The set-up of the account is not too arduous. You are asked for your home country, your email address and your date of birth. All your videos will be anonymised as part of a stringent adherence to GDPR and safeguarding policies. The strength of this app is the infrastructure of a large brand that understands how to protect children. Be aware, your movie will become the property of the Lego group when uploaded.
Probably the most attractive selling point of this app is that there is no third-party advertising. Consequently, there are hours of uninterrupted fun offered.
4. LifeLapse Stop Motion Maker
- Free for the basic package
- PRO subscription plan, after a 7-day trial
- Pro Monthly $7.99/ Pro Yearly $39.99 on App Store
- For users 12+ with a focus on B2B adult target market
- Unique feature – professional-level design features – with Instagram cropping guidelines
Created by Bolandia Creative Inc., Life Lapse Stop Motion Maker is designed for a more sophisticated audience. It is available on iOS and Android . It is aimed at users 12 and above, and there is a definite feel of a professional design package. The interface is a clean white with simple black icons for the function buttons. Essentially, the company is aiming the app at other businesses looking to produce marketing material.
This is not to say that the app cannot be used by Lego movie makers. The app has an intuitive interface, with simple icons that make it clear how the features can be used. There is the option to adjust the brightness, contrast, saturation and warmth of each image. You can also change the speed and size of images.

The apparent marketing leaning of this app is evident in the offer of Instagram crop guidelines, which will allow businesses to upload the stop-motion animations to the site. However, the in-app tutorials are excellent for helping younger people compose the Lego movies with a degree of sophistication that the other apps don’t provide. There is the option of an exposure lock, so the conditions stay the same for each photograph. You can use the ghosted image overlay, which allows you to check the difference from one frame to another.
Particularly useful, the grids allow you to clearly map the changes from one image to the next. This stop motion maker app helps you to track your stop-motion animation with some accuracy and it’s quite popular for making Instagram Stop Motion Videos .
5. Onion Cam2
- Free
- For children aged 4+
- Unique feature – simplicity and the onion skin feature allowing you to easily track the stop motion effect

From the developers Yosuke Seki, this StopMotion camera is a simple tool for taking a series of images to produce your Lego movie and then play it back. You can now store the images within the app, which is new from Onion Cam1, which means you can come back to your movies and continue your work. You can also export your video with OnionCam 2.
The “onion” in the title comes from the onion-skin function which allows you to check the lapse between photographs. There is a translucent display of the picture you took last time – allowing you to gradually build up your time-lapse movie.
The guidelines are also a useful way to measure the changes you are making.
If you want an app that allows you to create a simple movie without too many bells and whistles, then this is the app for you. There are not too many advanced features, only the changing order function stands out. However, your young child should be able to use this app without much intervention from you.
Basic Tips for Improving Lego stop motion videos
The essential ingredients for the best Lego movies include creativity and patience. If you have both vital qualities, read on to understand how to maximise the effects in your film.
1. Get your timing right
If you want your characters to move quickly, then you need fewer images and movements per second. If you’re going to slow the characters down, you need to take more pictures with more actions. Getting this right is a matter of trial and error, to begin with.
However, you can make this easier for yourself by planning a little. If you have a shooting rate of 15-frames per second, then you will need to plan out 15 images to fill a second of film. Each action in your movie that would last a second will need 15 pictures with gradual changes per image.
2. Making your characters’ movements natural
If you are not careful, your characters will move around in a jerky fashion. In real life, we ease in and ease out of actions. We start and finish an action slowly. Therefore, when taking images, use more pictures at the start and end of a movement, giving the impression of easing in and out of actions.
3. Master the walk cycle
A great place to start your Lego movie-making is in the perfection of the walk. Your characters will go through 4 movements in a walk.
- One leg will step forward, heel down, and toe up.
- The toe on this foot then descends
- The other leg passes the standing leg
- The passing leg heel hits the floor
This movement will likely take about 20 frames. When moving the arms, make sure the opposite arms move with the leg – so the left arm swings as the right leg is moving forward.
4. Practice and perfect
Finally, watch how people move in real life. Notice how the heads, arms, and legs move together. Then, try to recreate this with your Lego characters. Watch your material, reflect on what could be improved, and try again. The only way to become a great Lego movie maker is to practice, practice, and practice some more!
Conclusion
Finding ways to produce content that stands out on social media is becoming increasingly difficult as video content is growing more popular. Online stop motion makers provide a simple way to use photos and videos to create attention-grabbing videos.

Ollie Mattison
Ollie Mattison is a writer and a lover of all things video.
Follow @Ollie Mattison
Ollie Mattison
Mar 27, 2024• Proven solutions
Brickfilms, the cool name for Lego stop-motion animations, is a raging success on YouTube and other video streaming sites. No longer are you limited to build and play with your Lego sets. You can now use apps to bring a story alive. Drag those bricks down from the attic or pull them out of the kids’ box, as you could have a potential goldmine in your home.
Preparation Tips for Shooting Lego Stop Motion Movies
Before you select your stop-motion movie maker , you need to secure some of the essential props to make your film-making a success. You only need a basic set of Lego bricks and your smartphone or iPad if you want to keep it simple. You could use a desk lamp for lighting or a professional camera to add some professionalism should you wish.
Start by setting up your scene. You need a flat and stable surface. It needs to be at a height where you will be comfortable working for an extended period. If you set it up on your floor, you could regret this when the aches in your knees and back kick in. Keep your set in place by using masking tape, so it doesn’t move if you accidentally bump into it.
Now you are ready to start. Lego movies are painstaking. It will take a while to get into a rhythm and to get something of value to be watched by others. Don’t be discouraged. You will get quicker and better with practice. You just need to get started.
With everything in place, as well as a realistic mindset, it is time to choose the stop motion app that will help you produce the best Lego movies.
You might also like:
Best Stop Motion App for Lego Movie
1. I Can Animate
- Cost of app: $2.99 on Apple Store or $4.99 per item on Google Play
- For children 4+
- Unique feature – the timeline allows for simple reordering and editing
I Can Animate is a way to produce movies quickly and with little need for that much tech knowledge. You can use your iOS device, whether tablet or phone, to create and then share your videos. This app is produced by Kudlian Software Ltd and retails on different prices on Apple Store and Google Play.
I Can Animate is unique in its simplicity. You use the camera on your iOS device, and the app will show you the differences between frames, so you can check your progress. This is called onion skinning and is essential to the success of your animation.
There are some basic editing features. These features include an ability to view the images on a timeline and duplicate or reorder these. You can also change the exposure, balance and focus settings to ensure there is a replication of conditions between photographs.
A useful option is the ability to connect a Bluetooth keyboard and capture your images without returning to your device. This means you can secure your phone or tablet and avoid knocking or changing the angle by tapping on the screen. Also helpful for streamlining the filming process is the inbuilt time-lapse feature. You can automatically capture images one after another without having to return to the camera.
You can then share these movies by exporting them to Facebook, YouTube or Dropbox.
2. Stop Motion Studio
- Free basic package with in-app purchases
- Pro version costing $9.99 on Apple Store and $4.99 on Google Play
- For children 4+
- Unique feature – the ability to add and edit audio
Stop Motion Studio, produced by Cateater, is an app offered for people age 4 and over and is available on iOS and Android – for your phone or your tablet. There is also a full-featured movie editing software that you can buy for your PC and Mac.
The app is free to download, with some free features. However, there are in-App purchases for some of the better features. You can purchase the Stop Motion Studio Pro app at the cost of $4.99 for Android devices, which then opens all the advanced features in the app.
The advanced features include a function to add and adjust audio, importing and cropping images as well as 4K Ultra HD and much more. The Green Screen function is particularly smart, as this allows you to include a background, which is preloaded onto the phone.
Reviews are positive. Most note that the product appears simple to use – and you can get high-quality Lego movies without feeling daunted. However, the intuitive nature of the app design belies the smart tools available for your movie production. You can add in text, speech bubbles and titles. You can add facial expressions to your Lego figures. The eraser tool is wonderful, as you can delete unwanted objects from your images.
3. The Lego Movie 2™ Movie Maker
- Free
- For children 8+
- Unique feature – a chance to be part of a Lego moviemaking community
This branded movie maker is free on iOS and Android . It is suitable for children aged 8 and above, so a little more advanced than the more basic I Can Animate – but it is designed only to be used on your phone, using the in-built camera. There is the option to add sounds and visual effects to the live footage, as well as edit material within the app. There is no save facility, which means your project needs to be sensible for the time you have before sharing to the site.
You will need to set up an account to be able to share your movies. However, for parents, this adds a reassuring level of moderation and support. Every video is moderated before it is shared. The set-up of the account is not too arduous. You are asked for your home country, your email address and your date of birth. All your videos will be anonymised as part of a stringent adherence to GDPR and safeguarding policies. The strength of this app is the infrastructure of a large brand that understands how to protect children. Be aware, your movie will become the property of the Lego group when uploaded.
Probably the most attractive selling point of this app is that there is no third-party advertising. Consequently, there are hours of uninterrupted fun offered.
4. LifeLapse Stop Motion Maker
- Free for the basic package
- PRO subscription plan, after a 7-day trial
- Pro Monthly $7.99/ Pro Yearly $39.99 on App Store
- For users 12+ with a focus on B2B adult target market
- Unique feature – professional-level design features – with Instagram cropping guidelines
Created by Bolandia Creative Inc., Life Lapse Stop Motion Maker is designed for a more sophisticated audience. It is available on iOS and Android . It is aimed at users 12 and above, and there is a definite feel of a professional design package. The interface is a clean white with simple black icons for the function buttons. Essentially, the company is aiming the app at other businesses looking to produce marketing material.
This is not to say that the app cannot be used by Lego movie makers. The app has an intuitive interface, with simple icons that make it clear how the features can be used. There is the option to adjust the brightness, contrast, saturation and warmth of each image. You can also change the speed and size of images.
The apparent marketing leaning of this app is evident in the offer of Instagram crop guidelines, which will allow businesses to upload the stop-motion animations to the site. However, the in-app tutorials are excellent for helping younger people compose the Lego movies with a degree of sophistication that the other apps don’t provide. There is the option of an exposure lock, so the conditions stay the same for each photograph. You can use the ghosted image overlay, which allows you to check the difference from one frame to another.
Particularly useful, the grids allow you to clearly map the changes from one image to the next. This stop motion maker app helps you to track your stop-motion animation with some accuracy and it’s quite popular for making Instagram Stop Motion Videos .
5. Onion Cam2
- Free
- For children aged 4+
- Unique feature – simplicity and the onion skin feature allowing you to easily track the stop motion effect
From the developers Yosuke Seki, this StopMotion camera is a simple tool for taking a series of images to produce your Lego movie and then play it back. You can now store the images within the app, which is new from Onion Cam1, which means you can come back to your movies and continue your work. You can also export your video with OnionCam 2.
The “onion” in the title comes from the onion-skin function which allows you to check the lapse between photographs. There is a translucent display of the picture you took last time – allowing you to gradually build up your time-lapse movie.
The guidelines are also a useful way to measure the changes you are making.
If you want an app that allows you to create a simple movie without too many bells and whistles, then this is the app for you. There are not too many advanced features, only the changing order function stands out. However, your young child should be able to use this app without much intervention from you.
Basic Tips for Improving Lego stop motion videos
The essential ingredients for the best Lego movies include creativity and patience. If you have both vital qualities, read on to understand how to maximise the effects in your film.
1. Get your timing right
If you want your characters to move quickly, then you need fewer images and movements per second. If you’re going to slow the characters down, you need to take more pictures with more actions. Getting this right is a matter of trial and error, to begin with.
However, you can make this easier for yourself by planning a little. If you have a shooting rate of 15-frames per second, then you will need to plan out 15 images to fill a second of film. Each action in your movie that would last a second will need 15 pictures with gradual changes per image.
2. Making your characters’ movements natural
If you are not careful, your characters will move around in a jerky fashion. In real life, we ease in and ease out of actions. We start and finish an action slowly. Therefore, when taking images, use more pictures at the start and end of a movement, giving the impression of easing in and out of actions.
3. Master the walk cycle
A great place to start your Lego movie-making is in the perfection of the walk. Your characters will go through 4 movements in a walk.
- One leg will step forward, heel down, and toe up.
- The toe on this foot then descends
- The other leg passes the standing leg
- The passing leg heel hits the floor
This movement will likely take about 20 frames. When moving the arms, make sure the opposite arms move with the leg – so the left arm swings as the right leg is moving forward.
4. Practice and perfect
Finally, watch how people move in real life. Notice how the heads, arms, and legs move together. Then, try to recreate this with your Lego characters. Watch your material, reflect on what could be improved, and try again. The only way to become a great Lego movie maker is to practice, practice, and practice some more!
Conclusion
Finding ways to produce content that stands out on social media is becoming increasingly difficult as video content is growing more popular. Online stop motion makers provide a simple way to use photos and videos to create attention-grabbing videos.
Ollie Mattison
Ollie Mattison is a writer and a lover of all things video.
Follow @Ollie Mattison
Top 16 Free Video Editing Software for Beginners [Very Easy to Use]
Top 15 Free Video Editing Software for Beginners [Very Easy to Use]
Ollie Mattison
Mar 27, 2024• Proven solutions
If you are not a video-making expert, own a video studio, or have a video specialist to trim and shoot video features, then don’t worry!
We are here to take you on the tour of the easiest video editing software that would promise a professional-looking end-product despite being absolutely inexperienced!
In my opinion, an ideal video editing software should be easy for everyone to get started. It could be simple video editing software, but it at least contains all the basic features you want. My recommendation is Wondershare Filmora, which compromises usability and capability to the best. It not only comes with all common video editing tools at your fingertips but also features you may need to bring your videos to the next level.
- 15 Best Easy Video Editing Software
- Basic Features You Need in an Easy Video Editing Software
- Why Video Editing Matters Nowadays?
- Basic Video Editing Terms You Should Know
Watch Video to Take a Quick View of the 18 Best Video Editors
Filmora Video Editor is an expert in creating and editing videos with outstanding functions and features. The easy-to-use interface will help you much! It offers versions for Windows, Mac, Android and iOS! Worth to have a try!
Try Free Video Editor Try Free Video Editor Try Free Video Editor Learn More >
15 Best Easy Video Editing Software
Below are the brief detail of easy video editors for PC, giving you more editing scalability than mobile-based editing apps. So if you are seeking easy video editing software for YouTube or website then look no further!
1. Wondershare Filmora - Easy Video Editing Software, Unlimited Video Sharing
Compatibility: Windows, Mac, Android, iPhone and iPad.
Wondershare Filmora paves the way to share videos instantly with family and friends, whatever it’s on YouTube, computer, mobile devices, or TV, you’ll choose your way.
For Win 7 or later (64-bit)
 Secure Download
For macOS 10.14 or later
Secure Download
You can directly upload the video to YouTube, as well as an optional message sending to Facebook and Twitter.
Preset profiles are included in output videos for playing on mobile devices like iPhone, iPad, iPod, PSP, etc. No further conversion required. A build-in DVD tool allows you to burn video to a high-quality DVD for watching on TV with your home DVD player.
Filmstock Stock Media Library ](https://filmstock.wondershare.com/creative-theme-tutorial?spm=rs.filmora%5Fweb&source%5Fchannel=seo%5Farticle )
Download the free trial version of Wondershare Filmora for your Mac/Windows version below, start to make your stunning home movies today!
2. Blender
Compatibility: Windows, Mac, and Linux.
This is free and open-source software, originally designed as a 3D animation suite but also has a use video editor. This editor lets you carry out basic actions like video cutting and video splicing. Hence, it is an easy video cutter and easy video joiner. It can also perform more advanced tasks such as video masking.
3. Lightworks
Compatibility: Windows, Mac, and Linux.
Lightworks is a free easy to use video editing software that comes with High precision video trimming, 720p video export for YouTube, Multicam support, and support of a large range of video formats. Its free version has ample features enough for most of the users. Although the paid pro version costs $25 a month.
4. Shotcut
Compatibility: Windows, Mac, and Linux.
Shotcut is a free, open-source video editing software, packed with ample features with wide range video formats support, timeline editing, 4K HD resolution support, and have several tutorials video.

Wondershare Filmora Video Editor
Filmora - No Watermark Video Editing Software
• Easily edit and export video files without watermark
• offers popular effects and filters for making your video professional
• Cross-platform supported - (Windows, Mac, iOS, Android)
Try Video Editor without Watermark Try Video Editor without Watermark Try Video Editor without Watermark Learn More >
5. VSDC
Compatibility: Windows
VSDC, an easy video editing software for windows, is a free video editing software, having an easy-to-learn powerful suite of features including audio editing and color correction. Although a paid version, pro, costs $19.99, having visual waveform, image stabilization and voice over support.
6. Machete Lite
Compatibility: Windows
Machete Lite is a free yet the simplest video editing software perfect for simple editing tasks. Only AVI and WMV files are supported in its free version. Its full version costs $19.95 having audio editing and more file type support, unlike the free version.
7. Avidemux
Compatibility: Windows, Mac, and Linux
Avoided is the simplest video editing software, perfect for beginners. It allows performing simple editing features like Encoding, simple cutting, and filtering with an easy-to-use interface.
8. Hitfilm Express
Compatibility: Windows and Mac
HitFilm Express is a free video editing software with features ranging from basic editing features like trimming, audio editing, and slicing to advance tools and features. Its free version supports over 180 special effects. There’s a built-in YouTube uploading.
Finding a Way to Edit Video for Free? Try This Out!
Filmora Video Editor brings you all the convenience of editing videos with handy functions. You can make your creative ideas into realize! More importantly, your edited video can export without a watermark!
Try It Free Try It Free Try It Free Learn More >
9. iMovie
Compatibility: Mac
If you are a beginner and searching for a good video editing software to get your hands clean on editing then iMovie editor is perfect for you. It is an easy video editing software for mac having an easy drag and drop interface. Features like Video trimming, split-screen, audio editing, pre-made transitions library, and 4K resolution support.
10. Openshot
Compatibility: Windows, Mac, and Linux
It is a free open source video editing software with an easy-to-use interface. Features like unlimited layers and tracks, time-mapping, real-time previews, trimming, snapping, clip resizing, curve-based keyframe animations etc. It offers more than enough features for free software.
11. Movie Maker
Compatibility: Windows
It is an easy video maker and editing software for beginners which can be downloaded from any third-party and use it to make and share high-quality movies.
12. Lumen5
Compatibility: Windows and Mac
It’s a perfect web-based video editing tool, best for Social Media promotion Campaigns with an easy drag-and-drop interface.
![]()
A cross-platform for making videos anywhere for all creators

Why your video editing isn’t good enough? How about some creative inspo?
- 100 Million+ Users
- 150+ Countries and Regions
- 4 Million+ Social Media Followers
- 5 Million+ Stock Media for Use
* Secure Download

13. Adobe Spark
Compatibility: Windows and Mac
Adobe Sparks is also a web-based easy video editor, similar to Lumen5. It offers an easy user interface but is a little restricted when it comes to offering a bank of images and footage to use.
14. Videopad
Compatibility: Windows
VideoPad is a simple video editing software for beginners, maybe not suitable for professional use. It has features like 3D Video Editing, Sound Effects and pre-made transitions Library, Reduce Camera Shakes and Multiple Resolutions export support.
15. Freemake
Compatibility: Windows
Freemake is a free video converter that is used to convert and alter videos that can modify and convert videos, embed videos to websites, and extract audio from video clips simply and fast. It supports above 500 video file formats and is compatible with multiple audio and image file formats for slideshows and video clip creation.
Basic Features You Need in an Easy Video Editing Software
A software having:
- Easy montage maker
- Easy video cutter
- Easy video joiner
- Compositing multiple elements together
- Color grading
- Motion tracking
- Stabilization
- Titles
- Background replacement
- Basic color correction
- Cross dissolves and fade-to-black transitions
- Audio crossfades
- Audio level adjustment using keyframes
- Auto synchronization of additional audio tracks
- Image position adjustment using keyframes
- Footage speed adjustments
- Basic color correction
- Footage bins for roughly organizing imported footage
Why Video Editing Matters Nowadays?
If videos aren’t a primary focus of your content marketing plan, the probability is it’s soon going to be certain! Every next production is turning into video-based content, be it content marketers or SEOs.
Around 50% of the content marketers are using Facebook and YouTube channels for the sake of video distribution since online activity spent on watching videos is 50%.
Moreover, by 2021, video is going to be projected to account for more than 80% out of all internet traffic.
Therefore, it has become a need to focus on video content if you are looking to grow the organic traffic of your publications.

Filmora Free Video Editor
Create AI-Generated Video with Filmora
Filmora Free video editor offers a ChatGPT plug-in and AI tools to enhance your creative vision. Make your idea into reality.
Try It Free Try It Free Try It Free Learn More >
Basic Video Editing Terms You Should Know
Below are some of the important yet basic terms that you should know related to videography in general and video editing in specific as well, whether you are a beginner or professional.
Aspect ratio:
The aspect ratio is the ratio of width and height of a video. Examples of the most used aspect ratios are: 4:3, 16:9, 1.85:1.
Refer to the image given below for a better understanding.

B-roll:
B-roll facilities one with the flexibility, when editing, to the video editing rules as it is an add-on picture that makes a previously incoherent scene seamless.
As shown in the image below, B-roll is used to insert which can make the transition easy to look on the eyes.
Bit rate:
Bit rate, also known as data rate, refers to the amount of data used for every second within the video. It is most commonly expressed in kilobits per second (kbps).
Close up:
Close-up refers to the shots that frame to subject tightly.
For instance, if it is a person, then the close-up covers solely his face.
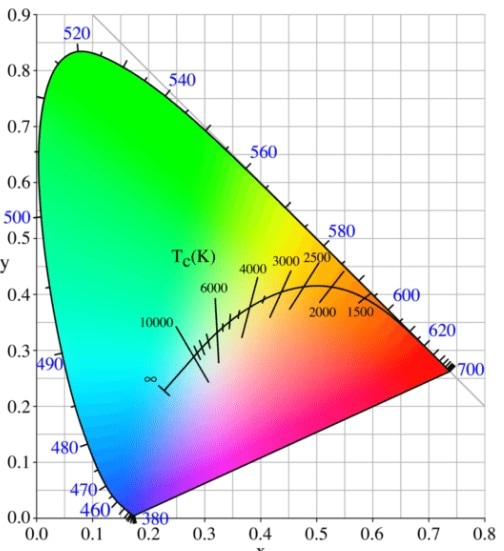
Color temperature:
Color temperature refers to the light visibility in a shot. Color temperature is expressed in Kelvin. The scale of color temperature ranges from cool to warm.
Composition:
Composition entails the process of combining multiple footages using video editing software.
Compression:
Compression is the process of minimizing the quantity of data utilized in a video file. It helps make in the process of uploading and downloading quite faster. This also leaves you with ample space for more of your publications.
Crop factor:
Crop factor refers to a number that expresses the ratio of the imaging area of a sensor to a full-frame sensor. It typically ranges from 1.3 to 2.0.
Cut-in
Cut-in refers to showing a specific part of a subject in order to emphasize a certain aspect or emotion. For instance, hand gestures may show nervousness, enthusiasm, agitation, etc.
Foley:
Often times the original sound of the scene captured in the video is not captured as naturally as they were supposed to sound like in reality. Hence, Foley is when you reproduce those sounds for that video.
Frame rate:
Frame rate refers to the video capturing by a shutter in a second or shutter cycling rate through opening and closing. Some of the common frame rates are 24, 25, 29.97, 30, etc. The frame rate is expressed in frames per second (fps).
High definition media interface:
HDMI is the connectors that digitally transfer audio and HD video to a television. This is helpful if you intend to work on a bigger screen or wish to share some of your productions.
Resolution:
Resolution refers to the horizontal and vertical pixels of your video. For instance 640×480 for SD and 1280×720 for HD. Sometimes resolution refers only to the number of pixels that paper vertically. For example 480p, 720p, and 1080p respectively.
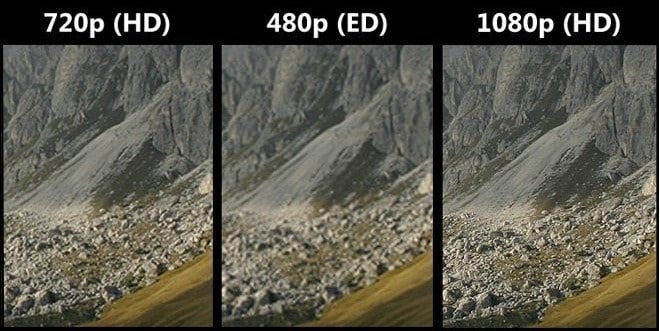
J-Cut:
J-cut refers to the editing technique in which the audio from a next scene is overlapped with the image from the previous scene, such that the audio segment of the next scene begins playing prior to its picture.
Jumpcut:
Jumpcut editing techniques refer to an abrupt transition between the two consecutive frames. The entity in the video containing jump cuts appears to jump along with the scene from one place to another. This looks disruptive to the audience.
L-Cut:
L-cut is exactly opposite to J-cut where the audio from the next scene overlays the image from the next scene to play the audio after an image has been displayed in the video.
Lower third:
As the name suggests, the lower third is derived from the rule of third which refers to the type of title, mostly used by vloggers, broadcasters, interviewers, and you tubers.
Memory bank:
You can understand the term by thinking of a memory box where we keep certain things as a memory of the events in someone’s life. Memory bank serves the same purpose through the use of video. It often uses natural sounds, document travel or merely store moments in routine life.
Press kit:
Press kit is used to provide information regarding your productions to the press for promotional purposes. Such information is often background including synopsis, crew, cast’s bios Q&A with the director, production stills and its reviews.
Shot list:
The shot list refers to the checklist related to the shots that a videographer plans to include in his/her content. This may help you save time and gear with efficient planning and handling. This gives a sense of direction to your production.
Storyboard:
A storyboard is a drawing to illustrate the scenes in the video. This gives a direct and organized way to visualize the needs for the shots or animation.
Sync:
Synchronization, aka sync, refers to the alignment of audio with video imaging.
Rule of thirds:
The rule of third is a grid that helps you to compose interesting and balanced shots to make your productions aesthetically pleasing. The grid is similar to a tic-tac-toe board since it segregates the picture into 9 segments. It helps bring points of interest to be aligned with the lines or intersection given in the grid.
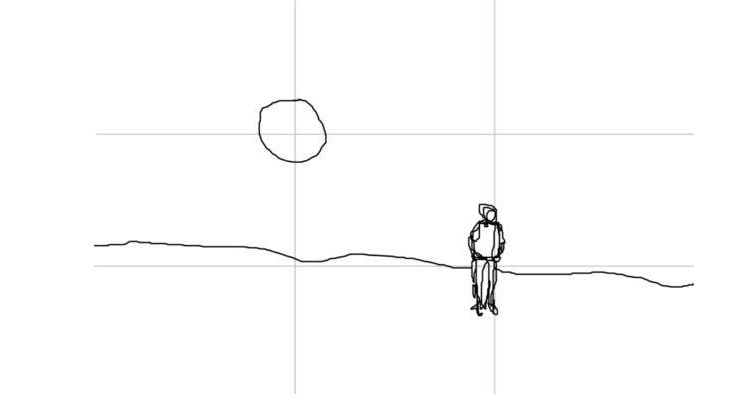
Three-point lighting:
This helps one to diminish the shadows for image balancing and provides an appealing contrast. These three lights are commonly known as fill, key, and backlight.

Tilts:
Tilts refer to the vertical transitions that your camera. This is the opposite of pans.
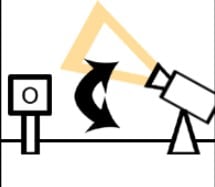
Pans:
Pans refer to the horizontal movements of your camera. This is exactly contrary to tilts.
White balance:
White balance refers to the process where the unrealistic color casts are removed in order to render a white object to be actually white in your photo, and not have other tints.
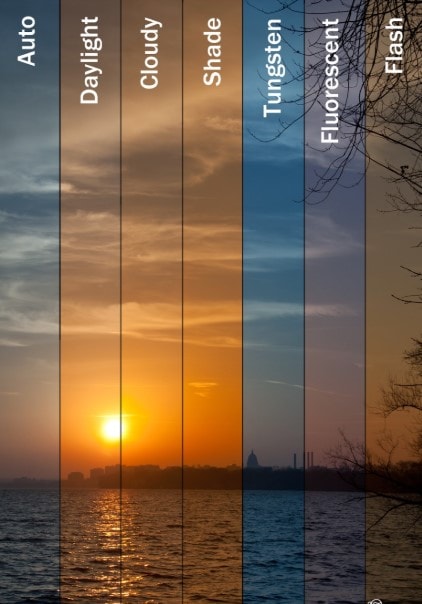
Wide-angle:
A wide-angel lens refers to a short focal length of a lens. This brings more of a subject rather than a subject being captured by a normal lens at equal distances.
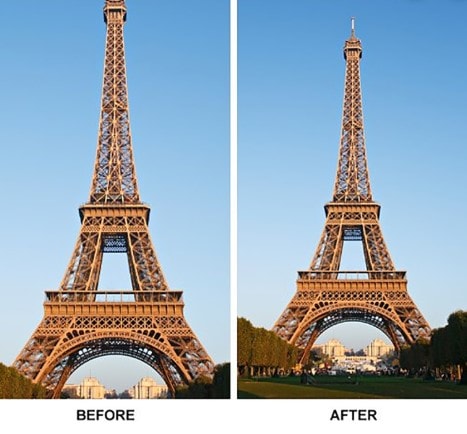
Non-linear editing:
NLEs is a non-destructive editing technique that allows one to access any frame in a video clip regardless of the sequence in the clip. It gives you the freedom to easily include effects, transitions, fades, etc. which cannot be achieved with linear editing
Pixel aspect ratio:
Pixels are several tiny squares that build up an image in a video. Whereas, aspect ratio refers to the ratio of width to height of a video. Hence, the pixel aspect ratio (PAR) is the ratio of width to height of the pixels.
Conclusion
Be it Instagram stories, YouTube product testimonials, or Facebook ads, using these easy-to-use video editing software will elevate your content into a professional and slick look.
So, I hope you are now ready to get started.
Lights, camera, action!
For Win 7 or later (64-bit)
Secure Download
For macOS 10.14 or later
Secure Download
Click here to get Filmora for PC by email
or Try Filmora App for mobile >>>
download filmora app for ios ](https://app.adjust.com/b0k9hf2%5F4bsu85t ) download filmora app for android ](https://app.adjust.com/b0k9hf2%5F4bsu85t )
Ollie Mattison
Ollie Mattison is a writer and a lover of all things video.
Follow @Ollie Mattison
Ollie Mattison
Mar 27, 2024• Proven solutions
If you are not a video-making expert, own a video studio, or have a video specialist to trim and shoot video features, then don’t worry!
We are here to take you on the tour of the easiest video editing software that would promise a professional-looking end-product despite being absolutely inexperienced!
In my opinion, an ideal video editing software should be easy for everyone to get started. It could be simple video editing software, but it at least contains all the basic features you want. My recommendation is Wondershare Filmora, which compromises usability and capability to the best. It not only comes with all common video editing tools at your fingertips but also features you may need to bring your videos to the next level.
- 15 Best Easy Video Editing Software
- Basic Features You Need in an Easy Video Editing Software
- Why Video Editing Matters Nowadays?
- Basic Video Editing Terms You Should Know
Watch Video to Take a Quick View of the 18 Best Video Editors
Filmora Video Editor is an expert in creating and editing videos with outstanding functions and features. The easy-to-use interface will help you much! It offers versions for Windows, Mac, Android and iOS! Worth to have a try!
Try Free Video Editor Try Free Video Editor Try Free Video Editor Learn More >
15 Best Easy Video Editing Software
Below are the brief detail of easy video editors for PC, giving you more editing scalability than mobile-based editing apps. So if you are seeking easy video editing software for YouTube or website then look no further!
1. Wondershare Filmora - Easy Video Editing Software, Unlimited Video Sharing
Compatibility: Windows, Mac, Android, iPhone and iPad.
Wondershare Filmora paves the way to share videos instantly with family and friends, whatever it’s on YouTube, computer, mobile devices, or TV, you’ll choose your way.
For Win 7 or later (64-bit)
Secure Download
For macOS 10.14 or later
Secure Download
You can directly upload the video to YouTube, as well as an optional message sending to Facebook and Twitter.
Preset profiles are included in output videos for playing on mobile devices like iPhone, iPad, iPod, PSP, etc. No further conversion required. A build-in DVD tool allows you to burn video to a high-quality DVD for watching on TV with your home DVD player.
Filmstock Stock Media Library ](https://filmstock.wondershare.com/creative-theme-tutorial?spm=rs.filmora%5Fweb&source%5Fchannel=seo%5Farticle )
Download the free trial version of Wondershare Filmora for your Mac/Windows version below, start to make your stunning home movies today!
2. Blender
Compatibility: Windows, Mac, and Linux.
This is free and open-source software, originally designed as a 3D animation suite but also has a use video editor. This editor lets you carry out basic actions like video cutting and video splicing. Hence, it is an easy video cutter and easy video joiner. It can also perform more advanced tasks such as video masking.
3. Lightworks
Compatibility: Windows, Mac, and Linux.
Lightworks is a free easy to use video editing software that comes with High precision video trimming, 720p video export for YouTube, Multicam support, and support of a large range of video formats. Its free version has ample features enough for most of the users. Although the paid pro version costs $25 a month.
4. Shotcut
Compatibility: Windows, Mac, and Linux.
Shotcut is a free, open-source video editing software, packed with ample features with wide range video formats support, timeline editing, 4K HD resolution support, and have several tutorials video.
Wondershare Filmora Video Editor
Filmora - No Watermark Video Editing Software
• Easily edit and export video files without watermark
• offers popular effects and filters for making your video professional
• Cross-platform supported - (Windows, Mac, iOS, Android)
Try Video Editor without Watermark Try Video Editor without Watermark Try Video Editor without Watermark Learn More >
5. VSDC
Compatibility: Windows
VSDC, an easy video editing software for windows, is a free video editing software, having an easy-to-learn powerful suite of features including audio editing and color correction. Although a paid version, pro, costs $19.99, having visual waveform, image stabilization and voice over support.
6. Machete Lite
Compatibility: Windows
Machete Lite is a free yet the simplest video editing software perfect for simple editing tasks. Only AVI and WMV files are supported in its free version. Its full version costs $19.95 having audio editing and more file type support, unlike the free version.
7. Avidemux
Compatibility: Windows, Mac, and Linux
Avoided is the simplest video editing software, perfect for beginners. It allows performing simple editing features like Encoding, simple cutting, and filtering with an easy-to-use interface.
8. Hitfilm Express
Compatibility: Windows and Mac
HitFilm Express is a free video editing software with features ranging from basic editing features like trimming, audio editing, and slicing to advance tools and features. Its free version supports over 180 special effects. There’s a built-in YouTube uploading.
Finding a Way to Edit Video for Free? Try This Out!
Filmora Video Editor brings you all the convenience of editing videos with handy functions. You can make your creative ideas into realize! More importantly, your edited video can export without a watermark!
Try It Free Try It Free Try It Free Learn More >
9. iMovie
Compatibility: Mac
If you are a beginner and searching for a good video editing software to get your hands clean on editing then iMovie editor is perfect for you. It is an easy video editing software for mac having an easy drag and drop interface. Features like Video trimming, split-screen, audio editing, pre-made transitions library, and 4K resolution support.
10. Openshot
Compatibility: Windows, Mac, and Linux
It is a free open source video editing software with an easy-to-use interface. Features like unlimited layers and tracks, time-mapping, real-time previews, trimming, snapping, clip resizing, curve-based keyframe animations etc. It offers more than enough features for free software.
11. Movie Maker
Compatibility: Windows
It is an easy video maker and editing software for beginners which can be downloaded from any third-party and use it to make and share high-quality movies.
12. Lumen5
Compatibility: Windows and Mac
It’s a perfect web-based video editing tool, best for Social Media promotion Campaigns with an easy drag-and-drop interface.
![]()
A cross-platform for making videos anywhere for all creators
Why your video editing isn’t good enough? How about some creative inspo?
- 100 Million+ Users
- 150+ Countries and Regions
- 4 Million+ Social Media Followers
- 5 Million+ Stock Media for Use
* Secure Download
13. Adobe Spark
Compatibility: Windows and Mac
Adobe Sparks is also a web-based easy video editor, similar to Lumen5. It offers an easy user interface but is a little restricted when it comes to offering a bank of images and footage to use.
14. Videopad
Compatibility: Windows
VideoPad is a simple video editing software for beginners, maybe not suitable for professional use. It has features like 3D Video Editing, Sound Effects and pre-made transitions Library, Reduce Camera Shakes and Multiple Resolutions export support.
15. Freemake
Compatibility: Windows
Freemake is a free video converter that is used to convert and alter videos that can modify and convert videos, embed videos to websites, and extract audio from video clips simply and fast. It supports above 500 video file formats and is compatible with multiple audio and image file formats for slideshows and video clip creation.
Basic Features You Need in an Easy Video Editing Software
A software having:
- Easy montage maker
- Easy video cutter
- Easy video joiner
- Compositing multiple elements together
- Color grading
- Motion tracking
- Stabilization
- Titles
- Background replacement
- Basic color correction
- Cross dissolves and fade-to-black transitions
- Audio crossfades
- Audio level adjustment using keyframes
- Auto synchronization of additional audio tracks
- Image position adjustment using keyframes
- Footage speed adjustments
- Basic color correction
- Footage bins for roughly organizing imported footage
Why Video Editing Matters Nowadays?
If videos aren’t a primary focus of your content marketing plan, the probability is it’s soon going to be certain! Every next production is turning into video-based content, be it content marketers or SEOs.
Around 50% of the content marketers are using Facebook and YouTube channels for the sake of video distribution since online activity spent on watching videos is 50%.
Moreover, by 2021, video is going to be projected to account for more than 80% out of all internet traffic.
Therefore, it has become a need to focus on video content if you are looking to grow the organic traffic of your publications.
Filmora Free Video Editor
Create AI-Generated Video with Filmora
Filmora Free video editor offers a ChatGPT plug-in and AI tools to enhance your creative vision. Make your idea into reality.
Try It Free Try It Free Try It Free Learn More >
Basic Video Editing Terms You Should Know
Below are some of the important yet basic terms that you should know related to videography in general and video editing in specific as well, whether you are a beginner or professional.
Aspect ratio:
The aspect ratio is the ratio of width and height of a video. Examples of the most used aspect ratios are: 4:3, 16:9, 1.85:1.
Refer to the image given below for a better understanding.
B-roll:
B-roll facilities one with the flexibility, when editing, to the video editing rules as it is an add-on picture that makes a previously incoherent scene seamless.
As shown in the image below, B-roll is used to insert which can make the transition easy to look on the eyes.
Bit rate:
Bit rate, also known as data rate, refers to the amount of data used for every second within the video. It is most commonly expressed in kilobits per second (kbps).
Close up:
Close-up refers to the shots that frame to subject tightly.
For instance, if it is a person, then the close-up covers solely his face.
Color temperature:
Color temperature refers to the light visibility in a shot. Color temperature is expressed in Kelvin. The scale of color temperature ranges from cool to warm.
Composition:
Composition entails the process of combining multiple footages using video editing software.
Compression:
Compression is the process of minimizing the quantity of data utilized in a video file. It helps make in the process of uploading and downloading quite faster. This also leaves you with ample space for more of your publications.
Crop factor:
Crop factor refers to a number that expresses the ratio of the imaging area of a sensor to a full-frame sensor. It typically ranges from 1.3 to 2.0.
Cut-in
Cut-in refers to showing a specific part of a subject in order to emphasize a certain aspect or emotion. For instance, hand gestures may show nervousness, enthusiasm, agitation, etc.
Foley:
Often times the original sound of the scene captured in the video is not captured as naturally as they were supposed to sound like in reality. Hence, Foley is when you reproduce those sounds for that video.
Frame rate:
Frame rate refers to the video capturing by a shutter in a second or shutter cycling rate through opening and closing. Some of the common frame rates are 24, 25, 29.97, 30, etc. The frame rate is expressed in frames per second (fps).
High definition media interface:
HDMI is the connectors that digitally transfer audio and HD video to a television. This is helpful if you intend to work on a bigger screen or wish to share some of your productions.
Resolution:
Resolution refers to the horizontal and vertical pixels of your video. For instance 640×480 for SD and 1280×720 for HD. Sometimes resolution refers only to the number of pixels that paper vertically. For example 480p, 720p, and 1080p respectively.
J-Cut:
J-cut refers to the editing technique in which the audio from a next scene is overlapped with the image from the previous scene, such that the audio segment of the next scene begins playing prior to its picture.
Jumpcut:
Jumpcut editing techniques refer to an abrupt transition between the two consecutive frames. The entity in the video containing jump cuts appears to jump along with the scene from one place to another. This looks disruptive to the audience.
L-Cut:
L-cut is exactly opposite to J-cut where the audio from the next scene overlays the image from the next scene to play the audio after an image has been displayed in the video.
Lower third:
As the name suggests, the lower third is derived from the rule of third which refers to the type of title, mostly used by vloggers, broadcasters, interviewers, and you tubers.
Memory bank:
You can understand the term by thinking of a memory box where we keep certain things as a memory of the events in someone’s life. Memory bank serves the same purpose through the use of video. It often uses natural sounds, document travel or merely store moments in routine life.
Press kit:
Press kit is used to provide information regarding your productions to the press for promotional purposes. Such information is often background including synopsis, crew, cast’s bios Q&A with the director, production stills and its reviews.
Shot list:
The shot list refers to the checklist related to the shots that a videographer plans to include in his/her content. This may help you save time and gear with efficient planning and handling. This gives a sense of direction to your production.
Storyboard:
A storyboard is a drawing to illustrate the scenes in the video. This gives a direct and organized way to visualize the needs for the shots or animation.
Sync:
Synchronization, aka sync, refers to the alignment of audio with video imaging.
Rule of thirds:
The rule of third is a grid that helps you to compose interesting and balanced shots to make your productions aesthetically pleasing. The grid is similar to a tic-tac-toe board since it segregates the picture into 9 segments. It helps bring points of interest to be aligned with the lines or intersection given in the grid.
Three-point lighting:
This helps one to diminish the shadows for image balancing and provides an appealing contrast. These three lights are commonly known as fill, key, and backlight.
Tilts:
Tilts refer to the vertical transitions that your camera. This is the opposite of pans.
Pans:
Pans refer to the horizontal movements of your camera. This is exactly contrary to tilts.
White balance:
White balance refers to the process where the unrealistic color casts are removed in order to render a white object to be actually white in your photo, and not have other tints.
Wide-angle:
A wide-angel lens refers to a short focal length of a lens. This brings more of a subject rather than a subject being captured by a normal lens at equal distances.
Non-linear editing:
NLEs is a non-destructive editing technique that allows one to access any frame in a video clip regardless of the sequence in the clip. It gives you the freedom to easily include effects, transitions, fades, etc. which cannot be achieved with linear editing
Pixel aspect ratio:
Pixels are several tiny squares that build up an image in a video. Whereas, aspect ratio refers to the ratio of width to height of a video. Hence, the pixel aspect ratio (PAR) is the ratio of width to height of the pixels.
Conclusion
Be it Instagram stories, YouTube product testimonials, or Facebook ads, using these easy-to-use video editing software will elevate your content into a professional and slick look.
So, I hope you are now ready to get started.
Lights, camera, action!
For Win 7 or later (64-bit)
Secure Download
For macOS 10.14 or later
Secure Download
Click here to get Filmora for PC by email
or Try Filmora App for mobile >>>
download filmora app for ios ](https://app.adjust.com/b0k9hf2%5F4bsu85t ) download filmora app for android ](https://app.adjust.com/b0k9hf2%5F4bsu85t )
Ollie Mattison
Ollie Mattison is a writer and a lover of all things video.
Follow @Ollie Mattison
Slow Motion Magic: Unlocking the Power of Windows Live Movie Maker
How to Use Windows Live Movie Maker Slow Motion Effect
Ollie Mattison
Mar 27, 2024• Proven solutions
Slow motion effect is one of the most popular video effects. Fortunately, Windows Live Movie Maker provides this useful function for you to slow down your videos either for better presentation or better video effect. It is very easy to use Windows Live Movie Maker slow motion function. Just get Windows Live Movie Maker installed and follow the below guide to use slow motion effect in Windows Live Movie Maker.
How to slow down videos in Windows Live Movie Maker
Step 1. Add photos and videos to Windows Live Movie Maker
Click “Add videos and photos” to browse and select videos and photos from you computer to add. You can also drag and drop videos and photos to the storyboard.
Step 2. Slow down videos in Windows Live Movie Maker
To slow down videos, select the video clip and on the Edit tab under “Video Tools” choose a speed (depending on how much you want to speed the video up or slow it down).

For more Windows Live Movie Maker tips, please go to how to edit videos in Windows Live Movie Maker .
By the way, Windows Live Movie Maker is really a good free video editing software. However, compared with other video editing software, it lacks some features. Have your thought about any video editing software better than Windows Live Movie Maker, which can slow down the motion effects and with powerful edting tools at the same time?
More Powerful Video Movie Making Can Slow Down Videos
For video movie making, you can use Wondershare Filmora to make a stunning movie from your home videos. All popular video formats are supported and lots of free video transition effects are provided for your to make your videos more smooth. With an intuitive interface, even beginners can make stunning movies with this video editor software.
Besides, you can directly upload your video to YouTube for sharing with family and friends. What’s the best? There are more special editing features like Scene Detection, Close-up, Jump Cut, Mosaic, Tilt Shift, Picture-in-Picture, Face off, Audio Separation, Playback Speed. Hurry to free download Wondershare Filmora to edit your stunning videos now!


Ollie Mattison
Ollie Mattison is a writer and a lover of all things video.
Follow @Ollie Mattison
Ollie Mattison
Mar 27, 2024• Proven solutions
Slow motion effect is one of the most popular video effects. Fortunately, Windows Live Movie Maker provides this useful function for you to slow down your videos either for better presentation or better video effect. It is very easy to use Windows Live Movie Maker slow motion function. Just get Windows Live Movie Maker installed and follow the below guide to use slow motion effect in Windows Live Movie Maker.
How to slow down videos in Windows Live Movie Maker
Step 1. Add photos and videos to Windows Live Movie Maker
Click “Add videos and photos” to browse and select videos and photos from you computer to add. You can also drag and drop videos and photos to the storyboard.
Step 2. Slow down videos in Windows Live Movie Maker
To slow down videos, select the video clip and on the Edit tab under “Video Tools” choose a speed (depending on how much you want to speed the video up or slow it down).
For more Windows Live Movie Maker tips, please go to how to edit videos in Windows Live Movie Maker .
By the way, Windows Live Movie Maker is really a good free video editing software. However, compared with other video editing software, it lacks some features. Have your thought about any video editing software better than Windows Live Movie Maker, which can slow down the motion effects and with powerful edting tools at the same time?
More Powerful Video Movie Making Can Slow Down Videos
For video movie making, you can use Wondershare Filmora to make a stunning movie from your home videos. All popular video formats are supported and lots of free video transition effects are provided for your to make your videos more smooth. With an intuitive interface, even beginners can make stunning movies with this video editor software.
Besides, you can directly upload your video to YouTube for sharing with family and friends. What’s the best? There are more special editing features like Scene Detection, Close-up, Jump Cut, Mosaic, Tilt Shift, Picture-in-Picture, Face off, Audio Separation, Playback Speed. Hurry to free download Wondershare Filmora to edit your stunning videos now!
Ollie Mattison
Ollie Mattison is a writer and a lover of all things video.
Follow @Ollie Mattison
Also read:
- Updated In 2024, MKVtoolnix for macOS A Beginners Guide to Video Editing
- Updated 2024 Approved Create Stunning Videos From Images 10 Top Online Makers
- New The Art of the Ken Burns Effect Tips and Tricks for Stunning Results for 2024
- Updated No-Download Zone 10 Top Free Online Video Compressors
- New Thumbnail Mastery Boost Your YouTube Video Click-Through Rates for 2024
- Updated Discover the Power of VN Video Editor on PC for 2024
- New In 2024, The Ultimate Time-Saver How to Speed Up Videos in QuickTime Player
- Updated In 2024, How to Loop a Video for Free Best Tools for Windows, Mac, and Online
- Updated In 2024, Cut, Trim, and Edit Top 10 Free MP4 Video Editing Solutions
- New In 2024, Compress MPEG2 Videos Like a Pro A VirtualDub Tutorial
- New Maximize Your Reach Best Practices for Instagram Video Dimensions and Aspect Ratios
- Updated Top 14 Photo Music Video Maker for 2024
- In 2024, The Best Value Video Editing Software
- New 2024 Approved The Ultimate Virtualdub Alternative Guide
- Updated 2024 Approved 8 Excellent Online Tools to Convert Facebook Videos to MP3
- Updated Turn Photos Into Emotional Journeys Top Slideshow Video Makers Compared
- Updated 2024 Approved Trim and Edit MKV Files with Ease Top Mac Tools 2023
- Updated In 2024, The Ultimate List 10 Cartoon Video Creation Apps for Mobile
- New 2024 Approved Quick Guide How to Save Final Cut Pro Project?
- Updated 2024 Approved Start Recording Your Games Today 3 Easy Steps
- 2024 Approved Online Vertical Video Editing Made Easy Top Picks
- New Top-Rated Free Online Video Rotators for Flipping Videos for 2024
- Updated 2024 Approved Get the Job Done 10 Reliable Vegas Pro Alternatives for Mac Users
- In 2024, The Easiest Way to Edit FLV Files on Windows 8 Expert Tips and Tools
- Updated Make Movies on the Go Top 10 Android Video Editing Apps for 2024
- Updated 2024 Approved No-Cost 4K Video Conversion Top Picks
- New Top 5 Best Free WMV Video Joiners for 2024
- Updated 2024 Approved Do You Want Your Video Footage to Resemble Kodak Films? You Can Get the Old Kodak Film Look by Searching for Kodak 2383 LUT Free Download on the Internet
- In 2024, Planning to Use a Pokemon Go Joystick on Apple iPhone 13 Pro Max? | Dr.fone
- Looking For A Location Changer On Xiaomi 13 Ultra? Look No Further | Dr.fone
- Ultimate Guide from iPhone 13 iCloud Activation Lock Bypass
- In 2024, Fake the Location to Get Around the MLB Blackouts on OnePlus Ace 2 Pro | Dr.fone
- In 2024, CatchEmAll Celebrate National Pokémon Day with Virtual Location On Lava Blaze Curve 5G | Dr.fone
- The Top 10 Apple iPhone SE (2020) Emualtors for Windows, Mac and Android | Dr.fone
- In 2024, Does Life360 Notify When You Log Out On Apple iPhone 12 Pro Max? | Dr.fone
- Identify missing your drivers with Windows Device Manager on Windows 11 & 10 & 7
- 2024 Approved Learn to Merge Clips in DaVinci Resolve Simple Steps
- New In 2024, Free Ubuntu Video Editors Top Picks for Creators
- 9 Solutions to Fix Process System Isnt Responding Error on Oppo Reno 11F 5G | Dr.fone
- A Working Guide For Pachirisu Pokemon Go Map On Samsung Galaxy S23 | Dr.fone
- In 2024, Universal Unlock Pattern for Motorola Edge 40 Neo
- How to Change Google Play Location On Oppo A78 5G | Dr.fone
- In 2024, Forgotten The Voicemail Password Of Xiaomi Redmi Note 12R? Try These Fixes
- How Do You Get Sun Stone Evolutions in Pokémon For Vivo S17e? | Dr.fone
- In 2024, FRP Hijacker by Hagard Download and Bypass your Xiaomi 14 Pro FRP Locks
- In 2024, 3 Things You Must Know about Fake Snapchat Location On Motorola Edge 40 Neo | Dr.fone
- Title: Updated Audio Fade Ins and Outs Made Easy 2 Final Cut Pro Techniques for 2024
- Author: Ava
- Created at : 2024-05-19 14:42:31
- Updated at : 2024-05-20 14:42:31
- Link: https://video-content-creator.techidaily.com/updated-audio-fade-ins-and-outs-made-easy-2-final-cut-pro-techniques-for-2024/
- License: This work is licensed under CC BY-NC-SA 4.0.
