
:max_bytes(150000):strip_icc():format(webp)/001_2654847-5b99b903c9e77c005077d0d8.jpg)
Updated 2024 Approved 8 Best Educational Animation Software for School
Revolutionize Your Classroom: 10 Best Animation Software
8 Best Educational Animation Software for School

Shanoon Cox
Mar 27, 2024• Proven solutions
The use of educational animation software in schools is one of the most exciting progressions that have taken place in education technology.
With free to use animation software , helps the students in being creative and allows them to design their own movies, comic strips, and more that is endlessly creative.
Some animation for educational purposes also makes a class lively, lets the students absorb knowledge faster, encourages a child to explore a subject with full enthusiasm.
So in this article, I will walk you through the 8 best educational animation software. I hope it is helpful.
- Part 1: Why You Need to Use Educational Animation
- Part 2: 8 Best Animation for Educational Purposes
- Part 3: FAQ about Education Animation Software
You might also like: 10 Classical Animated Cartoon Types With Examples
Part 1: Why You Need to Use Educational Animation
1. Improve Students’ Presentation Skill
With the use of educational animation, the students are cheered to deliver engaging and interesting presentations. The animation is one of the best ways to encourage the students to put bigger and better efforts into their project works or presentations, slideshow creations, or visual concept explanations. Animation, being visually appealing helps to connect with audiences and helps the students learn a great skill for the future.
2. An Animation Is a Versatile Tool
The term multi-sensory method is often heard in various professional development sessions and meets. It is another strength of educational animation. The use of animation for educational purposes helps the students to witness and hear their favorite characters in difficult situations. They narrate the same story to their teachers and friends. Definitely, writing or reading or doing maths is important but the use of a multi-sensory educational animation tool helps to increase the critical thinking ability of a student and is extremely effective.
3. Teach Students How to Cooperate
Sharing an animated creation with friends across the globe helps the students in learning how to cooperate. There are various websites that allow you to create an animated movie or explanatory lessons and share it with a group of friends, not necessarily someone from your known circle. Anyone using the same tool can view your movie irrespective of language barriers. It gives the student a platform not only to connect and cooperate but also to the exposure.
Part 2: 8 Best Animation for Educational Purposes
1. iKITMovie
Do you love animation and wish to create one? The iKITMovie software is a great educational animation tool for adults as well as children. It helps in creating wonderful animated movies easily and quickly. Whether home or school, iKITMovie animation for educational purposes is used by students all across the globe. The features are-
- Overlay – explosions
- Updated new tutorials and tips and tricks
- 2,200+ Sound F/X
- Compatible with the school network
- Direct animation video upload on YouTube
- Addition of face to your characters
- Smoke or fire addition to your animated clip
- Voiceover, music, or sound addition to the animated scene

2. CLIP STUDIO
ClipStudio is the global leader in comic and manga creation software. It provides great and effective art tools for all comic artists or manga lovers. This educational animation software is perfect for both artists looking forward to paper and pen graphics as well as for artists looking for creating cartoons digitally. The features of ClipStudio includes-
- Supports frame by frame animation
- Amazing control over display and timing adjustments for creating animation
- Offer table light function
- Check several cels at one go with onion skinning technique
- Pencil, pen and advanced brushes tool to create original sketches
- Supports 3D figures and objects

3. Moovly
Moovly is one of the best educational animation tools for creating videos easily by the teachers and the students. Whether delivering presentations or classroom assignments, school marketing, or video journalism, Moovly helps in creating the best animation for educational purposes. The features of this software are-
- Access unlimitedly to over 500,000 illustrations, videos, music, sound, and photos
- Publish unlimitedly to Moovly Gallery
- Personal library storage up to 1GB
- Unlimited access to the Moovly Studio editor
- Free automatic education plan to the users from educational email domains known by Moovly

4. Harmony
This tool is used by users across the globe and lets you create any style of animation quickly. Harmony offers all tools that you require for paperless cut-out and the fusion animation creations. The features of Harmony includes-
- Occlusion and 3D camera moves
- Any style of animation, effects application, and 3D composition
- Blend the 3D imported models with 2D for hybrid productions
- Create art with vector tools
- Use Z-depth for creating multiplane scenes

5. Synfig Studio
A free 2D animation software, Synfig Studio is powerfully designed for creating film-quality animation using a vector and bitmap artwork. You don’t need to create a frame by frame animation with Synfig Studio. With less manpower and resources, create animation for educational purposes easily with the Synfig Studio software. The features are-
- Multiple layer support
- Create cutout animation using bitmap images
- Create smooth motion with automatic animation keyframes
- Greater range of dynamic imaging
- Pressure sensitivity based drawing tools

6. Blender
Blender is a 3D animation tool that can be used to create educational animation presentations or clips quite easily. The features of Blender are-
- Built-in path tracer engine renders stunning animations
- Real-time viewport preview
- High definition range lighting support
- A comprehensive range of modeling tools
- 3D painting with textured brushes and masking

7. GoAnimate
It is a great app that makes classroom studies more interesting where students can learn with the help of fascinating animated instructions. With GoAnimate, you can try your hand at creating animated videos at back-to-school nights, open houses, staff meetings, assemblies, and other various events. The features are-
- Make reports, presentations, and stories with animated videos
- Text-to-speech technology
- Special students engagement with animated videos
- Characters, props, backgrounds, etc. are apt for a K-12 audience
- Great tools at the click of the mouse

8. Animaker
Save your studio expense with Animaker educational animation tool. Now, you can create studio-like animation for educational purposes easily with Animaker. Make your own animated videos at home or in school. The features of Animaker are-
- 6 Popular Video Styles
- 720 different types of animated videos
- Create tutorial or funny videos and share

Part 2: FAQ about Education Animation Software
1. How do you make an educational animation video?
If you have set out to make an animation as a teaching aid, then you need the correct type of educational animation software to get you started. Up there with the greats are Renderforest, who let you make tutorials in child-friendly, fun fashion, and Filmora which features all sorts of other plugins to allow you to tailor the suite that you need.
Using Filmora you can replace After Effects, work with a Mac to edit footage, or create animations. There are limitless possibilities with this program – but it does let you create educational animation software pieces that will satisfy even the perfectionists out there.
2. Why is the animation used in education?
The Institute of Progressive Education estimates several reasons why animation helps children learn better. At an early age, the bright color and bold shapes of cartoons help us develop recognition, understand words, and even tell time.
As we grow up, animation triggers the centers of the brain that work best for visual learning. When we insert a moral into a cartoon, it is also more often remembered because of the visuals. It is like the difference between seeing a film and reading a summary of the film.
Educational Animation Software is the tool we use to help create educational animations. It is playing more and more of a role in the teaching world, the deeper we go into the digital age.
3. What are the benefits of using animation in teaching and learning of science subjects?
Animation allows students to develop their understanding by applying rational thinking to their imagination.
Educational Animation software has an especially important place in the teaching of science because it will enable children to understand what is going on at a microscopic level.
It does this by recreating things that cannot be seen by the naked eye. There was a study into this in the Journal of Life Science Education, which focused on cell biology education.
By showing cell mitosis in a cartoon, the teachers can communicate actions that they would never get to see.
4. What makes a good educational video?
Instructive recordings have become a significant piece of advanced education, giving a significant substance conveyance device in many flipped, mixed, and online classes.
Successful utilization of video as an instructive device is improved when educators think about three components: how to deal with a psychological heap of the video, how to boost understudy commitment with the video, and how to advance dynamic gaining from the video.
This exposition audits writing applicable to every one of these standards and proposes viable ways educators can utilize these standards when using video as an instructive device.
All three components together answer the question of how to make animated educational videos.
5. Which animation software is best for beginners?
Irrespective of whether these are just your initial steps in the field of animation, it is important to experiment.
So, knowing about alternative software or better ones from what you are using now is much required. You can also look for software that may bring in more versatility to your work. There are always different ways of improving what you are already doing.
Some of the best animation software includes Adobe character animator, Cartoon Animator 4, Stop Motion Studio, DigiCel FlipBook, Moho Pro, and Moho Debut, Toon Boom Harmony, Blender, Pencil2D, Synfig Studio, Animaker, Vyond, Moovly, Wideo, and more.
Conclusion
There are a plethora of educational animation apps and sites that help the students to make their video presentations interesting and exciting. They do not just enjoy creating animation for educational purposes but also use it as a tool to enhance their creative ability and share their creations on the global platform.
Shanoon Cox
Shanoon Cox is a writer and a lover of all things video.
Follow @Shanoon Cox
Shanoon Cox
Mar 27, 2024• Proven solutions
The use of educational animation software in schools is one of the most exciting progressions that have taken place in education technology.
With free to use animation software , helps the students in being creative and allows them to design their own movies, comic strips, and more that is endlessly creative.
Some animation for educational purposes also makes a class lively, lets the students absorb knowledge faster, encourages a child to explore a subject with full enthusiasm.
So in this article, I will walk you through the 8 best educational animation software. I hope it is helpful.
- Part 1: Why You Need to Use Educational Animation
- Part 2: 8 Best Animation for Educational Purposes
- Part 3: FAQ about Education Animation Software
You might also like: 10 Classical Animated Cartoon Types With Examples
Part 1: Why You Need to Use Educational Animation
1. Improve Students’ Presentation Skill
With the use of educational animation, the students are cheered to deliver engaging and interesting presentations. The animation is one of the best ways to encourage the students to put bigger and better efforts into their project works or presentations, slideshow creations, or visual concept explanations. Animation, being visually appealing helps to connect with audiences and helps the students learn a great skill for the future.
2. An Animation Is a Versatile Tool
The term multi-sensory method is often heard in various professional development sessions and meets. It is another strength of educational animation. The use of animation for educational purposes helps the students to witness and hear their favorite characters in difficult situations. They narrate the same story to their teachers and friends. Definitely, writing or reading or doing maths is important but the use of a multi-sensory educational animation tool helps to increase the critical thinking ability of a student and is extremely effective.
3. Teach Students How to Cooperate
Sharing an animated creation with friends across the globe helps the students in learning how to cooperate. There are various websites that allow you to create an animated movie or explanatory lessons and share it with a group of friends, not necessarily someone from your known circle. Anyone using the same tool can view your movie irrespective of language barriers. It gives the student a platform not only to connect and cooperate but also to the exposure.
Part 2: 8 Best Animation for Educational Purposes
1. iKITMovie
Do you love animation and wish to create one? The iKITMovie software is a great educational animation tool for adults as well as children. It helps in creating wonderful animated movies easily and quickly. Whether home or school, iKITMovie animation for educational purposes is used by students all across the globe. The features are-
- Overlay – explosions
- Updated new tutorials and tips and tricks
- 2,200+ Sound F/X
- Compatible with the school network
- Direct animation video upload on YouTube
- Addition of face to your characters
- Smoke or fire addition to your animated clip
- Voiceover, music, or sound addition to the animated scene
2. CLIP STUDIO
ClipStudio is the global leader in comic and manga creation software. It provides great and effective art tools for all comic artists or manga lovers. This educational animation software is perfect for both artists looking forward to paper and pen graphics as well as for artists looking for creating cartoons digitally. The features of ClipStudio includes-
- Supports frame by frame animation
- Amazing control over display and timing adjustments for creating animation
- Offer table light function
- Check several cels at one go with onion skinning technique
- Pencil, pen and advanced brushes tool to create original sketches
- Supports 3D figures and objects
3. Moovly
Moovly is one of the best educational animation tools for creating videos easily by the teachers and the students. Whether delivering presentations or classroom assignments, school marketing, or video journalism, Moovly helps in creating the best animation for educational purposes. The features of this software are-
- Access unlimitedly to over 500,000 illustrations, videos, music, sound, and photos
- Publish unlimitedly to Moovly Gallery
- Personal library storage up to 1GB
- Unlimited access to the Moovly Studio editor
- Free automatic education plan to the users from educational email domains known by Moovly
4. Harmony
This tool is used by users across the globe and lets you create any style of animation quickly. Harmony offers all tools that you require for paperless cut-out and the fusion animation creations. The features of Harmony includes-
- Occlusion and 3D camera moves
- Any style of animation, effects application, and 3D composition
- Blend the 3D imported models with 2D for hybrid productions
- Create art with vector tools
- Use Z-depth for creating multiplane scenes
5. Synfig Studio
A free 2D animation software, Synfig Studio is powerfully designed for creating film-quality animation using a vector and bitmap artwork. You don’t need to create a frame by frame animation with Synfig Studio. With less manpower and resources, create animation for educational purposes easily with the Synfig Studio software. The features are-
- Multiple layer support
- Create cutout animation using bitmap images
- Create smooth motion with automatic animation keyframes
- Greater range of dynamic imaging
- Pressure sensitivity based drawing tools
6. Blender
Blender is a 3D animation tool that can be used to create educational animation presentations or clips quite easily. The features of Blender are-
- Built-in path tracer engine renders stunning animations
- Real-time viewport preview
- High definition range lighting support
- A comprehensive range of modeling tools
- 3D painting with textured brushes and masking
7. GoAnimate
It is a great app that makes classroom studies more interesting where students can learn with the help of fascinating animated instructions. With GoAnimate, you can try your hand at creating animated videos at back-to-school nights, open houses, staff meetings, assemblies, and other various events. The features are-
- Make reports, presentations, and stories with animated videos
- Text-to-speech technology
- Special students engagement with animated videos
- Characters, props, backgrounds, etc. are apt for a K-12 audience
- Great tools at the click of the mouse
8. Animaker
Save your studio expense with Animaker educational animation tool. Now, you can create studio-like animation for educational purposes easily with Animaker. Make your own animated videos at home or in school. The features of Animaker are-
- 6 Popular Video Styles
- 720 different types of animated videos
- Create tutorial or funny videos and share
Part 2: FAQ about Education Animation Software
1. How do you make an educational animation video?
If you have set out to make an animation as a teaching aid, then you need the correct type of educational animation software to get you started. Up there with the greats are Renderforest, who let you make tutorials in child-friendly, fun fashion, and Filmora which features all sorts of other plugins to allow you to tailor the suite that you need.
Using Filmora you can replace After Effects, work with a Mac to edit footage, or create animations. There are limitless possibilities with this program – but it does let you create educational animation software pieces that will satisfy even the perfectionists out there.
2. Why is the animation used in education?
The Institute of Progressive Education estimates several reasons why animation helps children learn better. At an early age, the bright color and bold shapes of cartoons help us develop recognition, understand words, and even tell time.
As we grow up, animation triggers the centers of the brain that work best for visual learning. When we insert a moral into a cartoon, it is also more often remembered because of the visuals. It is like the difference between seeing a film and reading a summary of the film.
Educational Animation Software is the tool we use to help create educational animations. It is playing more and more of a role in the teaching world, the deeper we go into the digital age.
3. What are the benefits of using animation in teaching and learning of science subjects?
Animation allows students to develop their understanding by applying rational thinking to their imagination.
Educational Animation software has an especially important place in the teaching of science because it will enable children to understand what is going on at a microscopic level.
It does this by recreating things that cannot be seen by the naked eye. There was a study into this in the Journal of Life Science Education, which focused on cell biology education.
By showing cell mitosis in a cartoon, the teachers can communicate actions that they would never get to see.
4. What makes a good educational video?
Instructive recordings have become a significant piece of advanced education, giving a significant substance conveyance device in many flipped, mixed, and online classes.
Successful utilization of video as an instructive device is improved when educators think about three components: how to deal with a psychological heap of the video, how to boost understudy commitment with the video, and how to advance dynamic gaining from the video.
This exposition audits writing applicable to every one of these standards and proposes viable ways educators can utilize these standards when using video as an instructive device.
All three components together answer the question of how to make animated educational videos.
5. Which animation software is best for beginners?
Irrespective of whether these are just your initial steps in the field of animation, it is important to experiment.
So, knowing about alternative software or better ones from what you are using now is much required. You can also look for software that may bring in more versatility to your work. There are always different ways of improving what you are already doing.
Some of the best animation software includes Adobe character animator, Cartoon Animator 4, Stop Motion Studio, DigiCel FlipBook, Moho Pro, and Moho Debut, Toon Boom Harmony, Blender, Pencil2D, Synfig Studio, Animaker, Vyond, Moovly, Wideo, and more.
Conclusion
There are a plethora of educational animation apps and sites that help the students to make their video presentations interesting and exciting. They do not just enjoy creating animation for educational purposes but also use it as a tool to enhance their creative ability and share their creations on the global platform.
Shanoon Cox
Shanoon Cox is a writer and a lover of all things video.
Follow @Shanoon Cox
Resizing Your Video: How to Change Aspect Ratio in Final Cut Pro
Wondershare Filmora
Create stunning effects with simple clicks.
Most of you must be wondering what is the purpose of changing the aspect ratio of a video. The aspect ratio is the size of the frame occupied by the video during the play mode. In other words, you can refer to it as the shape of the image concerning its width and height. There are surplus ways to change the size of the images but you must search for optimal tools to establish this task. While modifying the width and height values, make a note of the image resolution. You must resize the images without affecting the resolution and quality of the video. Making changes in one image parameter should not affect the other attributes.

The Final Cut Pro app helps to carry out this task professionally without any issues. This video editor works on every detail of the video and implements respective changes on the image size retaining the quality of the file. Quickly scroll down for more details on the efficient utilization of the Final Cut Pro app in modifying the aspect ratio of the video.
In this article
01 How to change the aspect ratio in the Final Cut Pro?
02 Why Can’t I change the aspect ratio of my video?
03 What is the common aspect ratio of videos?
How to change the aspect ratio in the Final Cut Pro?
The Final Cut Pro app is an exclusive program that edits videos professionally. The easy interface encourages the newbie to work on it without any hesitation. This app comprises essential and advanced controls to bring a great impact on the videos as per your requirements. It is enough if you make the right click to accomplish the desired effect on the video. Here, you will learn how to modify the aspect ratio in your video to resize the media file without affecting its quality.
There is a need to reshape the video frame for various reasons. If you want to upload any videos on a social media website, the platform supports only restricted aspect ratio video size. In those scenarios, you must learn to reshape your memorable captures without distorting the crucial factors in the video files. Watch the steps below carefully to study the change in aspect ratio attributes in the videos.
Step1Install the application
Download the Final Cut Pro app and install it in your system. Then, launch the tool and upload the desired video that requires the resize operation. Place the video on the timeline and move the pointer to any area on the video to work on its aspect ratio values.

Step2Modify the values
At the right top of the screen, you will find the property window. Tap the ‘Modify’ option to alter the aspect ratio values according to your needs. In the pop-up window change the Video format to ‘Custom’ and alter the resolution values based on the required video size. To convert the shape to 16:9, enter the values like 1920 and 1080. For a square type frame, type in the values like 1080 and 1080. Ensure that both the values are the same for a square type video size.
The values you enter nearby the ‘Video’ label carries the size of the video image. Based on the requirement, you can alter them optimally.


Finally, save the changes and witness the resize operation on the video. You can further modify the values if you are not convinced with the acquired shape.
The aspect ratio establishes complete control of the video size. Alter the video size and use the files on any platform without any hesitation on its compatibility.
For Win 7 or later (64-bit)
For macOS 10.12 or later
Why Can’t I change the aspect ratio of my video?
There are scenarios you may encounter while changing the aspect ratio of your videos. You can refer below to the common issues that require a better fix to overcome the irregular reframing activities.
Problem: Even after changing the resolution values to 1440 X 1080 using the final cut pro app, the video frame covers the widescreen without modifying the size concerning the assigned values.
Solution 1: In this situation, you must fix the default spatial fit settings to fill the format in the final cut pro app. When you import the videos for editing, automatically the video would have taken this fit option. Before working on the aspect ratio values, modify the fit to fill settings so that you can crop the unwanted areas in the video frames precisely.
Solution 2: Another alternate solution to overcome the above problem is that you must disclose the Video inspector in your Final Cut Pro application. Then, in the ‘Anamorphic Override’ settings change the value to Standard instead of the none or widescreen mode. By altering this value, you can get the desired outcomes without any hesitation.
When you struggle to change the aspect ratio in your videos using the Final Cut Pro app, you must look for alternative solutions to fix them.
What is the common aspect ratio of videos?
The allowable aspect ratio for the videos and images differs with the social media platforms. In the case of the Facebook cover photo, the image size varies with desktop and mobile view. You can go for a horizontal frame with an aspect ratio of 16:9. Here, the width is wider than height.
For Twitter and Facebook posts, set the aspect ratio for the media files to 1200 x 675 pixels. In other terms 16:9, again it looks more or like a horizontal frame. In the YouTube platform, the permitted channel art size is 2560 x 1440 and the thumbnail is 1280 x 720.
The Instagram and Pinterest pins opt for square type video frames like 1200 X 1200 pixels or 500 X 500 pixels. The latter value holds good to set profile pictures for your account. The YouTube channel icon must be 800 X 800 in a square frame to enhance visibility.

The Instagram posts allow the tallest media files like 1080 X 1350. The Snapchat and TikTok go with 1080 X 1920 values. You can find the long Pinterest carrying posts measuring 1000 X 2100. Though this platform does not recommend this size, still the posts are successfully uploaded in this dimension flawlessly.
It is highly recommended to follow the above-discussed guidelines to post the favorite videos on the relevant social media platform without witnessing any compatibility issues. These are the common aspect ratio dimensions supported by the respective platforms. While posting the media files in this environment, you must abide by its standards to get rid of unwanted uploading issues. In certain digital spaces, you may not know the reason for the failure in uploading the image or videos. In those scenarios, read the guidelines provided by that platform and modify the media file dimension according to those values and then try uploading it again. Most video upload failure happens due to the incompatibility of the media file sizes. Watch the dimensions before posting or uploading any media files in the online space.
Most social media platform allows both landscape and portrait video sizes optimally. You can switch to any size format as per your comfort. When you upload larger images or videos either you will receive an error message or it forces you to crop the content to fit perfectly with their guidelines. To overcome such a situation, you can check out the permittable file size before uploading the media files into its environment.
Conclusion
Therefore, you had a better understanding of how to change the aspect ratio using the Final Cut Pro program. You can follow the above-discussed instructions and carry out the task as per your needs.
A short synopsis of the common media file sizes permitted on social media platforms has been listed out in this article and these enlightening facts help you to get rid of file size compatibility issues. Overcome the challenges in modifying the rigid file sizes of the videos using the forceful altering options. Connect with this article to discover exciting performances of the Final Cut Pro tool and its potential utilization in editing a media file. Stay tuned for jaw-dropping information on the video edition functionalities of the incredible application Final Cut Pro.
Wondershare Filmora
Do magic with Filmora. Try it now.
Try It Free Try It Free Try It Free Learn More >

Most of you must be wondering what is the purpose of changing the aspect ratio of a video. The aspect ratio is the size of the frame occupied by the video during the play mode. In other words, you can refer to it as the shape of the image concerning its width and height. There are surplus ways to change the size of the images but you must search for optimal tools to establish this task. While modifying the width and height values, make a note of the image resolution. You must resize the images without affecting the resolution and quality of the video. Making changes in one image parameter should not affect the other attributes.
The Final Cut Pro app helps to carry out this task professionally without any issues. This video editor works on every detail of the video and implements respective changes on the image size retaining the quality of the file. Quickly scroll down for more details on the efficient utilization of the Final Cut Pro app in modifying the aspect ratio of the video.
In this article
01 How to change the aspect ratio in the Final Cut Pro?
02 Why Can’t I change the aspect ratio of my video?
03 What is the common aspect ratio of videos?
How to change the aspect ratio in the Final Cut Pro?
The Final Cut Pro app is an exclusive program that edits videos professionally. The easy interface encourages the newbie to work on it without any hesitation. This app comprises essential and advanced controls to bring a great impact on the videos as per your requirements. It is enough if you make the right click to accomplish the desired effect on the video. Here, you will learn how to modify the aspect ratio in your video to resize the media file without affecting its quality.
There is a need to reshape the video frame for various reasons. If you want to upload any videos on a social media website, the platform supports only restricted aspect ratio video size. In those scenarios, you must learn to reshape your memorable captures without distorting the crucial factors in the video files. Watch the steps below carefully to study the change in aspect ratio attributes in the videos.
Step1Install the application
Download the Final Cut Pro app and install it in your system. Then, launch the tool and upload the desired video that requires the resize operation. Place the video on the timeline and move the pointer to any area on the video to work on its aspect ratio values.
Step2Modify the values
At the right top of the screen, you will find the property window. Tap the ‘Modify’ option to alter the aspect ratio values according to your needs. In the pop-up window change the Video format to ‘Custom’ and alter the resolution values based on the required video size. To convert the shape to 16:9, enter the values like 1920 and 1080. For a square type frame, type in the values like 1080 and 1080. Ensure that both the values are the same for a square type video size.
The values you enter nearby the ‘Video’ label carries the size of the video image. Based on the requirement, you can alter them optimally.
Finally, save the changes and witness the resize operation on the video. You can further modify the values if you are not convinced with the acquired shape.
The aspect ratio establishes complete control of the video size. Alter the video size and use the files on any platform without any hesitation on its compatibility.
For Win 7 or later (64-bit)
For macOS 10.12 or later
Why Can’t I change the aspect ratio of my video?
There are scenarios you may encounter while changing the aspect ratio of your videos. You can refer below to the common issues that require a better fix to overcome the irregular reframing activities.
Problem: Even after changing the resolution values to 1440 X 1080 using the final cut pro app, the video frame covers the widescreen without modifying the size concerning the assigned values.
Solution 1: In this situation, you must fix the default spatial fit settings to fill the format in the final cut pro app. When you import the videos for editing, automatically the video would have taken this fit option. Before working on the aspect ratio values, modify the fit to fill settings so that you can crop the unwanted areas in the video frames precisely.
Solution 2: Another alternate solution to overcome the above problem is that you must disclose the Video inspector in your Final Cut Pro application. Then, in the ‘Anamorphic Override’ settings change the value to Standard instead of the none or widescreen mode. By altering this value, you can get the desired outcomes without any hesitation.
When you struggle to change the aspect ratio in your videos using the Final Cut Pro app, you must look for alternative solutions to fix them.
What is the common aspect ratio of videos?
The allowable aspect ratio for the videos and images differs with the social media platforms. In the case of the Facebook cover photo, the image size varies with desktop and mobile view. You can go for a horizontal frame with an aspect ratio of 16:9. Here, the width is wider than height.
For Twitter and Facebook posts, set the aspect ratio for the media files to 1200 x 675 pixels. In other terms 16:9, again it looks more or like a horizontal frame. In the YouTube platform, the permitted channel art size is 2560 x 1440 and the thumbnail is 1280 x 720.
The Instagram and Pinterest pins opt for square type video frames like 1200 X 1200 pixels or 500 X 500 pixels. The latter value holds good to set profile pictures for your account. The YouTube channel icon must be 800 X 800 in a square frame to enhance visibility.
The Instagram posts allow the tallest media files like 1080 X 1350. The Snapchat and TikTok go with 1080 X 1920 values. You can find the long Pinterest carrying posts measuring 1000 X 2100. Though this platform does not recommend this size, still the posts are successfully uploaded in this dimension flawlessly.
It is highly recommended to follow the above-discussed guidelines to post the favorite videos on the relevant social media platform without witnessing any compatibility issues. These are the common aspect ratio dimensions supported by the respective platforms. While posting the media files in this environment, you must abide by its standards to get rid of unwanted uploading issues. In certain digital spaces, you may not know the reason for the failure in uploading the image or videos. In those scenarios, read the guidelines provided by that platform and modify the media file dimension according to those values and then try uploading it again. Most video upload failure happens due to the incompatibility of the media file sizes. Watch the dimensions before posting or uploading any media files in the online space.
Most social media platform allows both landscape and portrait video sizes optimally. You can switch to any size format as per your comfort. When you upload larger images or videos either you will receive an error message or it forces you to crop the content to fit perfectly with their guidelines. To overcome such a situation, you can check out the permittable file size before uploading the media files into its environment.
Conclusion
Therefore, you had a better understanding of how to change the aspect ratio using the Final Cut Pro program. You can follow the above-discussed instructions and carry out the task as per your needs.
A short synopsis of the common media file sizes permitted on social media platforms has been listed out in this article and these enlightening facts help you to get rid of file size compatibility issues. Overcome the challenges in modifying the rigid file sizes of the videos using the forceful altering options. Connect with this article to discover exciting performances of the Final Cut Pro tool and its potential utilization in editing a media file. Stay tuned for jaw-dropping information on the video edition functionalities of the incredible application Final Cut Pro.
Wondershare Filmora
Do magic with Filmora. Try it now.
Try It Free Try It Free Try It Free Learn More >
AVI Video Cutting Made Easy: Top 16 Tools for Windows, MAC, Android, iPhone, and Online
With the growing fame of video-sharing and social media applications like Twitter, Instagram, and TikTok, the demand for simple and fast video cutting and trimming tools has dramatically increased. Nowadays, you don’t have to play with complex video editing tools to produce high-quality videos.
Thanks to several user-friendly editing software to make things easy for everybody. However, finding the right programs to trim/cut videos is still challenging, especially in AVI format.
But, guess what? These top 16 AVI video cutters for Windows, MAC, Android, iPhone, and online will make video cutting and trimming fun, especially when you learn to do it using Filmora.
In this Article
Part 1: Best AVI Video Cutter to Trim/Cut AVI Video on Windows and MAC – Filmora Video Cutter [with steps}
Part 2: Top 3 Free AVI Video Cutter on Windows
Part 3: Top 3 Free AVI Video Cutter on MAC
Part 4: Top 3 Free AVI Video Cutter on Android
Part 5: Top 3 Free AVI Video Cutter on iPhone
Part 6: Top 3 Free AVI Video Cutter Online
Part 7: Bottom Line
Part 8: FAQs
Part 1: Best AVI Video Cutter to Trim/Cut AVI Video on Windows and MAC – Filmora Video Cutter [with steps]
Filmora by Wondershare is a star video editor with outstanding outcomes. Whether you have a MAC or Windows PC, you can download Filmora regardless of your operating system. The program best serves those who intend to make high-quality videos. The software provides editing support for all video formats, including AVI.
Although Filmora is an affordable editor with tons of audio and video editing options, you can still download the software for free and create projects if watermarks don’t bother you. Moreover, you can count this tool’s capabilities in cropping, resizing, and Chroma screen support. But that’s not the only sweet fruit.
In fact, Filmora is equipped with many jaw-dropping features, including preset templates, auto beat sync, split-screen, speed ramping, motion tracking, keyframing, creative transitions, titles, filters, and much more. And the best part is, you can learn and understand Filmora in no time. That’s why the program is loved and supported by all types of users.
So does Filmora helps cut and trim AVI videos? Yes! It does if you follow these steps correctly.
Step 1: Download Filmora Video Editor
First, download Filmora Video Editor by choosing your operating system, as seen in the screenshot below.
Run the setup and let it finish without any pause or break.
Step 2: Import Your Video to Filmora Video Editor
Importing your AVI video is a very simple process. Just click on the “Film Clip” icon.
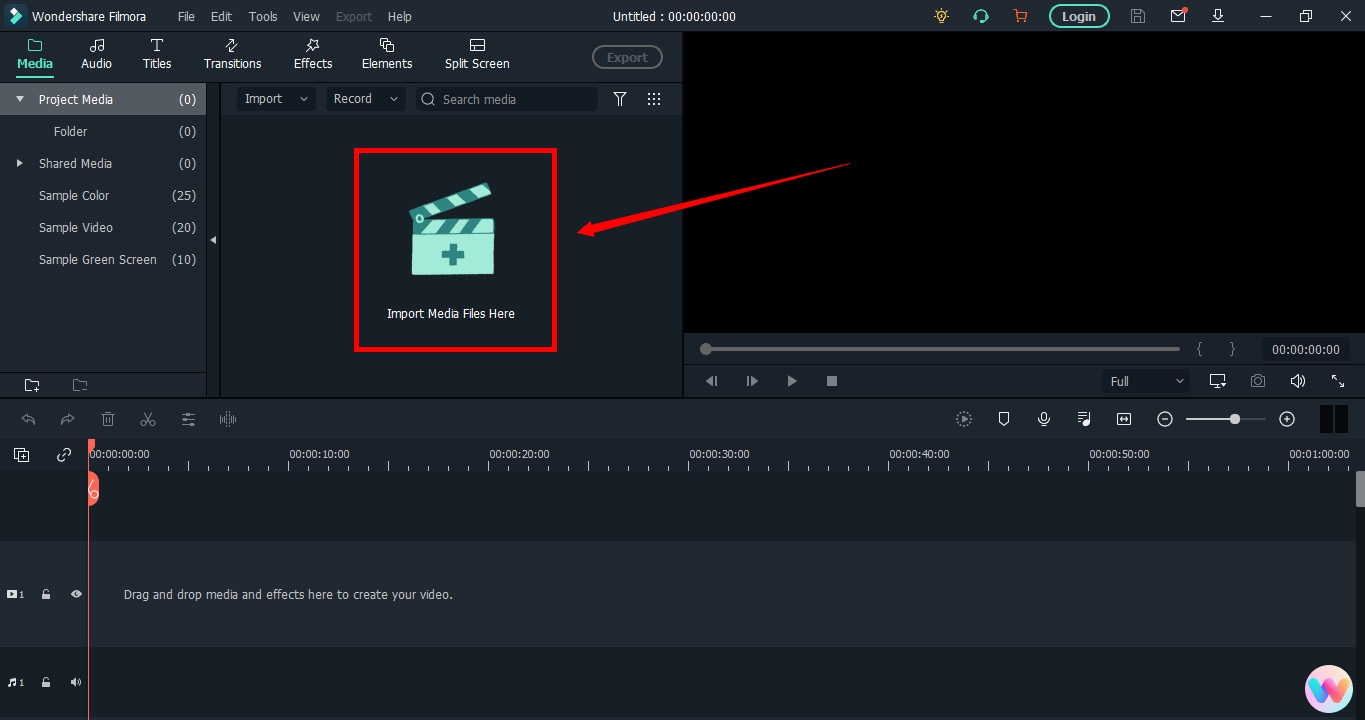
It will open a new window screen on your computer to select the video from the directory. Find the clip you want to import and cut. Use your mouse to select it and click the “Open” button.
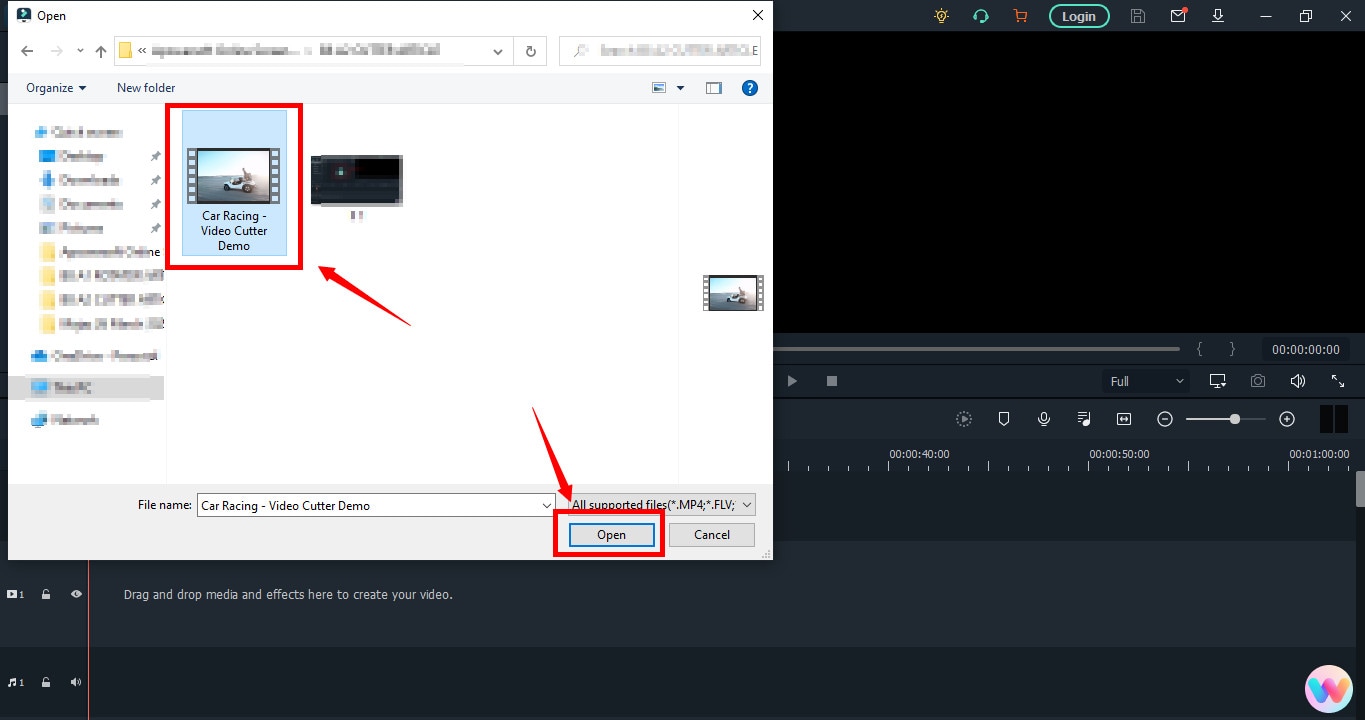
The video will be loaded in the “Media” folder of Filmora. The clip’s thumbnail should be visible to assure you have done everything correctly.
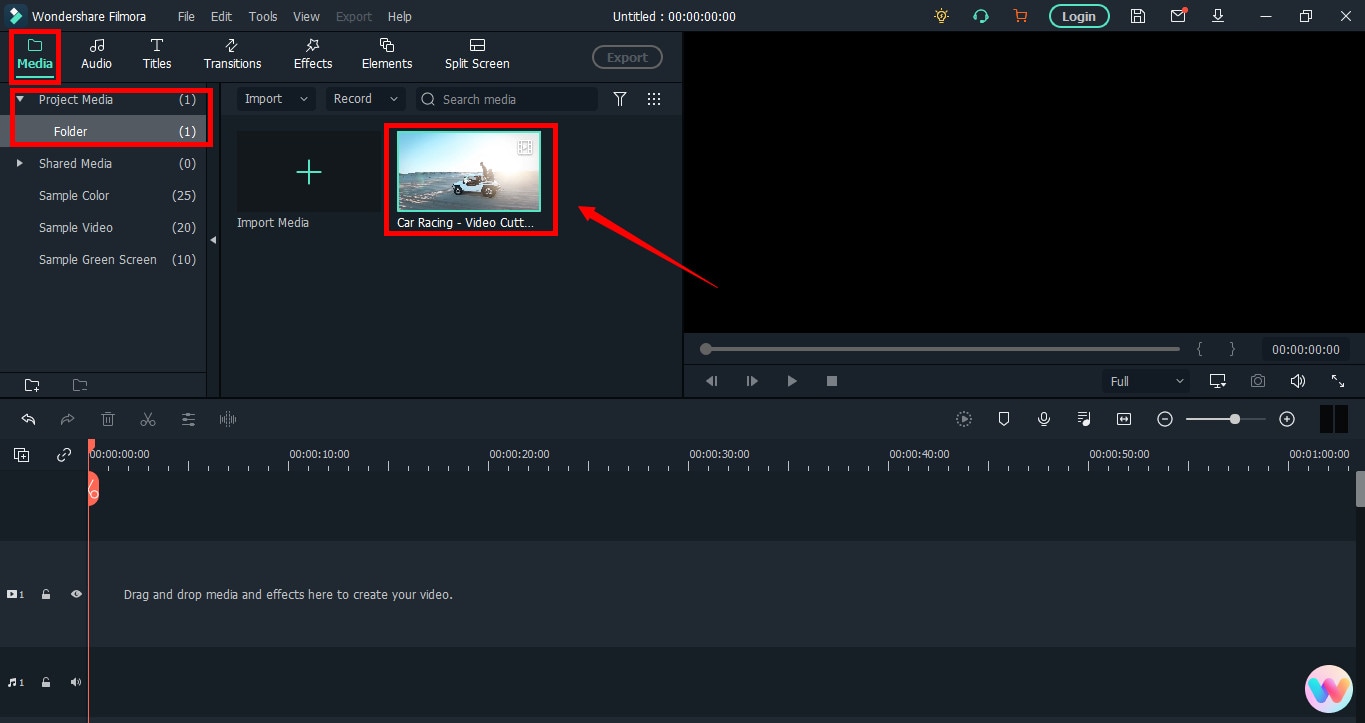
If you can see that, let’s go to the next step.
Step 3: Drag and Drop Video to Filmora’s Timeline
Select the video in the media folder by clicking over it once. Now, without leaving the hold of the left button of your mouse, slide the video down to the track in the timeline.
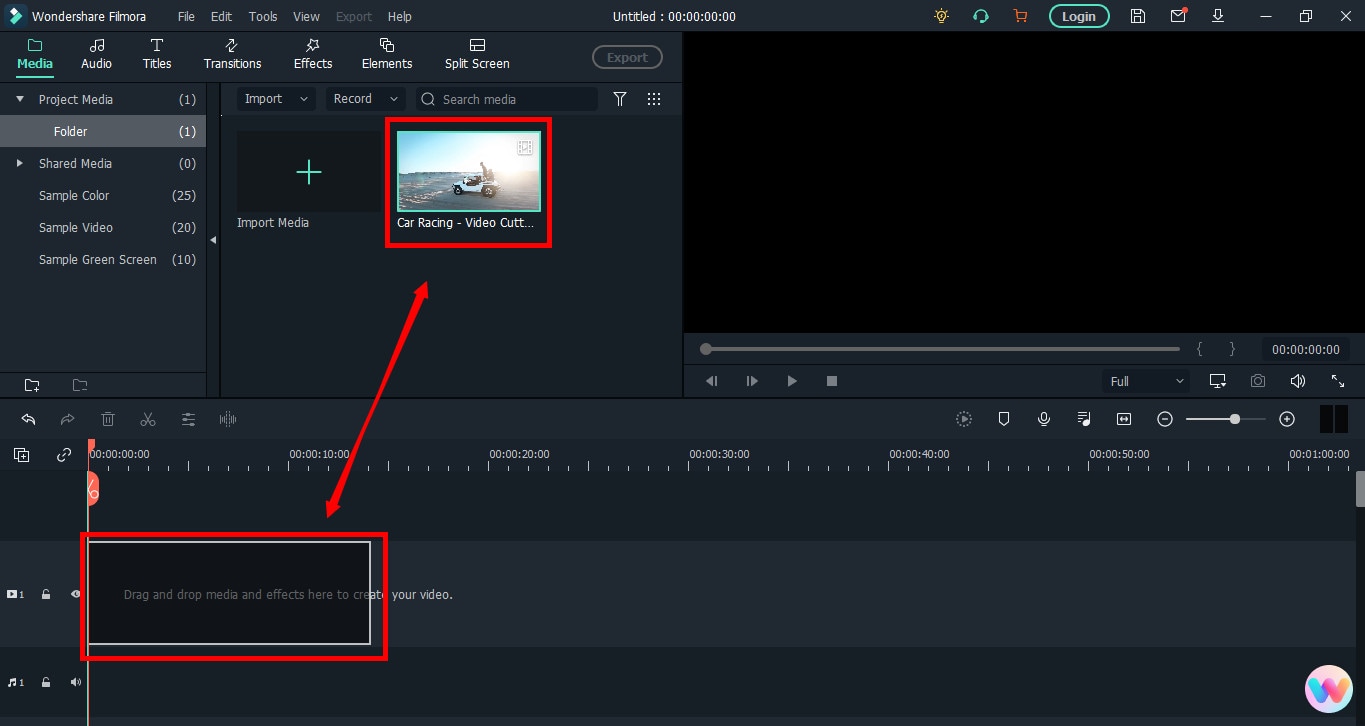
After that, a message will pop up, asking about your preference for the project settings. It is recommended to choose the “Match to Media” option unless you’re an experienced video editor who knows how to play with the resolution and frame rates.
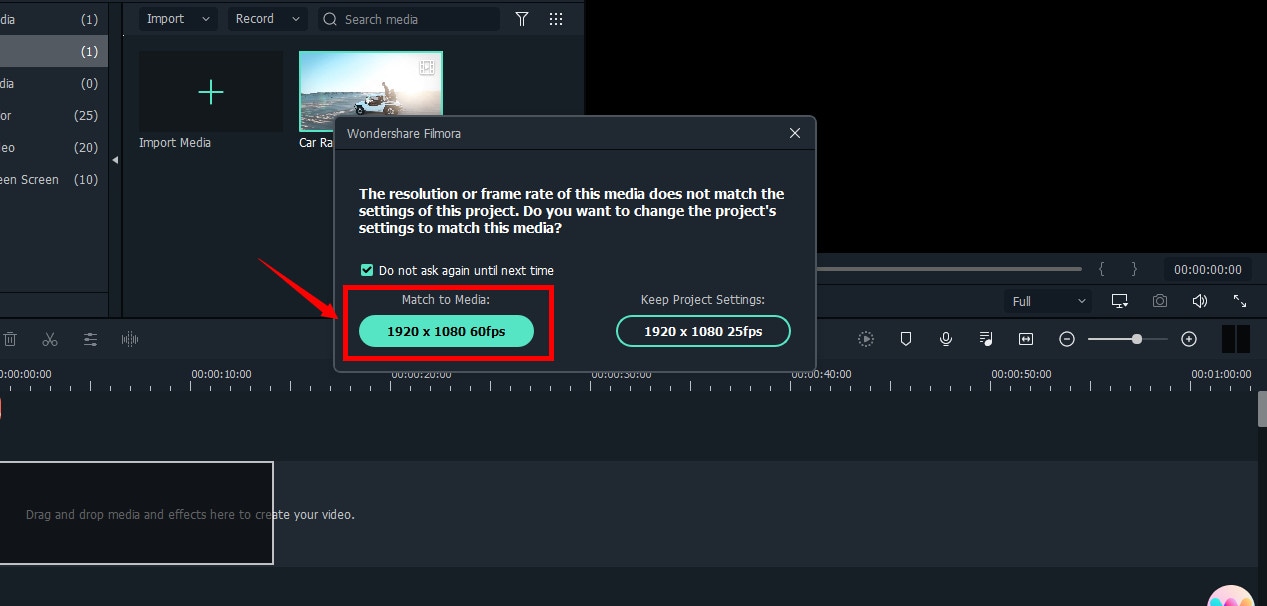
You will see the video on the timeline with its preview on the “Preview Screen” on the right side of the interface.
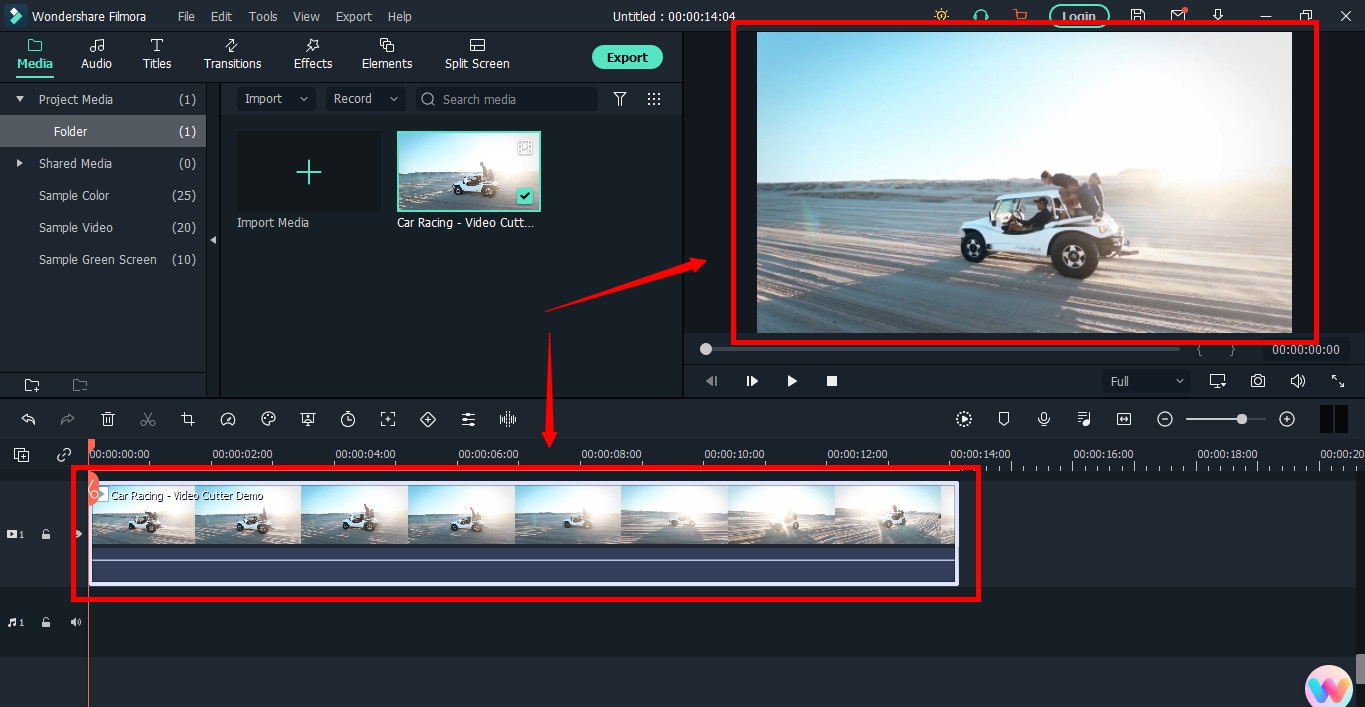
Step 4: Cutting Your Video in Filmora
Here comes the core step you have been waiting for. But before you go any further, you need to know about the “Playhead.”
Playhead is an orange-reddish marker you can find on the timeline.
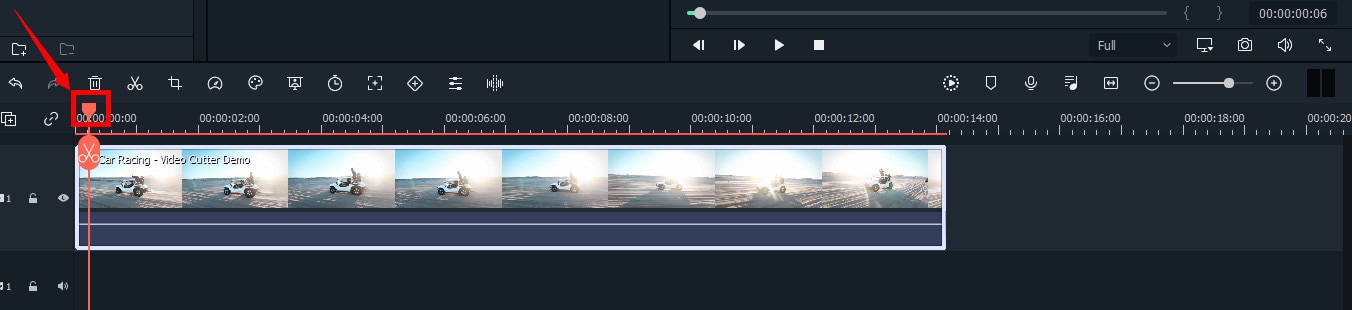
It has an important role in cutting your videos.
So, move the playhead to your desired frame and click on the “scissor” icon to make the “starting” cut.
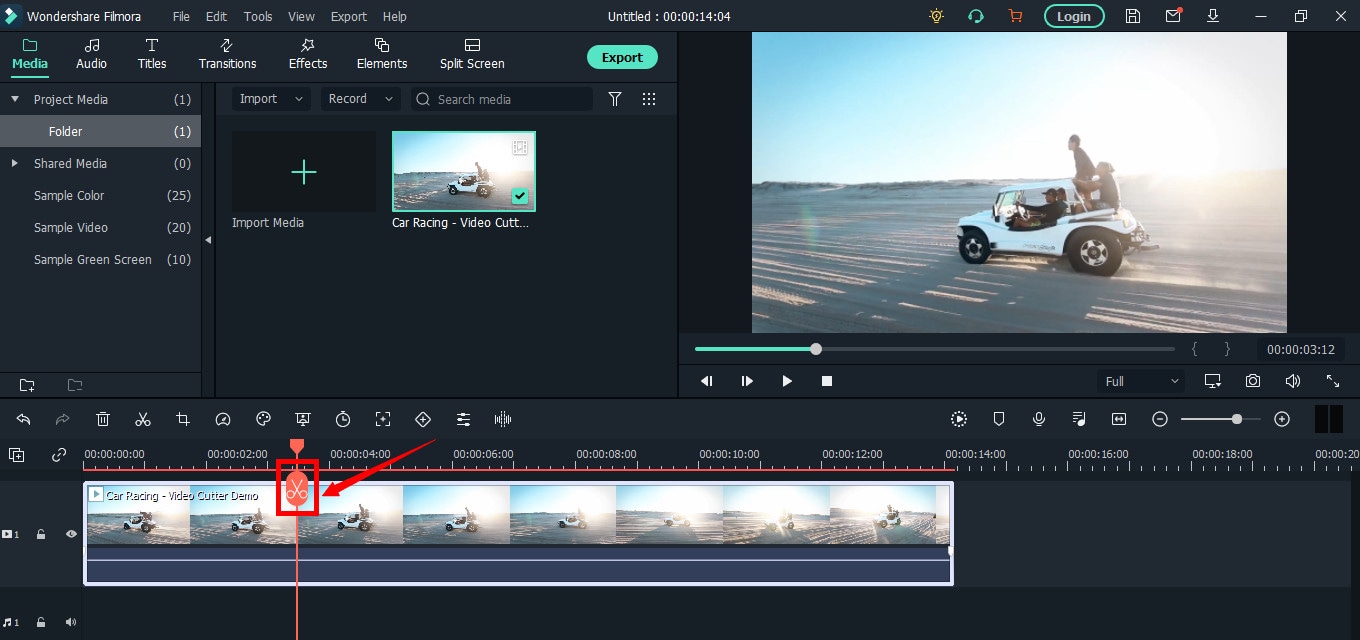
As soon as you do it, you will see that the single clip is now divided into two parts similar to this image.
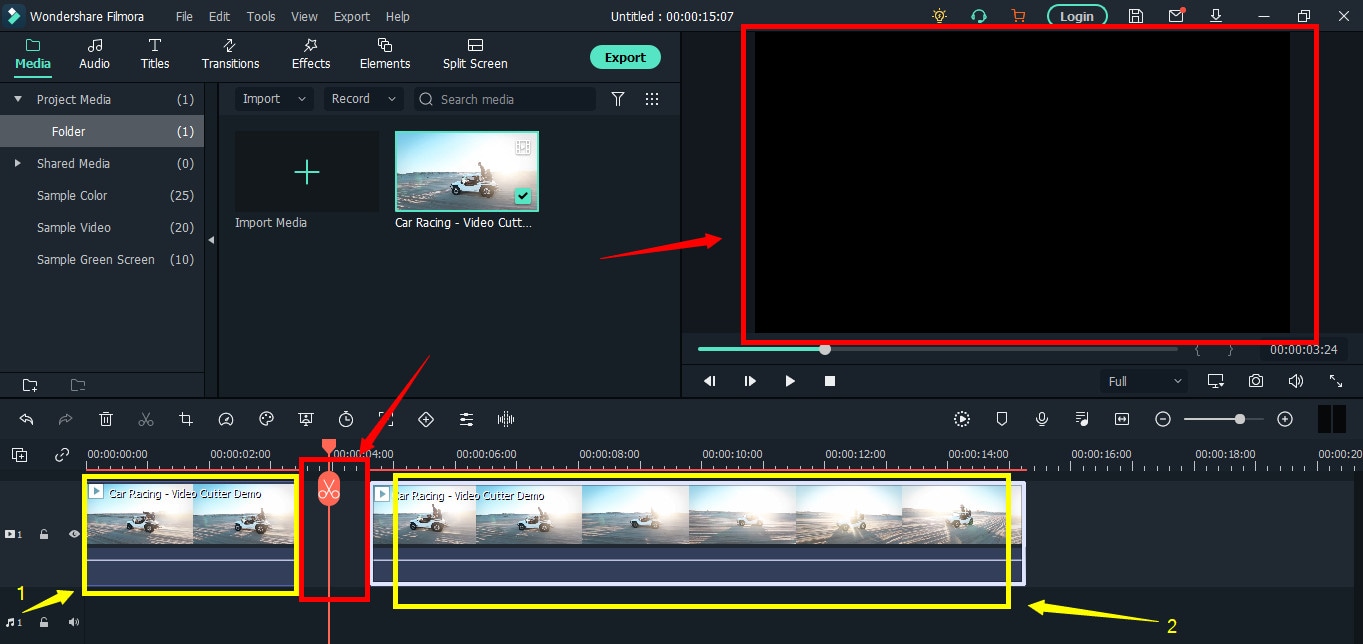
The “Red” marked area in the above screenshot ensures a gap between the clips on the timeline. The “Yellow” arrows confirm two separate clips of the same video.
Place the two clips together as seen in this “Green” area.
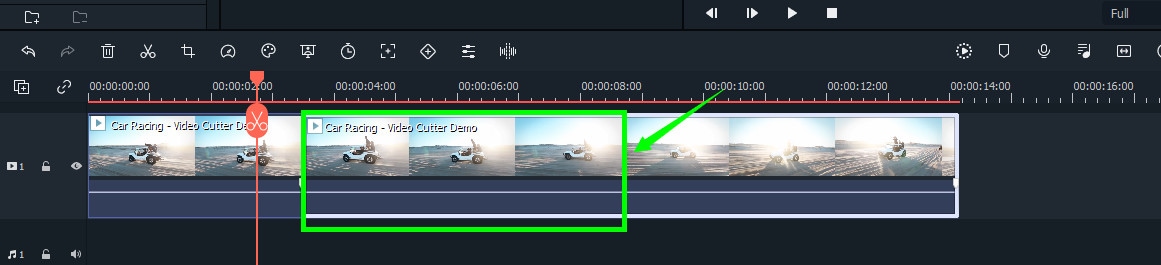
And place the playhead anywhere on the clip. And click on the “scissor” icon once again to make the “ending” cut (second cut).
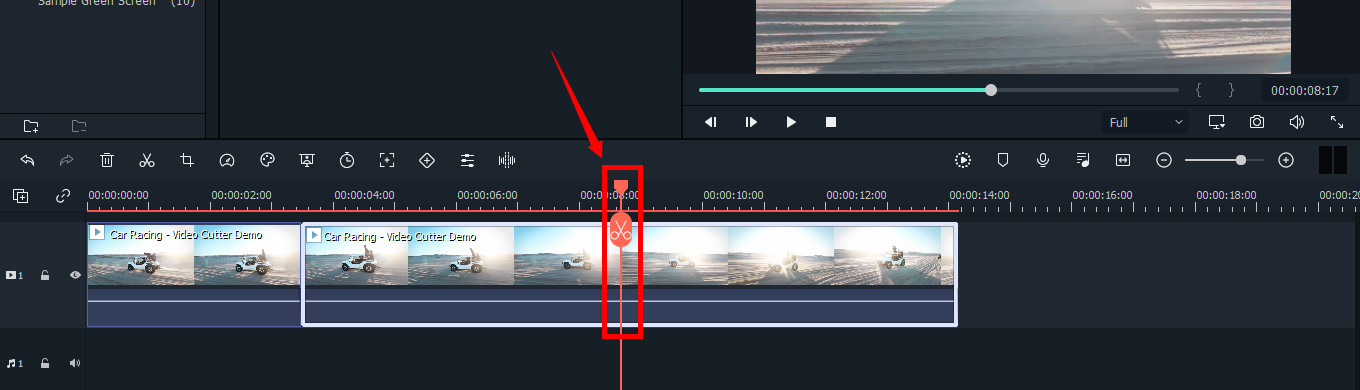
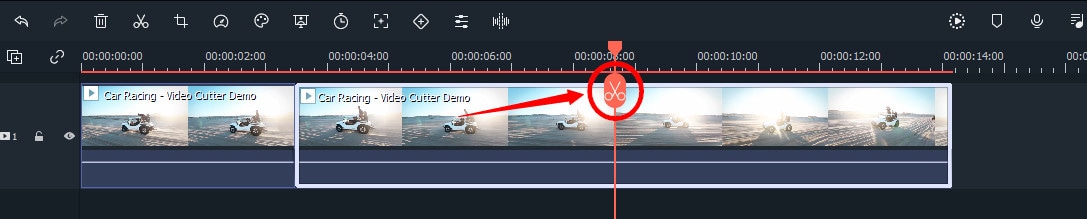
If done correctly, there should be three clips now of the same video, as you can observe in this screenshot.
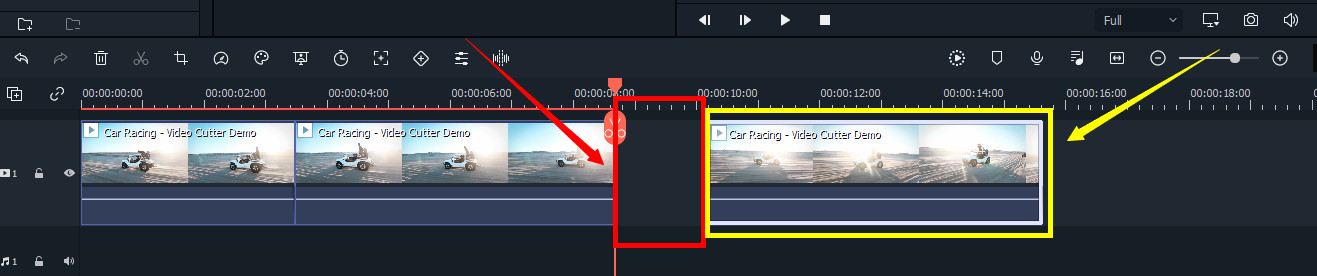
Again, the “Red” area in the above photo indicates the gap, and the “Yellow” area ensures a third segment of the video.
Note: The gaps you can see in the divided clips are made intentionally for understanding. Practically, Filmora doesn’t move the clip or make gaps in between after you have made the cuts.
Keep in mind that there are three clips on the timeline. Now, if you want to remove the second clip from the video, you need to select that portion first by clicking on it.
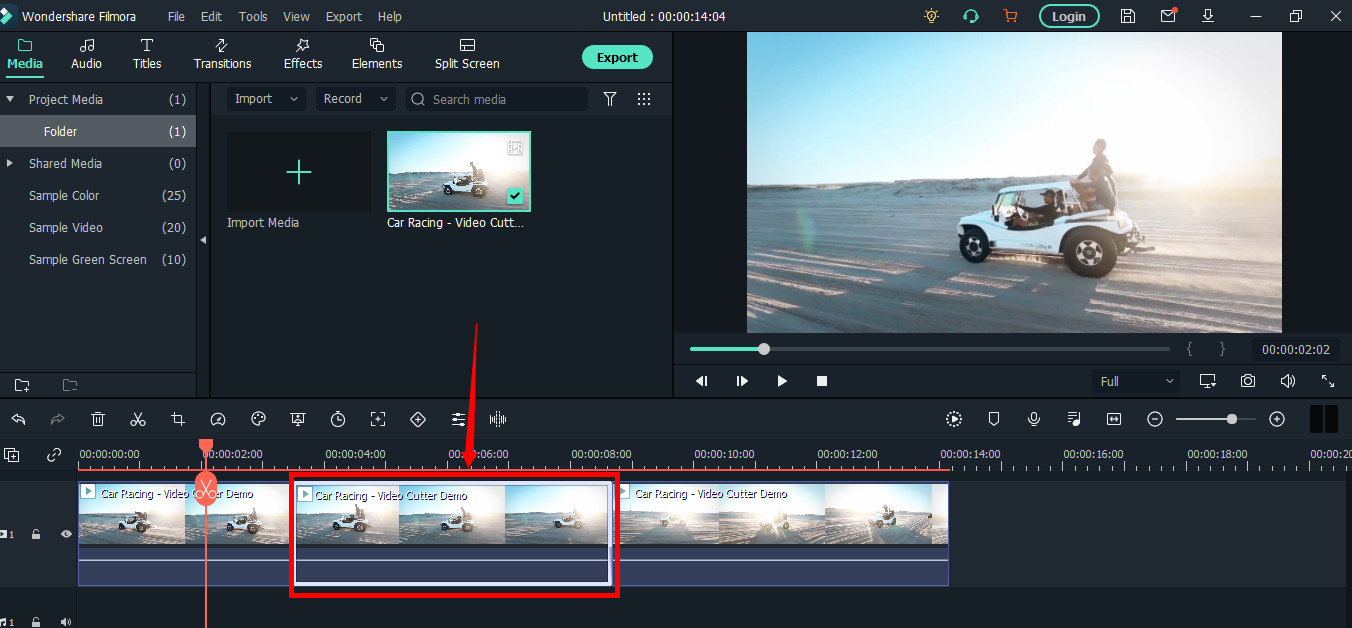
Then, right-click on the mouse and choose “Cut” from the menu.
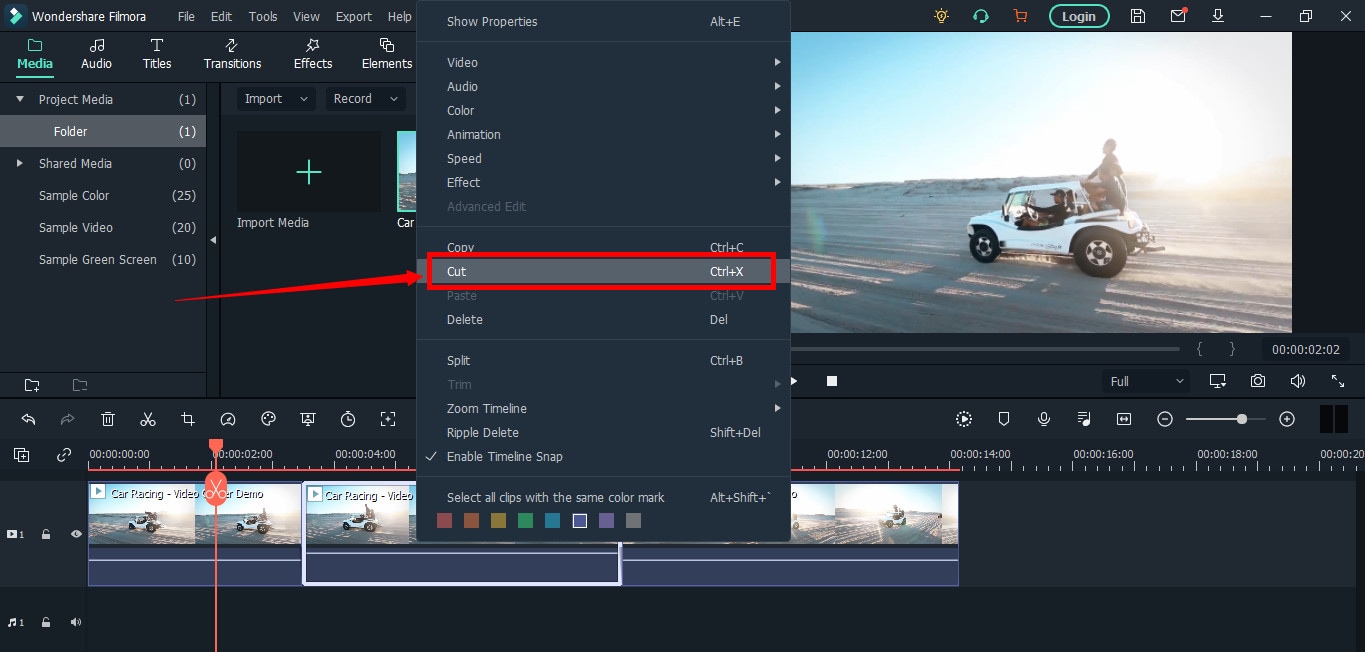
Within a semi-second, the selected portion will be removed from the timeline. And you will be able to see the remaining parts of the video. Now, pull the second clip using your mouse and place it at the end of the first clip without leaving a gap in between.
Then, click the “Play” button under the preview screen to see the results.
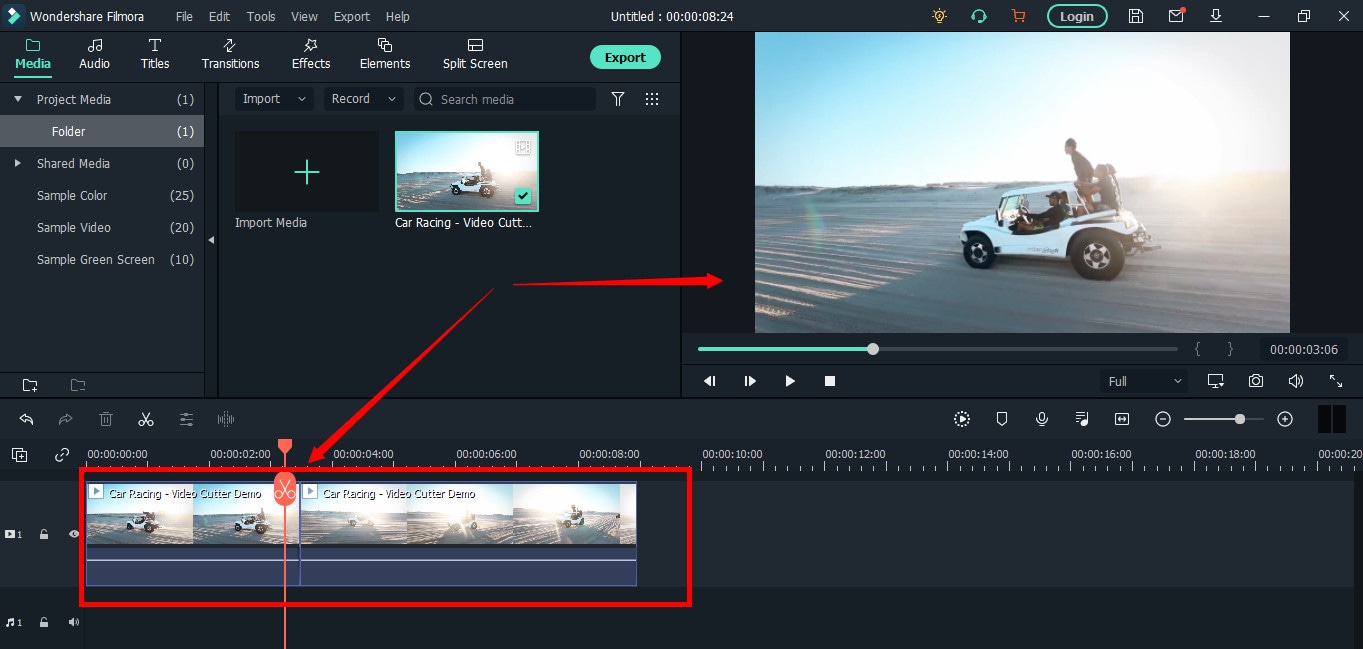
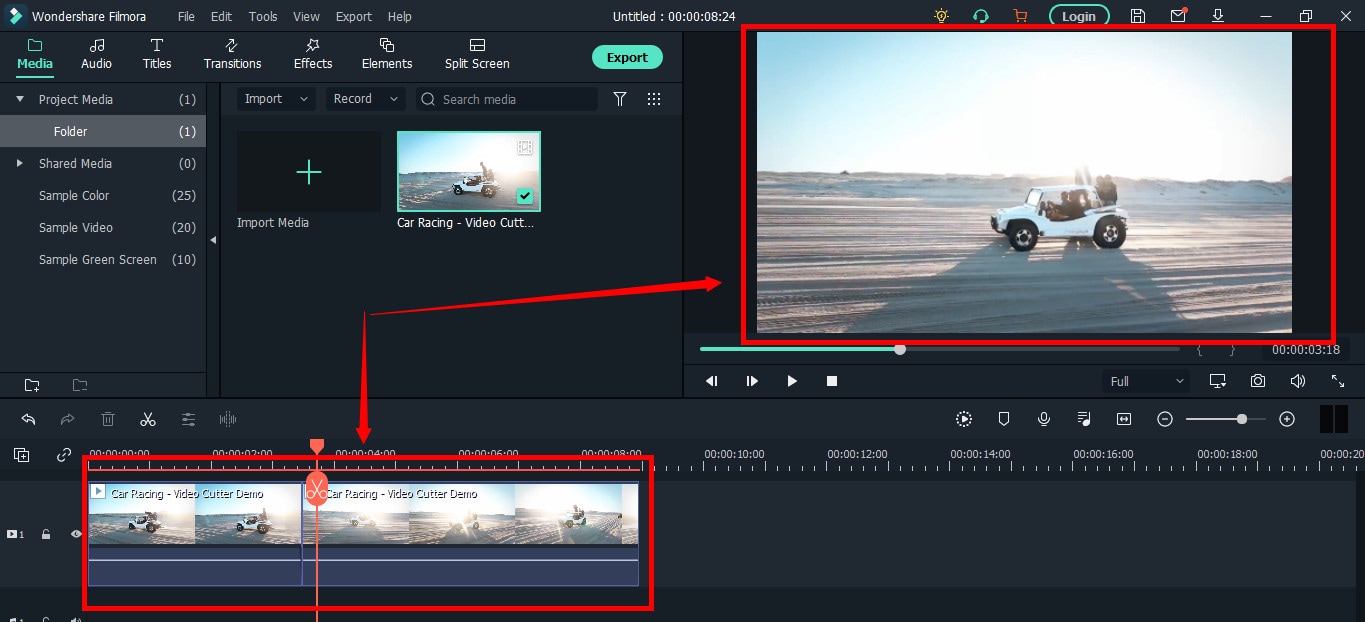
You can see in the above two screenshots that there’s a jump between the scenes due to cuts, confirming that video has been cut significantly.
Step 5: Trimming Your Video in Filmora
Remember that cutting and trimming in Filmora are two different things. Trimming allows you to remove a particular video part from visibility without deleting the portion.
So feel free to skip this step if you’re happy learning the cutting technique. But if you’re interested in trimming, here’s how you do it.
Take your mouse cursor at the beginning or end of the clip you want to trim. Keep holding the clip’s corner and slide the mouse back or front to trim the part
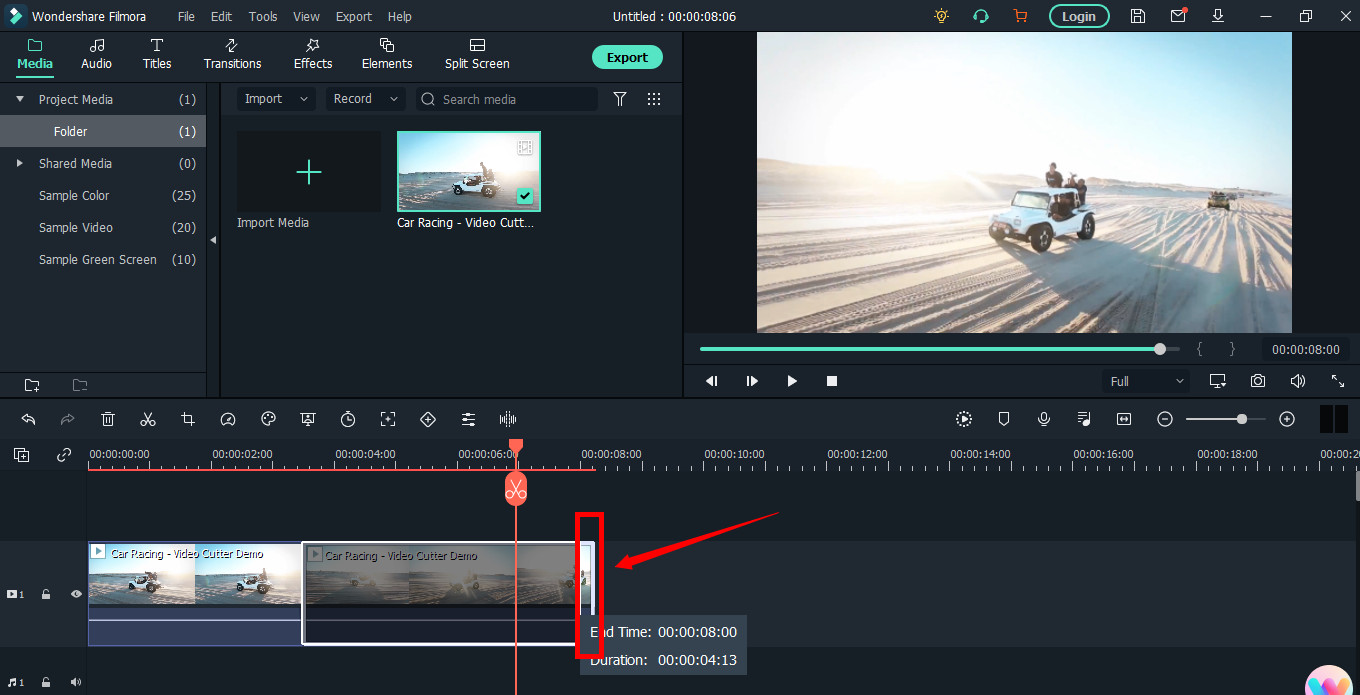
Note: Since the trim tool doesn’t delete the video, the final project based on trimming will be of a larger size. Therefore, it is advised to cut videos rather than trimming for fast rendering, better results, and small video size.
Step 6: Save Project and Export Your Cut/Trimmed AVI Video
Choose “Save Project” from the “File” menu.
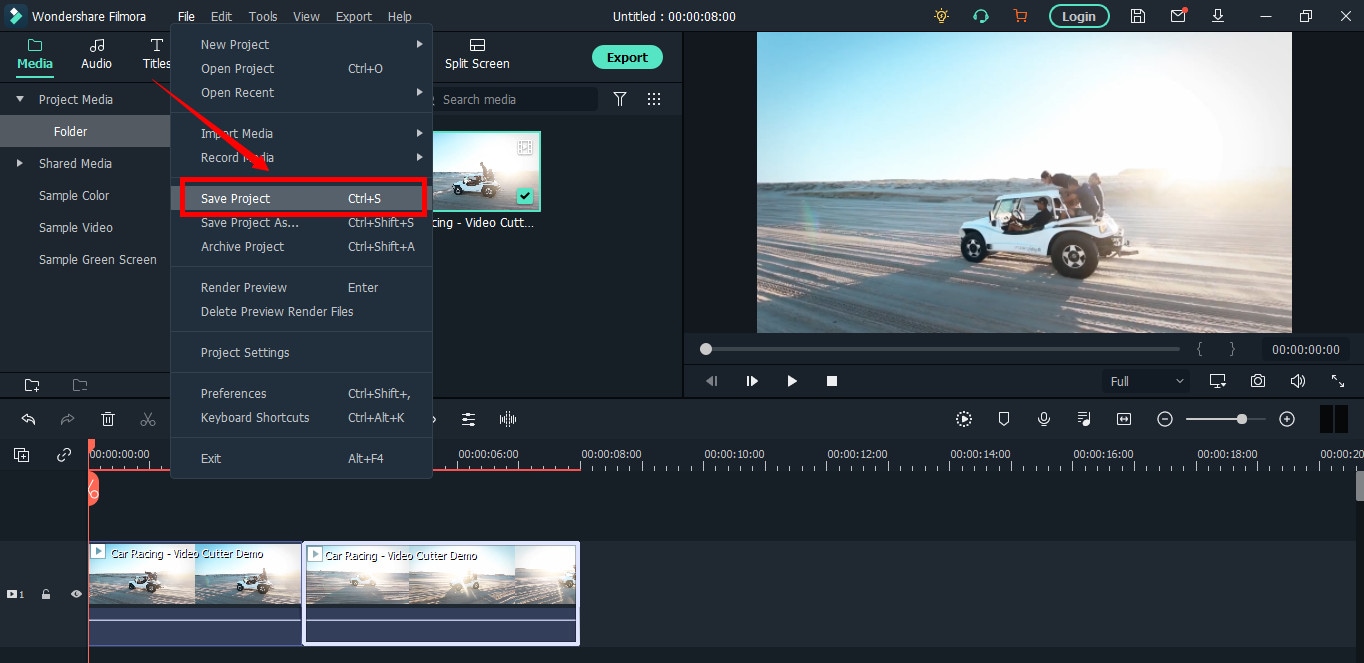
Select the directory to save the project, rename the new video, and click the “Save” button.

Click on the “Export” button to save the video in AVI or any other video format of your choice on your computer.
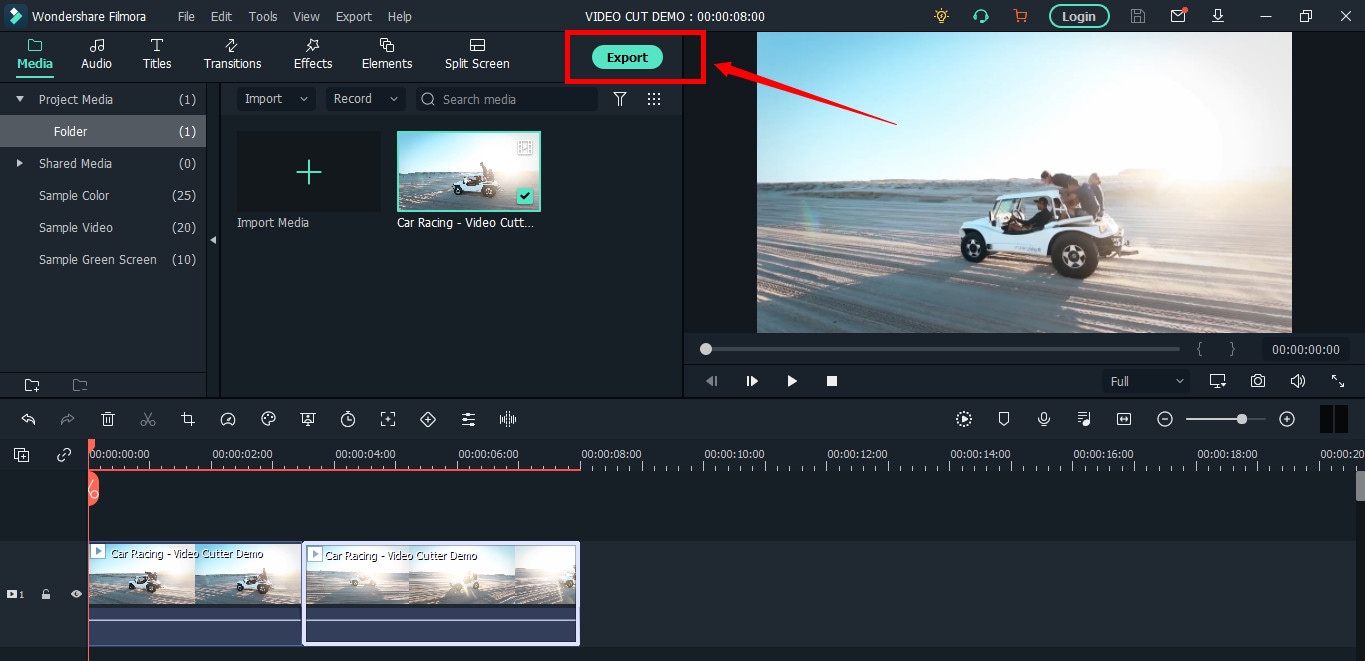
Part 2: Top 3 Free AVI Video Cutter on Windows
As a Windows user, finding an excellent video cutter is relatively easy. However, not all software permits importing AVI videos. In the same way, some video trimmers come at a price. So if you really don’t want to pay and enjoy cutting your AVI files, try using these three video cutting tools.
Microsoft Photos (Windows 10)
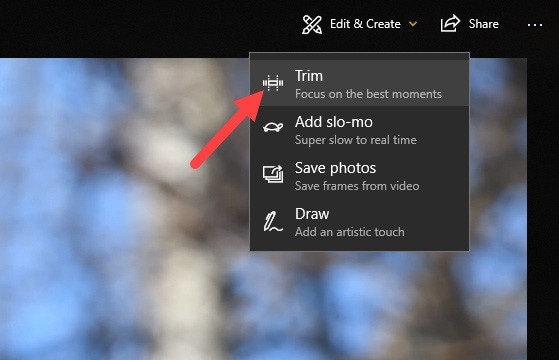
Microsoft Photos or Photo App is a free photo viewer and editor with your Windows 10. It offers incredible photo editing and enhancement along with different tools for organizing and editing videos in a very friendly way. Likewise, you can create drawings over the videos and add 3D effects and background music to your clips.
You can also trim AVI videos with Microsoft Photos quickly. All you need to do is open your clip with the Photo App, choose the “Trim” option, select a portion of the video you want to trim, and go ahead.
That’s it!
Features
- Quick video trimming
- Cool text effects
- 3D library and effects
- It has a clear interface
- You can find and tag people’s faces
- The program has 15+ filters for editing
- Motion tracking option for drawing on videos
- Allows you to view and organize your files easily
Pros
- Microsoft Photos is free for Windows users
- It automatically creates albums
- The program has a touch-friendly interface
- You can integrate your OneDrive with the software
Cons
- Lacks before and after view
- Not included in older Windows versions
- It doesn’t support selective focus or panorama stitching
Handbrake
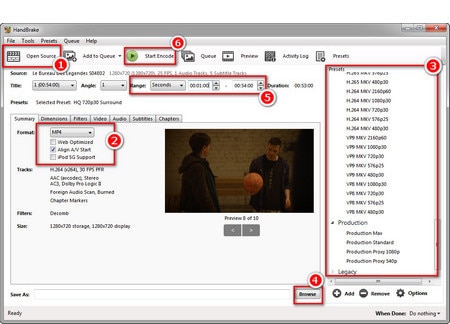
Handbrake is best-known for its video transcoding traits. Unlike typical video editors, this open-source tool includes limited options to rip Blu-rays and DVDs. Moreover, you can mix the 5.1 soundtracks and convert them to stereo to make the audio compatible with your TV speakers.
But the exciting thing about Handbrake is that you can use this software on your macOS 10.13 or later versions to cut AVI videos for free. However, it’s a bit technical process, as there’s no timeline to help you trim or make cuts on the clips directly with the help of your mouse.
You are required to mention a time range (seconds, minutes, or hours) to keep a specific part of the video while the software removes the non-ranged parts of the clip. For instance, you have a video of 10 seconds. You start the range from 5 seconds and end it at 10 seconds. So, the first four seconds of the video will be cut from the entire clip.
Features
- Video cutting, cropping, and resizing
- Low-quality and old video restoration
- Video conversion from any format to MKV or MP4
Pros
- Handbrake is free
- You can convert batch videos with ease
- It supports MAC, Windows, and Linux OS
- Allows you to import video files in all major formats
- The software comes with various video conversion presets
Cons
- Handbrake is not a user-friendly tool
- The video file output is limited to two formats (MKV and MP4) only
Gihosoft Video Cutter
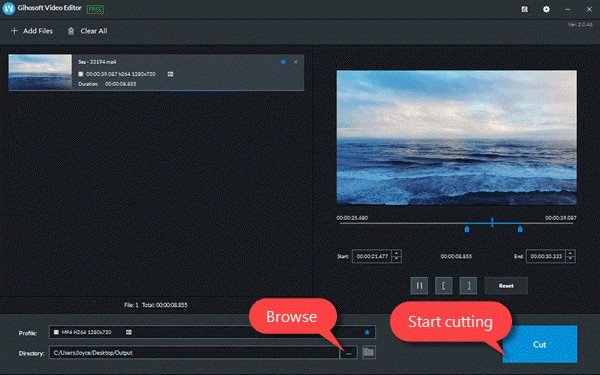
Gihosoft is a clean, free, lossless video cutter on your Windows PC. It’s a simple tool that helps you cut video files into various output formats. So be it AVI, MPEG, or any other file, with Gihosoft, everything becomes handy.
Another fascinating fact about this software is that it allows you to cut videos in three simple steps without losing the quality. So right after installing the program, you simply need to import your file, choose the start and end time, and click the “Cut” button to remove the part of the video.
Features
- Fast video and audio cutting
- Easy drag and drop audio/video files
- It supports most audio and video formats
Pros
- Free for both Windows and MAC operating systems
- The cutter saves video in original quality
Cons
- It does not include basic video editing features
Part 3: Top 3 Free AVI Video Cutter on MAC
Are you looking for a great AVI video cutter for your MAC? Sadly, you have limited product choices as compared to Windows users. But to ensure you don’t waste time looking for a suitable tool, here’s a list of three AVI video cutting programs you can use on your Macintosh.
iMovie
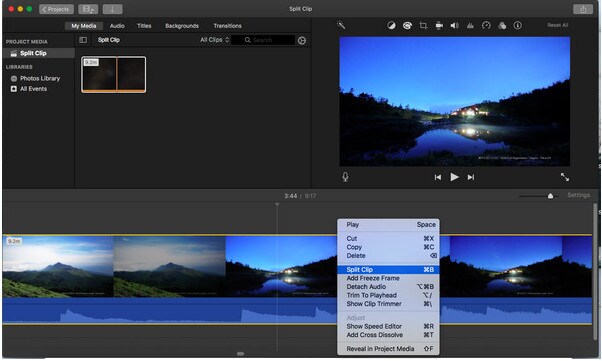
The first and foremost recommended software for free video cutting on MAC is Apple’s own tool, iMovie . It is a built-in program that comes with your system, so there is no need to spend extra on a video editor. iMovie allows you to browse and import most video files, including AVI, right from your computer. Also, this tool is equipped with multiple functions, such as audio editing, video quality enhancement, and much more.
This MAC’s video editor is ideal for beginners. Many home users and small business owners find this tool extremely simple, as they don’t like to be confused with complex features. So, if you want to make cuts to your video clips, start working on iMovie. And within a few clicks, you can trim or cut your videos for free.
Features
- Video cutting and trimming
- Cropping and rotation
- Effects and transitions
- Built-in themes
- HD and 4K video support
- Movie sharing
- Audio adjustments
- Chroma screen controls
- Character tracking
Pros
- Free to use for MAC users
- Clean timeline
- One-click video cutting and trimming
- Easy-to-remember keyboard shortcuts
- Direct share projects to your social media, like YouTube
Cons
- It takes a lot of time to export videos
- iMovie needs high HDD storage space
VideoPad by NCH

VideoPad by NCH is a beginner-level video editor with all the basic features. The software is specifically designed for home movie makers. That is why VideoPad is easy to understand and use.
VideoPad is entirely free of cost for non-commercial purposes, but it has limited features. On the other hand, if you want to enjoy full traits, you can purchase the tool.
VideoPad supports video files, including AVI, WMV, MPEG, MOV, MP4, ASF, and XviD. Likewise, you can also burn movies to Blu-ray, DVD, HD-DVD, or CD. And most importantly, you can easily cut or trim AVI videos on your MAC, as the software is available on both MAC and Windows systems.
Features
- Audio tools
- Video rotation
- Video sharing
- Visual effects
- Video transitions
- 3D Video editing
- Color correction
- Overlays and texts
- Video optimization
- Great plugin support
- Direct video uploading
- Multiple video resolutions
- Video cutting and trimming
- Files exportation to various devices
- Stereoscopic conversion from 2D to 3D
Pros
- You can use the basic tools for free
- Allows 360-degree video production
- It supports a wide range of video formats
- Compatible with MAC and Windows computers
Cons
- The auto speech feature performs poorly
- The free version has annoying notifications
Xilisoft Video Cutter
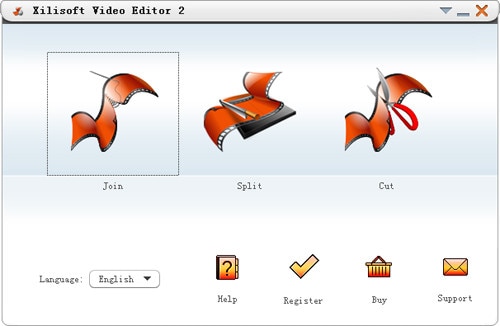
Xilisoft Video Cutter is the simplest tool to cut videos on MAC. This software has a straightforward option to cut the clip after importing it to the timeline. The program is fast and has a user-friendly interface.
Moreover, you can polish your videos by merging multiple clips or increasing the video quality once you’re done with the cutting process. At the same time, this video cutter allows you to import all video formats, including XviD, DivX, MOV, FLV, MP4, MPEG-4/, MKV, MPEG, WMV, and AVI.
Features
- Video joining
- Support multiple output video formats, including HD
Pros
- Easy video cutting and merging
- It doesn’t require a large storage space
- Extremely uncomplicated interface
- Real-time preview to make better cuts
- Available on both MAC and Windows systems
Cons
- The trial version is free to use but limits you from enjoying extra features
Part 4: Top 3 Free AVI Video Cutter on Android
After capturing nice videos with your Android mobile phone, you may need to cut unnecessary scenes to make your clips look professional. While there are numerous Android cutters, not all support the AVI format. So below, you will find the 3 best AVI video cutters for Android, which are free to use.
Quick – Video Editor & Maker
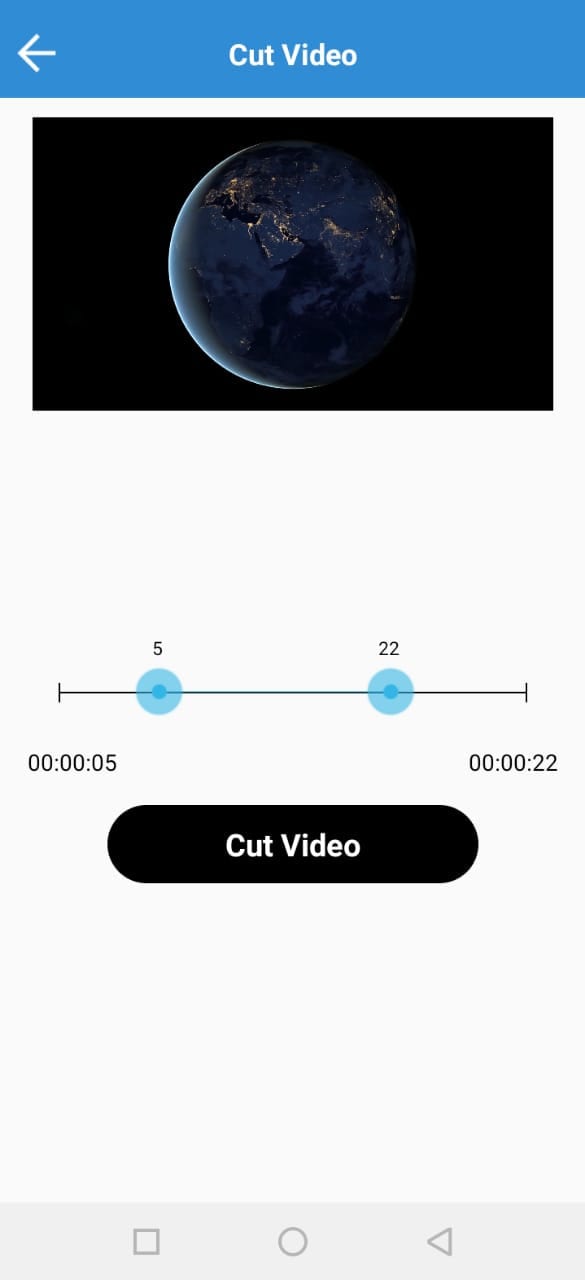
Quick – Video Editor & Maker is a free video editor with PRO results. Many photographers and vloggers love using this app to cut clips immediately. Furthermore, the application offers a wide range of options to assure you don’t have to look to any other tool to rotate or compress video. Quick – Video Editor & Maker lets you import videos in all major formats, including AVI, MPEG, WMA, and more.
Features
- Video cutting, fading, and rotation
- Speed control tools
- Conversion from video to GIF
Pros
- Free app
- Simple interface
Cons
- Lack of updates
- Some users complain about app crash
Funimate Video Editor & Maker
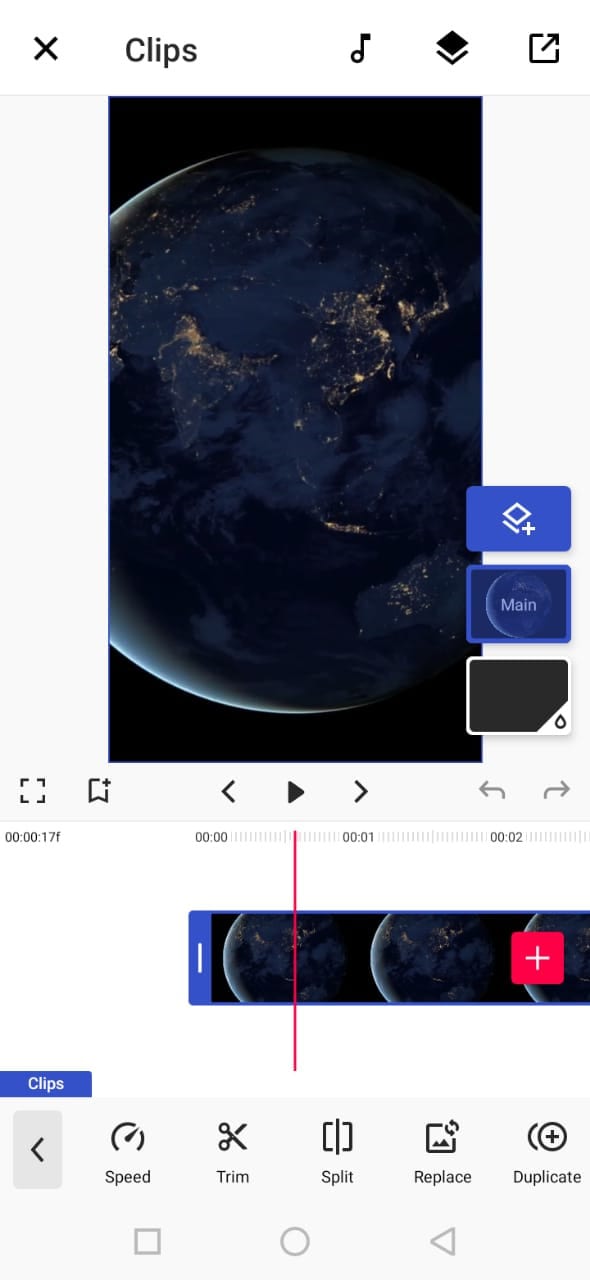
If you want to make some professional-grade video edits quickly, you are welcome to download and use Funimate Video Editor & Maker on your Android device. It’s a free tool to cut videos. It has an easy procedure, and you can cut AVI videos in a few seconds.
Plus, you can use the app to add custom animations, effects, and many other exciting elements. You can share your makes on social media like TikTok, Instagram, and other platforms. Contrarily, the app itself is a community with millions of Funimate-users who share their creations daily. You can also join or watch videos from other creators to learn more about new techniques and trends in video editing.
Features
- Video trimming and splitting
- Animation and cropping
- Filters and AI effects
- Speed adjustment
- Keyframing and video merging
Pros
- Free Android application with several editing tools
- Easy trimming, splitting, and cropping
- Aspect ratio, border, and color customization
- Direct social media sharing
Cons
- Free users cannot use templates
- The free version stamps watermarks on each project
Part 5: Top 3 Free AVI Video Cutter on iPhone
No wonder iPhone’s camera captures high-quality videos. But the problem begins when there’s no free app to cut AVI videos. So if you’re recording great spots, but deep inside, you really want to remove some parts, then these 3 free AVI video cutters will work smoothly on your iPhone.
Cut, Trim, Split Video Editor
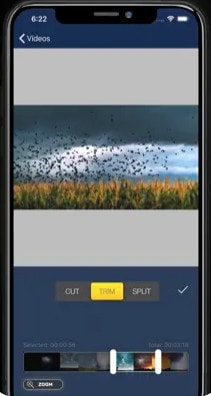
Download Cut, Trim, Split Video Editor on your iPhone to delete/cut unwanted portions of your video clips. The tool is also best for trimming iPhone-recorded clips without messing with the frames. Or, if you just want to split the video into multiple parts for your next WhatsApp status, this iPhone app can do that job for you.
The app supports multiple video file types, including MOV, MP4, AVI, MPEG, MPEG-2, and 3GPP
Features
- Easy trimming and cutting video clips
- Splitting big-sized videos into two smaller clips
- Import video from file-sharing platforms, like iCloud, using Wi-Fi
Pros
- Free app for fast video cutting and sharing
- Simple UI interface
Cons
- The free version shows advertisements
Splice - Video Editor & Maker
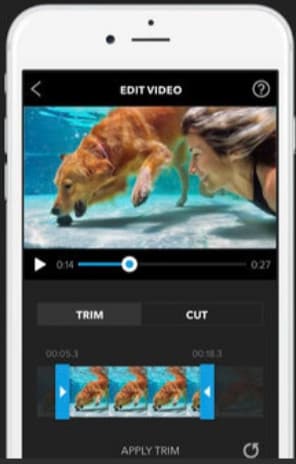
Splice is an extraordinary video editor that makes it easy to make fully customized and professional videos from your iPhone. The app is also best for video cutting. Besides, it has many interesting features, which you can use from your device.
Features
- Cutting, trimming, and cropping your videos
- Exposure, saturation, and exposure adjustment
- Slow and fast motion with speed ramping option
- Video masking and overlay
- Color correction and text overlays
Pros
- Free basic features, such as video cutting
- iTunes integration
- Supports AVI video input
- User-friendly application
- Access to the music library
- Quick and simple social sharing
Cons
- Output videos require high mobile storage space
Part 6: Top 3 Free AVI Video Cutter Online
Don’t want to install video cutters on your MAC, Windows, smartphone, or any other device? No problem! You can use online video cutters and trimmers to split, cut, or trim your clips for free.
However, the problem still exists in online tools, as not all web-based editors allow importing AVI files. So to save your time and energy, you can directly go to the following online AVI cutters to complete your tasks.
Kapwing
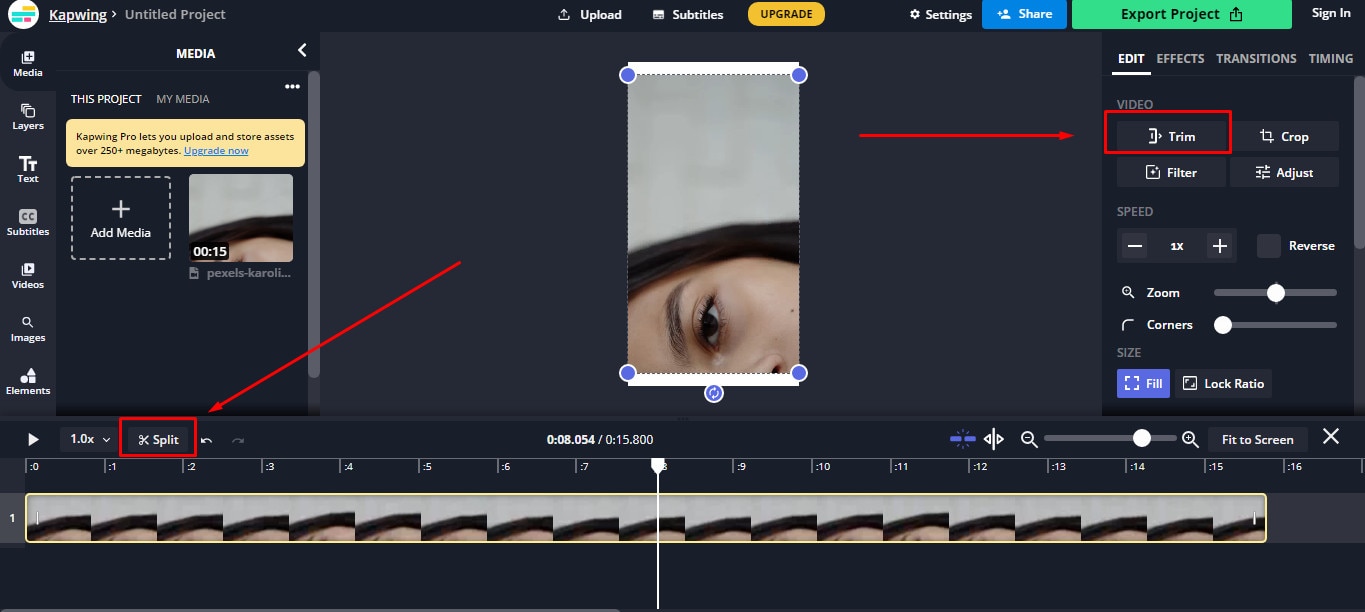
Kapwing is an online video editor best for casual creatives, such as Vloggers and YouTubers. You can use this web-based platform to cut your videos. Gladly, Kapwing supports all AVI incomings. You can upload your AVI video files to this platform and use its trim or split feature. To do that, you need to upload your AVI video and choose the “Trim” or “Split” tool to see the magic. Once done with the trimming process, you can explore Kapwing’s other incredible traits and apply them to your project.
Features
- Video splitting, trimming, and merging
- Audio capturing
- Speed adjustment
- Image and video library
- Text editing and overlay
- Auto-generated subtitles
- Several collaboration tools
- Video creation from scratch
- Templates, shapes, and emojis
- Simple drag-and-drop interface
- Video transitions, plugins, and elements
Pros
- Free online video trimmer
- User-friendly interface
- You can export 30-minutes long projects
- Allows you to export unlimited videos with a watermark
- One watermark-free video export is available each month
Cons
- Cannot export long videos with a free account
- Only 10 minutes transcription limit is available for free users
- You need to purchase a monthly or annual subscription to remove the watermark from multiple videos
Clideo
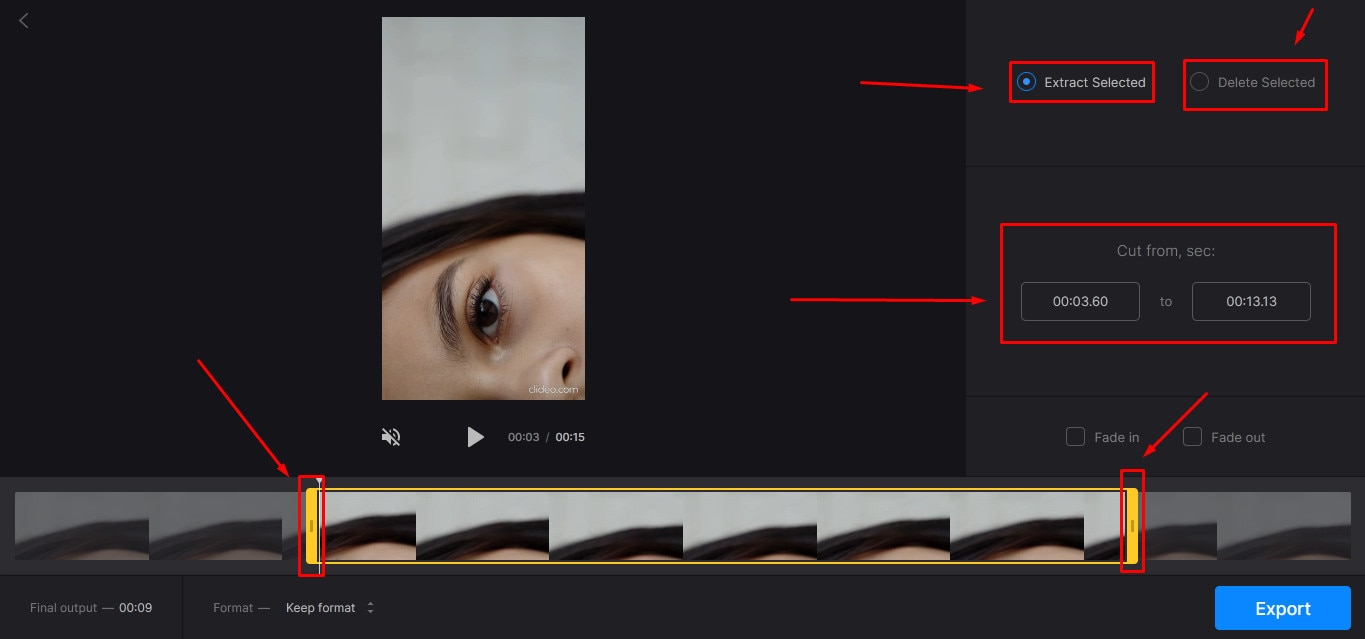
Clideo is not just a video cutter but an online solution to all your video editing problems. The tool is super popular, with 4 million+ users a month. And why not? This is one of those web-based platforms that allow AVI video files to be imported and exported without converting them into any other formats.
Nevertheless, if you’re only looking for video cutting options, this tool makes your life easy. Simply upload your video, and select the portion of it by setting start and end times. Choose whether you want to delete or extract the selected part from the clip, and hit the “Export” button.
And within a few moments, you can enjoy a trimmed video clip. And if you plan to be more creative, you can look for other Clideo features to make videos more fascinating.
Features
- Video combining and cutting
- Resize and crop clips
- Compress your videos
- Add text and subtitles
- Add music to your video files
- Filters and color correction tools
- Audio mute, cutting, and muting
- Video rotation, flipping, and speed adjustment
Pros
- Basic tools can be used for free
- Best for beginners and intermediate users
- Ideal for AVI videos and also supports other video formats
Cons
- You cannot use the free version regularly
Aspose
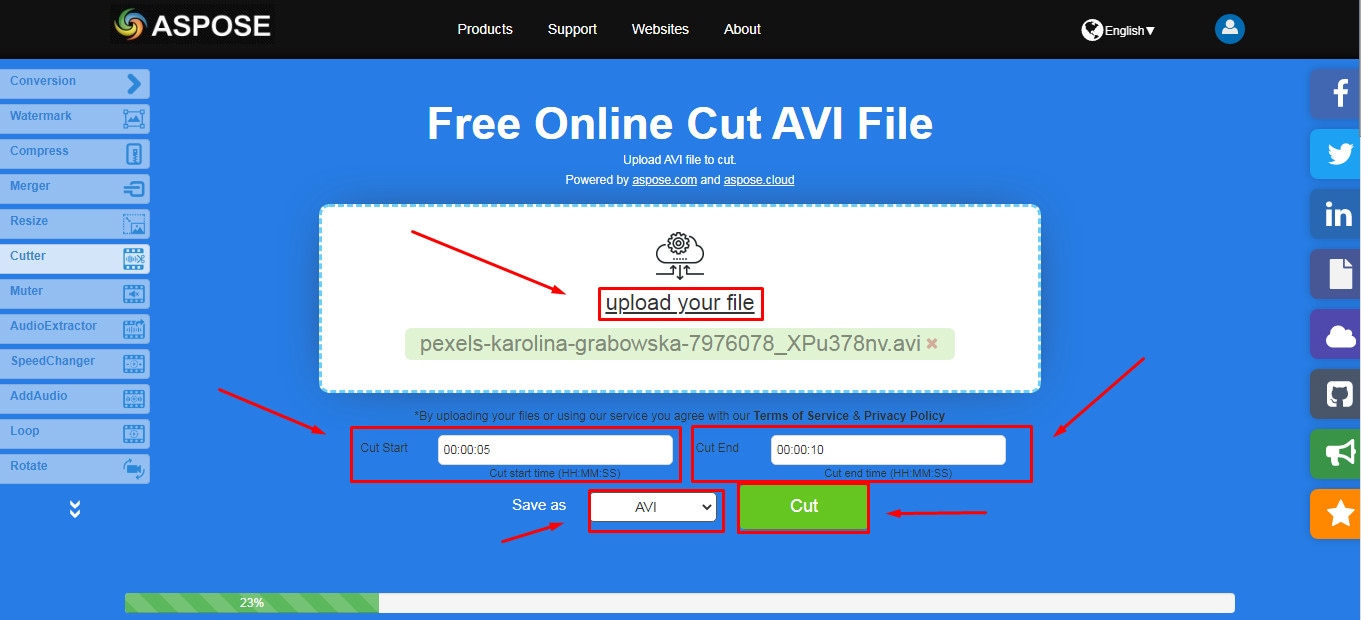
Aspose is a free web-based application to cut clips. You can use this tool on any operating system. It supports all major video file formats, including AVI, MKV, MOV, MP4, FLV, WMV, WEBM, and GIF. Additionally, you can use Aspose for various other reasons, such as audio extraction, video resizing, and more.
Features
- Video cutting and compressing
- Looping, rotation, and video merging
- Adding watermarks on videos
- Sound muting
- Speed change and audio addition
Pros
- Aspose is a free online tool
- It offers straightforward options to cut and edit videos
Cons
- No color correction option
- Slow video cutting process
- Lacks timeline and other valuable features
Part 7: Bottom Line
Tired of finding AVI cutters? Relax and try these top 16 AVI video cutters for Windows, MAC, iPhone, Android, and online. Almost all these tools are free to use and are extremely handy. On the other hand, if you want to cut and trim videos professionally, download Filmora and follow the step-by-step guide in this article for making clean cuts.
Part 8: FAQs
Q1. How do I trim an AVI video?
To trim an AVI video file, ensure that the software or tool you use supports AVI input. Generally, you need to upload or import a clip on the program, select the portion of the video, and apply the cut/trim feature to make it happen.
Q2. Which is the best online video cutter?
Kapwing and Clideo are the two best online video cutters you can use for free. Both web-based tools also allow you to cut your AVI videos.
Q3. Which is the best video cutter and joiner software?
Filmora, iMovie, and Kapwing are some of the best video cutters and joiner tools. These video editors are also free to use and come with different features.
Q4. How do I trim an AVI file in Windows 10?
Trimming an AVI video file in Windows 10 is very simple. Launch the Microsoft Photos (Photo App) application on your computer, add clip, and select the “Trim” tool to trim a specific video part.
Q5. How can I cut a video on my computer for free?
MAC and Windows users can download Filmora to cut videos for free. Filmora also offers a wide range of other features to make your clips exciting. Contrarily, Windows users can use the built-in Photo App in Windows 10 or download Gihosoft or Handbrake software to cut clips. Likewise, MAC users can download VideoPad, Xilisoft Video Cutter, or iMovie for free.
With the growing fame of video-sharing and social media applications like Twitter, Instagram, and TikTok, the demand for simple and fast video cutting and trimming tools has dramatically increased. Nowadays, you don’t have to play with complex video editing tools to produce high-quality videos.
Thanks to several user-friendly editing software to make things easy for everybody. However, finding the right programs to trim/cut videos is still challenging, especially in AVI format.
But, guess what? These top 16 AVI video cutters for Windows, MAC, Android, iPhone, and online will make video cutting and trimming fun, especially when you learn to do it using Filmora.
In this Article
Part 1: Best AVI Video Cutter to Trim/Cut AVI Video on Windows and MAC – Filmora Video Cutter [with steps}
Part 2: Top 3 Free AVI Video Cutter on Windows
Part 3: Top 3 Free AVI Video Cutter on MAC
Part 4: Top 3 Free AVI Video Cutter on Android
Part 5: Top 3 Free AVI Video Cutter on iPhone
Part 6: Top 3 Free AVI Video Cutter Online
Part 7: Bottom Line
Part 8: FAQs
Part 1: Best AVI Video Cutter to Trim/Cut AVI Video on Windows and MAC – Filmora Video Cutter [with steps]
Filmora by Wondershare is a star video editor with outstanding outcomes. Whether you have a MAC or Windows PC, you can download Filmora regardless of your operating system. The program best serves those who intend to make high-quality videos. The software provides editing support for all video formats, including AVI.
Although Filmora is an affordable editor with tons of audio and video editing options, you can still download the software for free and create projects if watermarks don’t bother you. Moreover, you can count this tool’s capabilities in cropping, resizing, and Chroma screen support. But that’s not the only sweet fruit.
In fact, Filmora is equipped with many jaw-dropping features, including preset templates, auto beat sync, split-screen, speed ramping, motion tracking, keyframing, creative transitions, titles, filters, and much more. And the best part is, you can learn and understand Filmora in no time. That’s why the program is loved and supported by all types of users.
So does Filmora helps cut and trim AVI videos? Yes! It does if you follow these steps correctly.
Step 1: Download Filmora Video Editor
First, download Filmora Video Editor by choosing your operating system, as seen in the screenshot below.
Run the setup and let it finish without any pause or break.
Step 2: Import Your Video to Filmora Video Editor
Importing your AVI video is a very simple process. Just click on the “Film Clip” icon.
It will open a new window screen on your computer to select the video from the directory. Find the clip you want to import and cut. Use your mouse to select it and click the “Open” button.
The video will be loaded in the “Media” folder of Filmora. The clip’s thumbnail should be visible to assure you have done everything correctly.
If you can see that, let’s go to the next step.
Step 3: Drag and Drop Video to Filmora’s Timeline
Select the video in the media folder by clicking over it once. Now, without leaving the hold of the left button of your mouse, slide the video down to the track in the timeline.
After that, a message will pop up, asking about your preference for the project settings. It is recommended to choose the “Match to Media” option unless you’re an experienced video editor who knows how to play with the resolution and frame rates.
You will see the video on the timeline with its preview on the “Preview Screen” on the right side of the interface.
Step 4: Cutting Your Video in Filmora
Here comes the core step you have been waiting for. But before you go any further, you need to know about the “Playhead.”
Playhead is an orange-reddish marker you can find on the timeline.
It has an important role in cutting your videos.
So, move the playhead to your desired frame and click on the “scissor” icon to make the “starting” cut.
As soon as you do it, you will see that the single clip is now divided into two parts similar to this image.
The “Red” marked area in the above screenshot ensures a gap between the clips on the timeline. The “Yellow” arrows confirm two separate clips of the same video.
Place the two clips together as seen in this “Green” area.
And place the playhead anywhere on the clip. And click on the “scissor” icon once again to make the “ending” cut (second cut).
If done correctly, there should be three clips now of the same video, as you can observe in this screenshot.
Again, the “Red” area in the above photo indicates the gap, and the “Yellow” area ensures a third segment of the video.
Note: The gaps you can see in the divided clips are made intentionally for understanding. Practically, Filmora doesn’t move the clip or make gaps in between after you have made the cuts.
Keep in mind that there are three clips on the timeline. Now, if you want to remove the second clip from the video, you need to select that portion first by clicking on it.
Then, right-click on the mouse and choose “Cut” from the menu.
Within a semi-second, the selected portion will be removed from the timeline. And you will be able to see the remaining parts of the video. Now, pull the second clip using your mouse and place it at the end of the first clip without leaving a gap in between.
Then, click the “Play” button under the preview screen to see the results.
You can see in the above two screenshots that there’s a jump between the scenes due to cuts, confirming that video has been cut significantly.
Step 5: Trimming Your Video in Filmora
Remember that cutting and trimming in Filmora are two different things. Trimming allows you to remove a particular video part from visibility without deleting the portion.
So feel free to skip this step if you’re happy learning the cutting technique. But if you’re interested in trimming, here’s how you do it.
Take your mouse cursor at the beginning or end of the clip you want to trim. Keep holding the clip’s corner and slide the mouse back or front to trim the part
Note: Since the trim tool doesn’t delete the video, the final project based on trimming will be of a larger size. Therefore, it is advised to cut videos rather than trimming for fast rendering, better results, and small video size.
Step 6: Save Project and Export Your Cut/Trimmed AVI Video
Choose “Save Project” from the “File” menu.
Select the directory to save the project, rename the new video, and click the “Save” button.
Click on the “Export” button to save the video in AVI or any other video format of your choice on your computer.
Part 2: Top 3 Free AVI Video Cutter on Windows
As a Windows user, finding an excellent video cutter is relatively easy. However, not all software permits importing AVI videos. In the same way, some video trimmers come at a price. So if you really don’t want to pay and enjoy cutting your AVI files, try using these three video cutting tools.
Microsoft Photos (Windows 10)
Microsoft Photos or Photo App is a free photo viewer and editor with your Windows 10. It offers incredible photo editing and enhancement along with different tools for organizing and editing videos in a very friendly way. Likewise, you can create drawings over the videos and add 3D effects and background music to your clips.
You can also trim AVI videos with Microsoft Photos quickly. All you need to do is open your clip with the Photo App, choose the “Trim” option, select a portion of the video you want to trim, and go ahead.
That’s it!
Features
- Quick video trimming
- Cool text effects
- 3D library and effects
- It has a clear interface
- You can find and tag people’s faces
- The program has 15+ filters for editing
- Motion tracking option for drawing on videos
- Allows you to view and organize your files easily
Pros
- Microsoft Photos is free for Windows users
- It automatically creates albums
- The program has a touch-friendly interface
- You can integrate your OneDrive with the software
Cons
- Lacks before and after view
- Not included in older Windows versions
- It doesn’t support selective focus or panorama stitching
Handbrake
Handbrake is best-known for its video transcoding traits. Unlike typical video editors, this open-source tool includes limited options to rip Blu-rays and DVDs. Moreover, you can mix the 5.1 soundtracks and convert them to stereo to make the audio compatible with your TV speakers.
But the exciting thing about Handbrake is that you can use this software on your macOS 10.13 or later versions to cut AVI videos for free. However, it’s a bit technical process, as there’s no timeline to help you trim or make cuts on the clips directly with the help of your mouse.
You are required to mention a time range (seconds, minutes, or hours) to keep a specific part of the video while the software removes the non-ranged parts of the clip. For instance, you have a video of 10 seconds. You start the range from 5 seconds and end it at 10 seconds. So, the first four seconds of the video will be cut from the entire clip.
Features
- Video cutting, cropping, and resizing
- Low-quality and old video restoration
- Video conversion from any format to MKV or MP4
Pros
- Handbrake is free
- You can convert batch videos with ease
- It supports MAC, Windows, and Linux OS
- Allows you to import video files in all major formats
- The software comes with various video conversion presets
Cons
- Handbrake is not a user-friendly tool
- The video file output is limited to two formats (MKV and MP4) only
Gihosoft Video Cutter
Gihosoft is a clean, free, lossless video cutter on your Windows PC. It’s a simple tool that helps you cut video files into various output formats. So be it AVI, MPEG, or any other file, with Gihosoft, everything becomes handy.
Another fascinating fact about this software is that it allows you to cut videos in three simple steps without losing the quality. So right after installing the program, you simply need to import your file, choose the start and end time, and click the “Cut” button to remove the part of the video.
Features
- Fast video and audio cutting
- Easy drag and drop audio/video files
- It supports most audio and video formats
Pros
- Free for both Windows and MAC operating systems
- The cutter saves video in original quality
Cons
- It does not include basic video editing features
Part 3: Top 3 Free AVI Video Cutter on MAC
Are you looking for a great AVI video cutter for your MAC? Sadly, you have limited product choices as compared to Windows users. But to ensure you don’t waste time looking for a suitable tool, here’s a list of three AVI video cutting programs you can use on your Macintosh.
iMovie
The first and foremost recommended software for free video cutting on MAC is Apple’s own tool, iMovie . It is a built-in program that comes with your system, so there is no need to spend extra on a video editor. iMovie allows you to browse and import most video files, including AVI, right from your computer. Also, this tool is equipped with multiple functions, such as audio editing, video quality enhancement, and much more.
This MAC’s video editor is ideal for beginners. Many home users and small business owners find this tool extremely simple, as they don’t like to be confused with complex features. So, if you want to make cuts to your video clips, start working on iMovie. And within a few clicks, you can trim or cut your videos for free.
Features
- Video cutting and trimming
- Cropping and rotation
- Effects and transitions
- Built-in themes
- HD and 4K video support
- Movie sharing
- Audio adjustments
- Chroma screen controls
- Character tracking
Pros
- Free to use for MAC users
- Clean timeline
- One-click video cutting and trimming
- Easy-to-remember keyboard shortcuts
- Direct share projects to your social media, like YouTube
Cons
- It takes a lot of time to export videos
- iMovie needs high HDD storage space
VideoPad by NCH
VideoPad by NCH is a beginner-level video editor with all the basic features. The software is specifically designed for home movie makers. That is why VideoPad is easy to understand and use.
VideoPad is entirely free of cost for non-commercial purposes, but it has limited features. On the other hand, if you want to enjoy full traits, you can purchase the tool.
VideoPad supports video files, including AVI, WMV, MPEG, MOV, MP4, ASF, and XviD. Likewise, you can also burn movies to Blu-ray, DVD, HD-DVD, or CD. And most importantly, you can easily cut or trim AVI videos on your MAC, as the software is available on both MAC and Windows systems.
Features
- Audio tools
- Video rotation
- Video sharing
- Visual effects
- Video transitions
- 3D Video editing
- Color correction
- Overlays and texts
- Video optimization
- Great plugin support
- Direct video uploading
- Multiple video resolutions
- Video cutting and trimming
- Files exportation to various devices
- Stereoscopic conversion from 2D to 3D
Pros
- You can use the basic tools for free
- Allows 360-degree video production
- It supports a wide range of video formats
- Compatible with MAC and Windows computers
Cons
- The auto speech feature performs poorly
- The free version has annoying notifications
Xilisoft Video Cutter
Xilisoft Video Cutter is the simplest tool to cut videos on MAC. This software has a straightforward option to cut the clip after importing it to the timeline. The program is fast and has a user-friendly interface.
Moreover, you can polish your videos by merging multiple clips or increasing the video quality once you’re done with the cutting process. At the same time, this video cutter allows you to import all video formats, including XviD, DivX, MOV, FLV, MP4, MPEG-4/, MKV, MPEG, WMV, and AVI.
Features
- Video joining
- Support multiple output video formats, including HD
Pros
- Easy video cutting and merging
- It doesn’t require a large storage space
- Extremely uncomplicated interface
- Real-time preview to make better cuts
- Available on both MAC and Windows systems
Cons
- The trial version is free to use but limits you from enjoying extra features
Part 4: Top 3 Free AVI Video Cutter on Android
After capturing nice videos with your Android mobile phone, you may need to cut unnecessary scenes to make your clips look professional. While there are numerous Android cutters, not all support the AVI format. So below, you will find the 3 best AVI video cutters for Android, which are free to use.
Quick – Video Editor & Maker
Quick – Video Editor & Maker is a free video editor with PRO results. Many photographers and vloggers love using this app to cut clips immediately. Furthermore, the application offers a wide range of options to assure you don’t have to look to any other tool to rotate or compress video. Quick – Video Editor & Maker lets you import videos in all major formats, including AVI, MPEG, WMA, and more.
Features
- Video cutting, fading, and rotation
- Speed control tools
- Conversion from video to GIF
Pros
- Free app
- Simple interface
Cons
- Lack of updates
- Some users complain about app crash
Funimate Video Editor & Maker
If you want to make some professional-grade video edits quickly, you are welcome to download and use Funimate Video Editor & Maker on your Android device. It’s a free tool to cut videos. It has an easy procedure, and you can cut AVI videos in a few seconds.
Plus, you can use the app to add custom animations, effects, and many other exciting elements. You can share your makes on social media like TikTok, Instagram, and other platforms. Contrarily, the app itself is a community with millions of Funimate-users who share their creations daily. You can also join or watch videos from other creators to learn more about new techniques and trends in video editing.
Features
- Video trimming and splitting
- Animation and cropping
- Filters and AI effects
- Speed adjustment
- Keyframing and video merging
Pros
- Free Android application with several editing tools
- Easy trimming, splitting, and cropping
- Aspect ratio, border, and color customization
- Direct social media sharing
Cons
- Free users cannot use templates
- The free version stamps watermarks on each project
Part 5: Top 3 Free AVI Video Cutter on iPhone
No wonder iPhone’s camera captures high-quality videos. But the problem begins when there’s no free app to cut AVI videos. So if you’re recording great spots, but deep inside, you really want to remove some parts, then these 3 free AVI video cutters will work smoothly on your iPhone.
Cut, Trim, Split Video Editor
Download Cut, Trim, Split Video Editor on your iPhone to delete/cut unwanted portions of your video clips. The tool is also best for trimming iPhone-recorded clips without messing with the frames. Or, if you just want to split the video into multiple parts for your next WhatsApp status, this iPhone app can do that job for you.
The app supports multiple video file types, including MOV, MP4, AVI, MPEG, MPEG-2, and 3GPP
Features
- Easy trimming and cutting video clips
- Splitting big-sized videos into two smaller clips
- Import video from file-sharing platforms, like iCloud, using Wi-Fi
Pros
- Free app for fast video cutting and sharing
- Simple UI interface
Cons
- The free version shows advertisements
Splice - Video Editor & Maker
Splice is an extraordinary video editor that makes it easy to make fully customized and professional videos from your iPhone. The app is also best for video cutting. Besides, it has many interesting features, which you can use from your device.
Features
- Cutting, trimming, and cropping your videos
- Exposure, saturation, and exposure adjustment
- Slow and fast motion with speed ramping option
- Video masking and overlay
- Color correction and text overlays
Pros
- Free basic features, such as video cutting
- iTunes integration
- Supports AVI video input
- User-friendly application
- Access to the music library
- Quick and simple social sharing
Cons
- Output videos require high mobile storage space
Part 6: Top 3 Free AVI Video Cutter Online
Don’t want to install video cutters on your MAC, Windows, smartphone, or any other device? No problem! You can use online video cutters and trimmers to split, cut, or trim your clips for free.
However, the problem still exists in online tools, as not all web-based editors allow importing AVI files. So to save your time and energy, you can directly go to the following online AVI cutters to complete your tasks.
Kapwing
Kapwing is an online video editor best for casual creatives, such as Vloggers and YouTubers. You can use this web-based platform to cut your videos. Gladly, Kapwing supports all AVI incomings. You can upload your AVI video files to this platform and use its trim or split feature. To do that, you need to upload your AVI video and choose the “Trim” or “Split” tool to see the magic. Once done with the trimming process, you can explore Kapwing’s other incredible traits and apply them to your project.
Features
- Video splitting, trimming, and merging
- Audio capturing
- Speed adjustment
- Image and video library
- Text editing and overlay
- Auto-generated subtitles
- Several collaboration tools
- Video creation from scratch
- Templates, shapes, and emojis
- Simple drag-and-drop interface
- Video transitions, plugins, and elements
Pros
- Free online video trimmer
- User-friendly interface
- You can export 30-minutes long projects
- Allows you to export unlimited videos with a watermark
- One watermark-free video export is available each month
Cons
- Cannot export long videos with a free account
- Only 10 minutes transcription limit is available for free users
- You need to purchase a monthly or annual subscription to remove the watermark from multiple videos
Clideo
Clideo is not just a video cutter but an online solution to all your video editing problems. The tool is super popular, with 4 million+ users a month. And why not? This is one of those web-based platforms that allow AVI video files to be imported and exported without converting them into any other formats.
Nevertheless, if you’re only looking for video cutting options, this tool makes your life easy. Simply upload your video, and select the portion of it by setting start and end times. Choose whether you want to delete or extract the selected part from the clip, and hit the “Export” button.
And within a few moments, you can enjoy a trimmed video clip. And if you plan to be more creative, you can look for other Clideo features to make videos more fascinating.
Features
- Video combining and cutting
- Resize and crop clips
- Compress your videos
- Add text and subtitles
- Add music to your video files
- Filters and color correction tools
- Audio mute, cutting, and muting
- Video rotation, flipping, and speed adjustment
Pros
- Basic tools can be used for free
- Best for beginners and intermediate users
- Ideal for AVI videos and also supports other video formats
Cons
- You cannot use the free version regularly
Aspose
Aspose is a free web-based application to cut clips. You can use this tool on any operating system. It supports all major video file formats, including AVI, MKV, MOV, MP4, FLV, WMV, WEBM, and GIF. Additionally, you can use Aspose for various other reasons, such as audio extraction, video resizing, and more.
Features
- Video cutting and compressing
- Looping, rotation, and video merging
- Adding watermarks on videos
- Sound muting
- Speed change and audio addition
Pros
- Aspose is a free online tool
- It offers straightforward options to cut and edit videos
Cons
- No color correction option
- Slow video cutting process
- Lacks timeline and other valuable features
Part 7: Bottom Line
Tired of finding AVI cutters? Relax and try these top 16 AVI video cutters for Windows, MAC, iPhone, Android, and online. Almost all these tools are free to use and are extremely handy. On the other hand, if you want to cut and trim videos professionally, download Filmora and follow the step-by-step guide in this article for making clean cuts.
Part 8: FAQs
Q1. How do I trim an AVI video?
To trim an AVI video file, ensure that the software or tool you use supports AVI input. Generally, you need to upload or import a clip on the program, select the portion of the video, and apply the cut/trim feature to make it happen.
Q2. Which is the best online video cutter?
Kapwing and Clideo are the two best online video cutters you can use for free. Both web-based tools also allow you to cut your AVI videos.
Q3. Which is the best video cutter and joiner software?
Filmora, iMovie, and Kapwing are some of the best video cutters and joiner tools. These video editors are also free to use and come with different features.
Q4. How do I trim an AVI file in Windows 10?
Trimming an AVI video file in Windows 10 is very simple. Launch the Microsoft Photos (Photo App) application on your computer, add clip, and select the “Trim” tool to trim a specific video part.
Q5. How can I cut a video on my computer for free?
MAC and Windows users can download Filmora to cut videos for free. Filmora also offers a wide range of other features to make your clips exciting. Contrarily, Windows users can use the built-in Photo App in Windows 10 or download Gihosoft or Handbrake software to cut clips. Likewise, MAC users can download VideoPad, Xilisoft Video Cutter, or iMovie for free.
AVS Video Editor: A Comprehensive Analysis
The AVS Video Editor edits videos and can make edits like cutting, trimming, splitting, and merging them. Both novices and professional filmmakers can use it because of its basic and advanced editing features. This recorder is compatible with DV/HDV, webcams, and VHS cameras. In addition, it allows you to capture the screen of your PC, take screenshots, and highlight mouse and keyboard movements with drawing tools. Create an emotional and persuasive effect by removing black bars with the Crop Scale and changing the aspect ratio.

In addition to the above features, AVS Video Editor has a wide variety of patterns, stickers, emoji, arrows, and many others: *150+ supported formats *300+ visual effects and transitions *Colour balance fine-tuning *Video stabilization of shaky recordings *Chromakey *Playback Control (slow-mo and fast mo) *A wide variety of text styles, animated captions, speech bubbles, and credits *A rich collection of patterns. Publish your video in social media sites, burn a DVD/Blu-ray disc, or save your video in the format of your choice on your computer.
In this article, we will review the AVS editor briefly
AVS Pros
- You can choose from more than 300 video effects, transitions, titles, and overlays.
- There are various features that make it easy for you to get the perfect results for your videos, such as the ability to flick through shots in your timeline without pausing.
- Based on your skill level, you can choose between two modes: Basic or Advanced.
- If you want to change the pace of your videos while maintaining their quality, you can use the video speed control.
How To Use AVS Video Editor?
As soon as you have downloaded and installed the software, follow the instructions. The first time you boot up your computer after installing the software, you will see a popup for quick start instructions. It would be a great place to start someday, even if you skip it for now. For an in-depth guide on how to use the software, we recommend watching the videos.
If you open AVS Video Editor for the first time, you’ll notice that it shares many features with other editing software. Files can be dragged and dropped directly into the program or imported from other sources, such as your desktop or cloud storage. The camera can also capture media directly from the clipboard and even the desktop screen can be captured.
The timeline displays several buttons for different functions once the media is loaded. A clip can be trimmed, enhanced with a filter, and text or music can be added.
You can add a variety of effects to your videos using AVS Video Editor, which makes it stand out from other video editing software. There are thousands of preset transitions and visual filters available for use within the program once you’ve opened a clip. Audio and brightness adjustments can also be made.
Other video editing software does not offer the same features as this one. AVS Video Editor, for example, allows you to add watermarks and overlays to videos without any lag time or loss in quality, which would be impossible with other programs.
The animated logos and text in the video are another great feature. Adding an intro or outro to the end of your video will give it that professional touch before you publish it on YouTube.
AVS VIDEO EDITOR – FEATURES
Video management of different formats
All major formats are supported. Video files such as AVI, VOB, MP4, DVD, WMV, 3GP, MOV, MKV can be processed and saved using , MPEG-4, H.263, etc. codecs. With DCI 4K, you can manage HD, Full HD, 2K Quad HD, 4K Ultra HD, and 4K Ultra HD.
Edit video
From a library of 300 video effects and transitions, you can cut, split, merge, rotate, and mix your video. Subtitles, audio, and comments are also supported. Stabilize flickering videos.
Acceleration of HD video editing
HD video processing becomes faster with AVI HD, WMV HD, TOD, AVCHD, MOD, MTS, and M2TS thanks to integrated video caching technology.
Video capture
DV/HDV/web camcorders and DVD burners can transfer video from these devices. Create video guides, presentations, or demos by recording multimedia files from the PC screen.
Creating Blu-Ray videos
Blu-ray Editor lets you edit your videos by applying various effects and adding descriptions, audio, video, and images.
Video sharing:
Your video can be saved on the computer, burned on a DVD / Blu-ray disc, adjusted for mobile devices (iOS, Android), or shared on social networks (Facebook, Youtube).
Final Verdict About AVS Video Editor
The software is very easy to use and includes a complete library of effects, transitions, menus, and subtitle elements that can be customized to suit any user’s needs. It is complete and very appealing for beginners just getting started with video editing as it allows you to burn to DVD or Blu-ray and post directly on social media.
Our Recommendation
While it is a great tool for beginners, it is outdated and behind modern-day video editors if you compare it with them. As a result, you need a video editor with plenty of powerful features and one that is competitive with the marketplace today. We recommended using our Filmora X video editor. Now it is user-friendly but also suitable for beginners. It contains all the features you need today to put life in your videos. It’s free to try for as long as you want, which is the main advantage here. So what are you waiting for? Try it out today, and you’ll enjoy editing videos.
For Win 7 or later (64-bit)
For macOS 10.12 or later
Also read:
- New 2024 Approved Chromecast Without Limits How to Stream Uncompatible Video Formats
- Updated In 2024, Leading Online Video Teaser Creators
- Updated In 2024, Transform Into a Toon Best Apps for Cartooning Yourself
- Updated Meme Mastery 10 Essential Apps for Android and iOS
- Updated PC Video Trimming Made Easy Top 10 Tools
- New 2024 Approved Video Tempo Changers Top Picks for Windows and Mac Users
- 2024 Approved Unlocking OS X Mavericks Video Editing Potential
- Updated 2024 Approved PC Video Editing Made Easy GoPro Quik and Its Alternatives
- Updated 2024 Approved Google Plays Top Charts Trending Android Apps
- New Best of the Best Top 10 Intro Maker Sites for Stunning Videos for 2024
- New Seamless Transitions The Art of Color Matching in PowerDirector
- New AVS Video Editor for Mac Video Editing Tool for Mac (Mountain Lion Included) for 2024
- Updated From Amateur to Expert Mastering the Art of Professional Movie Making for 2024
- New In 2024, The Ultimate List of GIF Speed Changer Apps and Websites
- Updated Top MP4 Editor for Windows 8 Professional Video Editing Made Easy
- Updated In 2024, Unleash the 80S Adding VHS Flair to Your FCP Projects
- Updated In 2024, Unbranded and Unbeatable 10 Free Android Video Editing Apps
- Updated 2024 Approved How to Reverse A Video in Final Cut Pro
- Updated 2024 Approved Elevate Your Video Game Top 1080P Video Editing Tools
- New The Most Popular 3D Video Production Tools You Cant Miss for 2024
- In 2024, Ubuntus Best Kept Secrets Top 10 Free Video Editing Tools
- New 2024 Approved Top-Rated iMovie Alternatives for Android Devices
- New 2024 Approved GoPro Quik Vs. The Competition A Review & Alternative Options for PC
- Updated In 2024, Best Free Video Editing Software for Windows (iMovie Equivalent)
- New 2024 Approved No-Cost Video Editing Solutions The Ultimate List
- Updated 2024 Approved Generate Stunning Audio Waveform Videos with These Tools
- Updated Ultimate Guide Best Music Video Creators for Everyone for 2024
- New The Ultimate List 10 Best Intro Makers on the Web for 2024
- Updated 2024 Approved Join AVI Files for Free Top 10 Reliable Freeware Options
- Updated In 2024, Get Ready for Dramatic Slow Motion Free Video Editing Tutorial - Filmora
- New Get Ready to Roll The Best Free and Paid Android Video Editors for 2024
- Updated 2024 Approved Unlock Maximum Engagement How to Resize Videos for Social Media Success
- Updated Mac Video Editing Software Top 10 Alternatives to Vegas Pro
- Updated Rev Up Your Footage Top-Rated Video Speed Changers for Windows and Mac for 2024
- New In 2024, Merge Like a Pro The Top 5 Free Online Video Editors
- New 2024 Approved Virtualdub A Review and Comparison of Top Video Editing Software
- Updated 2024 Approved The Art of YouTube Audio Extraction A Comprehensive Guide
- New Unlocking Picture-in-Picture A Beginners Guide to Final Cut Pro for 2024
- In 2024, Mac Video Editing Install Lumafusion or Try These Other Options
- New 2024 Approved Final Cut Pro X Essentials Adding and Customizing Titles
- In 2024, Hassle-Free Ways to Remove FRP Lock on Vivo Y100 5Gwith/without a PC
- How to Bypass Google FRP Lock from Samsung Galaxy A05 Devices
- Downloading SamFw FRP Tool 3.0 for Honor V Purse
- How To Update or Downgrade iPhone 12 mini? | Dr.fone
- 3 Things You Must Know about Fake Snapchat Location On Samsung Galaxy A23 5G | Dr.fone
- Fake the Location to Get Around the MLB Blackouts on Vivo V30 Lite 5G | Dr.fone
- Guide How To Unbrick a Bricked Itel A05s Phone | Dr.fone
- Updated 2024 Approved Best 10 Free and Best Text-to-Speech Generators
- How to Downgrade Apple iPhone 11 Pro to the Previous iOS Version? | Dr.fone
- 7 Solutions to Fix Chrome Crashes or Wont Open on Asus ROG Phone 8 Pro | Dr.fone
- How to Upgrade Apple iPhone XS Max without Losing Data? | Dr.fone
- Top 4 Android System Repair Software for OnePlus Nord N30 SE Bricked Devices | Dr.fone
- How to Transfer Text Messages from Samsung Galaxy S23 to New Phone | Dr.fone
- What is the best Pokemon for pokemon pvp ranking On Realme 11 Pro+? | Dr.fone
- Will Pokémon Go Ban the Account if You Use PGSharp On Tecno Spark 20C | Dr.fone
- Final Cut Pro for iPad- Is It Available for 2024
- In 2024, 9 Mind-Blowing Tricks to Hatch Eggs in Pokemon Go Without Walking On Vivo V30 Pro | Dr.fone
- New Make It Loop 10 Best Free Online Video Looping Platforms
- How To Transfer WhatsApp From Apple iPhone SE (2022) to other iPhone 13 devices? | Dr.fone
- In 2024, How to Unlock SIM Card on iPhone 12 Pro Max online without jailbreak
- Why can’t I play MP4 files on my Motorola Edge+ (2023)?
- How to Reset Poco F5 Pro 5G without Losing Data | Dr.fone
- Updated Top LUTs for Sony HLG
- New How To Mirror a Video Clip in Premiere Pro for 2024
- In 2024, How I Transferred Messages from Xiaomi Redmi K70E to iPhone 12/XS (Max) in Seconds | Dr.fone
- How to Remove and Reset Face ID on Apple iPhone 13 Pro | Dr.fone
- New 2024 Approved A Comprehensive Guide for Free Video Translator Downloading
- In 2024, How to Watch Hulu Outside US On Lava Storm 5G | Dr.fone
- In 2024, How Do I Stop Someone From Tracking My Samsung Galaxy A05? | Dr.fone
- In 2024, 7 Ways to Unlock a Locked Infinix Note 30 Phone
- How to Unlock SIM Card on Vivo Y36 online without jailbreak
- In 2024, Why Your WhatsApp Live Location is Not Updating and How to Fix on your Motorola Edge+ (2023) | Dr.fone
- How To Fake GPS On Apple iPhone 15 For Mobile Legends? | Dr.fone
- New In 2024, How to Make GIF Stickers for WhatsApp 100 The Simple Way
- Can I use iTools gpx file to catch the rare Pokemon On Itel S23 | Dr.fone
- In 2024, Unlocking iPhone 11 Passcode without a Computer
- In 2024, How to Screen Mirror your Apple iPhone 6s Display? | Dr.fone
- In 2024, Where Is the Best Place to Catch Dratini On Huawei Nova Y71 | Dr.fone
- Want to Play a Video in the Loop on Your Mac? Here Is How You Can Make a Video Loop in QuickTime in Simple Steps for 2024
- Title: Updated 2024 Approved 8 Best Educational Animation Software for School
- Author: Ava
- Created at : 2024-05-19 14:42:13
- Updated at : 2024-05-20 14:42:13
- Link: https://video-content-creator.techidaily.com/updated-2024-approved-8-best-educational-animation-software-for-school/
- License: This work is licensed under CC BY-NC-SA 4.0.
