
:max_bytes(150000):strip_icc():format(webp)/GettyImages-515810476-aabe0e5a88b44bb1ae49a5bfa97bec62.jpg)
Unlock Free Images for Your Business A Beginners Guide for 2024
Unlock Free Images for Your Business: A Beginner’s Guide
Did you know that some of the world’s most iconic advertisements use stock images for commercial use? For example, AlamapBBDO, a Brazilian ad agency, used stock photos from Getty Images to create their Endless Possibilities campaign in 2016. The advertising campaign combined photos of random people’s faces to recreate portraits of famous people such as the Dalai Lama and Pope Francis.

Most creative agencies prefer altering stock images in most of their work. This is because it allows them to create campaigns for different companies much faster at affordable costs. Keep reading to find out how to get free images for commercial use in your next project.
Part 1: Download images in loyalty-free sites
Several sites offer free images for commercial use as part of their services. In addition, you do not need to register an account to download the images. The sites typically rely on user contributions and content teams to ensure their databases are fresh and maintain consistent quality. Furthermore, all creative assets they offer fall under the creative commons zero license or a variation of it. Here are some of the sites that offer you images for commercial use for free.
1. Pexels

Pexels.com is a free-to-use provider of high-resolution photos and videos for aspiring creators. The German-based website was started in 2014 by two brothers and has been under the Canva umbrella since 2018.
Currently, the website hosts over 3.2 million images and videos from over 250,000 active contributors. In addition, all the material you find in its library is under the Pexels license, which slightly varies from the creative commons zero license model. Some of the restrictions it enforces include:
- You can only use pexels images for commercial use after making alterations to the original image. For example, you can use part of an image to create a collage for your commercial branding.
- Furthermore, you cannot use any of the website’s content to promote political ideologies and explicit content, especially if the images contain identifiable subjects.
Pexels is available through the following channels:
- Your web browser by typing the URL pexels.com.
- The Android and iOS app.
- A plugin for other content creation software such as Google Slides and MS Office.
- An extension on your Chrome browser.
- You can also access the database using the official Canva app.
2. Unsplash

Another website that offers free images for commercial use is Unsplash, a subsidiary of Getty Images since 2021. The website is a favorite among creators boasting over 16 billion photo impressions monthly. In addition, the database consists of over 3.48 million photos from more than 265,000 unique contributors, all under the Unsplash license.
The Unsplash license restricts the sale of its creative assets without incorporating new creative elements, including using them in print media and physical goods such as mugs and caps.
You can access Unsplash from your web browser or request API integration for your application from the site’s owners. In addition, the site also hosts photo walks across different cities, where Unsplash guides show you the best photo locations around the city and the best camera techniques for your work. Some cities to host the event include Boston, Montreal, Tokyo, and Toronto.
3. Freerange

Freerange Stock is an online resource for photos, illustrations, and textures you can download and use for commercial and non-commercial purposes. Since 2007, the site has continued to provide high-quality images to its community of over 800,000 registered users.
Unlike the previous examples, all content on Freerange falls under the website’s Equalicense. It grants you broad commercial rights of its stock images while allowing the contributors to retain control of their copyright, image resale, and distribution. As such, you cannot use the images for bulk distribution or print-on-demand works.
Freerange Stock maintains its steady supply of images for commercial use via the following methods:
- It has an in-house team of professional photographers who upload images across the different categories on the website.
- Freerange Stock also purchases image rights or directly commissions photos from independent creators.
- You can also contribute to the website’s library by voluntarily submitting your work to the platform. Kindly note that you will need a verified account to enable this function.
- The website also works directly with photographers through a licensing and distribution model, providing them extra exposure on the site.
- Finally, Freerange stock aggregates public domain images from other sources, including similar sites and government institutions. It does so by acknowledging the image owner and sometimes lists the image source when the owner is unknown.
Freerange Stock is accessible through your web browser or as an API integration on your app.
4. Vecteezy

Vecteezy is an extensive online library of free stock images for commercial use. Some of the site’s highlight features include the following:
- A best-in-class search engine that incorporates multiple filters to ensure your results are extremely accurate. For example, you can sort images by color, style, number of people, and age of the subjects, something other free stock websites do not provide.
- All images, videos, and vector illustrations are free for personal and commercial uses. It does so through a property sign and release model with its extensive network of contributors, which protects users from any legal liabilities.
- Finally, it employs a content team that manually reviews each photo submission to ensure consistent quality standards for its offerings.
In addition, you can also purchase design resource bundles by subscribing to its Vecteezy pro for as little as $9 monthly. Some of the resources available include the Ultimate Text Effects Layer Styles Bundle for Photoshop, which costs $39 stand-alone or $4.50 when you subscribe to pro.
Part 2: Buy from stock providers
Another way to get images for commercial use is by buying them from stock providers. Some of the benefits of buying images from stock providers include:
- You get a wide selection of unique photos from top-tier photographers. Stock providers always seek collaborations with the industry’s finest to edge out the competition.
- You receive exemplary customer service with your purchase. Selecting the right image can be confusing for amateur creators. As such, stock image providers have customer support channels to help you throughout your creative process.
- Stock images reduce your delivery times significantly. Buying images from a stock provider eliminates the need to invest in photography equipment and the time you need for post-production. As such, you can deliver projects in a fast and cost-effective way.
Despite the above positive, here are some challenges that buying stock images may present:
- Not all stock image providers will have the creative assets you need.
- Image overuse is likely since every creator will rush for the most popular contributor.
Below are some of the stock image providers you should consider.
1. iStock
iStockphoto.com is an online database of creative resources, including royalty-free photos, videos, audio, illustrations, and clip art you can use in your creations. The website is a Getty Images subsidiary based in Calgary, Canada. In addition, contributors earn royalties depending on how often users download their content.
2. Alamy.com
Alamy.com is a British-owned stock image provider with contributions from photographers and agencies in 173 countries. It compensates its contributors by offering higher than average payouts every time users download their creations. Some popular brands to use Alamy’s services include M&C Saatchi, Microsoft, and The Economist.
Part 3: Shot a Photo by yourself or create one with editing tools
Alternatively, you can get images for commercial use by shooting them yourself or creating them with editing tools such as Figma and Wondershare’s Filmstock. Here are some benefits of using this method:
- You get exactly what you want, provided you have the required skills and equipment. Sometimes, getting the right image for your commercial purpose can be challenging. As such, shooting an original photo may be the only option.
- You have full ownership of the image.
Unlike obtaining images from stock photography websites, you are free to use the image in whatever capacity you please without any restrictions. For example, sites such as Unsplash do not allow you to use their images in political statements, a restriction you can bypass when using your own creations.
However, you should also consider the following factors when using this method.
It requires a substantial investment
Getting high-quality images for commercial purposes requires specialist equipment. For example, the Panasonic LUMIX GH6 camera, which has 4K resolution capability, costs $2,197 on Amazon. This makes it extremely expensive for amateur creators.
There is a steep learning curve
Becoming a professional photographer takes time and effort. Unless you are creating as a hobby, it will be a while before you can start generating income from your creations.
Part 4: FAQs
1. Do you need a contributor account to get images for commercial use?
Not necessarily. Stock image sites like pexels.com allow you to download images from their website without creating an account. You will only need one if you want to showcase your work on the platform.
2. Can you use your smartphone to get images for commercial use?
Yes. Most stock image providers have device-specific apps that allow you to access their databases from your mobile device. For example, UnsplashPhotoPicker allows you access to the Unsplash library from your Android device.
Free Download For Win 7 or later(64-bit)
Free Download For macOS 10.14 or later
Free Download For macOS 10.14 or later
Intelligent Video Editing Tools with Reframe Capabilities
The auto-frame feature is needed to edit the videos professionally. Its purpose is to adjust the video clips so that the action of a scene is never out of the frame even after reformatting the video. Specifically, the quality of your video is not affected, and no frame is lost or damaged when you reformat the video for different aspect ratios.
The smart auto-reframe feature is mainly used for posting videos on social media platforms such as Facebook, Instagram, YouTube, etc. This article provides you with detailed information about the best video editors that are enriched with the smart auto-reframe feature. The method of using these tools is also provided.
Top Video Editors with Auto-Reframe for Smart Crop
Following are some of the best video editors that consist of an auto-reframe feature for smart crop:
1. Wondershare Filmora Video Editor
Supported OS: Windows and macOS
Pricing: Free trial, $ 79.99 for perpetual plan
For Win 7 or later (64-bit)
For macOS 10.12 or later
Wondershare Filmora Video Editor is a powerful and easy video editing software that provides different methods to save and share the video. This software includes GIF support, 4K editing support, and an audio equalizer. You can remove background noise from the video. Its key features also include video stabilization , color tuning, scene detection, advanced text editor and audio mixer,
Wondershare Filmora comes with plenty of smart features, among which auto-reframe is top of the list. It saves your editing time to create or edit a professional video. This feature can detect a moving object in your video and crops it automatically to suit different aspect ratios so you can post it on various platforms. In this way, it enhances the efficiency of your video. To use the auto-reframe feature in Filmora, you can follow the steps below:
Step 1: Install and Launch Software
Download the software and launch it on your devices. From Tools, select Auto Reframe.

Step 2: Import File
Use the drag and drop feature to import the file or click on the Import button for selecting and importing it.

Step 3: Choose Aspect Ratio
To start reframing, select the aspect ratio you need. You can also define the motion speed of the reframed video clip to make it fast or slow or keep the original speed. And then click Analyze to apply changes. Here I will choose 9:16 portrait mode to take the example.
Step 4: Adjust Frame
Filmora will convert the video to the selected aspect ratio automatically. After analyzing, select the frame and adjust its position.

Step 4: Export File
Click the Export button to save the file when you are done with reframing, adjustment, and editing. Share it where you want to.

2. Adobe Premiere Rush
Supported OS: Android, iOS, Windows and macOS
Pricing: Free trial, $9.99 per month
Adobe Premiere Rush is a desktop and mobile video editing app that lets you create innovative videos from your computer or mobile phone. It enables you to control your creations with audio features and graphic templates. It allows you to capture, color-correct, change clip sequence, trim, add color filters, text overlays, and record voiceovers .
The feature of auto-reframe is also available in this software that allows you to adjust your video and do reframing. You can set the frames according to your needs and requirements through the application of Auto Reframe to your video without affecting its quality when uploaded on social media platforms.
Step 1: Download the Software
Download the software on your mobile or computer and launch it.
Step 2: Import a Video
Import a video to the software you want to edit and adjust its frames.
Step 3: Apply Auto Frame
Click Effects panel and then select Auto Reframe, which will automatically keep the most important parts of the shot in the frame, and then the process will be started.
Step 4: Adjust Frames and Add Effects
Click Adjust Frame to adjust frame size according to your needs. To add Pan and Zoom effects or other effects, click Effects, select Motion menu.

Step 4: Adjust and Export
Set the speed of the video and the clip duration, and then export your video when editing is done. Save it to your device and share it.
3. Adobe Premiere Pro
Supported OS: Windows and macOS
Pricing: $20.99 per month (annual plan monthly paid)
Adobe Premiere Pro is a video editing software that is flexible and efficient for professional videos. It consists of powerful creative tools for audio, graphics, and colors. It allows you to create simultaneous projects and use motion graphic templates to enhance your video. This software also provides the feature of VR audio editing, transitions, adding effects, etc.
Adobe has added the smart auto-reframe feature to the software, especially for the broadcasters to optimize their content for different social media platforms. Using the auto-reframe feature, they can edit video in both YouTube’s landscape interface and Instagram’s vertical format.
Step 1: Download and Launch Software
Download the software from its official website, install it and launch it to use.
Step 2: Select the Sequence
Right-click and select the Auto Reframe Sequence option. Click New Item and select Sequence to create a sequence or add an already shot sequence.
Step 3: Apply Auto Reframe Feature
Select Effects and double click Auto Reframe tab to apply its effects. Select Aspect Ratio for reframing the video.

Step 4: Export and Save
Export the file when the auto frame feature is applied. Save it and share it.
4. Final Cut Pro X
Supported OS: Mac OS
Pricing: Free trial, $299.99
Final Cut Pro X was developed by Apple. It is a video editing software that allows you to edit a simple video to a traditional one because it consists of the Object Tracker for adding dynamic text to the video.
You can also add colors to the moving footage. You can apply tracking data to other graphics and text files to enhance your work.
The smart auto-frame feature present in Final Cut Pro X allows you to adjust the aspect ratios of the video file. Smart Conform feature will enable you to Auto Reframe in this Apple’s software where it works on sequences.
Step 1: Download and Install Software
Download Final Cut Pro X from its official website, install and launch it.
Step 2: Create Project
Create a project with the aspect ratio you need, i.e., vertical, landscape, square, etc, and click Smart Conform to apply Auto Reframe, and then set frame size and set the aspect ratio to maximize image quality. In this way, Final Cut Pro will analyze all the clips, focus on the most interesting parts, and automatically conform each clip to fill the entire frame.

Step 3: Add File and Adjust
Add file to the timeline, and you will the video is auto reframed in the Preview window. You can skim through the project to check how the Smart Conform tool did on the rest of the clips.
If you find some frames are out of the edge, you can manually adjust its position with keyframing.
Step 4: Save File
After everything is finely adjusted, export the edited and adjusted video and save it to your device.
5. Kamua
Supported OS: Online tool available for all devices
Pricing: Free
Kamua is a video editing browser-based tool that does not require to be downloaded. It comes with a user-friendly interface that makes it easy to use and understand. You can add subtitles to your video using this tool. It allows you to add filters to your video to make it effective and gain the attention of your followers. Its Ai features let you crop the video efficiently.
You can change the dimensions of the video and aspect ratio from vertical to horizontal using the Auto Reframe feature. In this software, the Auto Reframe feature is enabled by the AutoCrop feature that allows you to resize and reframe your video or the clips that have movement.
Step 1: Visit the Official Website
Open the official website of Kamua to use it for reframing: https://kamua.com/ .
Step 2: Select Aspect Ratio
Open Crop Settings and set the Aspect ratio for your file
Step 3: Apply Feature
Toggle AutoCrop and click Generate AutoCrop Preview. Set the aspect ratio and video dimensions
Step 4: Export File
Export the edited file when you are done with the reframing and resizing step. Save the file and share it to your desired platform.
Note: Since 16 November, 2021, Kamua is part of Jellysmack and the services has been discontinued. If you didn’t register it before, you may can’t use the features mentioned above.
Conclusion
The modern video editing software comes with the feature of smart auto reframing. This feature allows you to upload your video according to the platform where you want to upload it. For example, if you need to upload a video on YouTube, you can set the aspect ratio in the landscape interface. And if you want to upload your video on Instagram, you can set the aspect ratio to vertical format. These tools also allow you to set video dimensions. They not only allow you to edit videos but also the images having motion.
For Win 7 or later (64-bit)
For macOS 10.12 or later
Wondershare Filmora Video Editor is a powerful and easy video editing software that provides different methods to save and share the video. This software includes GIF support, 4K editing support, and an audio equalizer. You can remove background noise from the video. Its key features also include video stabilization , color tuning, scene detection, advanced text editor and audio mixer,
Wondershare Filmora comes with plenty of smart features, among which auto-reframe is top of the list. It saves your editing time to create or edit a professional video. This feature can detect a moving object in your video and crops it automatically to suit different aspect ratios so you can post it on various platforms. In this way, it enhances the efficiency of your video. To use the auto-reframe feature in Filmora, you can follow the steps below:
Step 1: Install and Launch Software
Download the software and launch it on your devices. From Tools, select Auto Reframe.
Step 2: Import File
Use the drag and drop feature to import the file or click on the Import button for selecting and importing it.
Step 3: Choose Aspect Ratio
To start reframing, select the aspect ratio you need. You can also define the motion speed of the reframed video clip to make it fast or slow or keep the original speed. And then click Analyze to apply changes. Here I will choose 9:16 portrait mode to take the example.
Step 4: Adjust Frame
Filmora will convert the video to the selected aspect ratio automatically. After analyzing, select the frame and adjust its position.
Step 4: Export File
Click the Export button to save the file when you are done with reframing, adjustment, and editing. Share it where you want to.
2. Adobe Premiere Rush
Supported OS: Android, iOS, Windows and macOS
Pricing: Free trial, $9.99 per month
Adobe Premiere Rush is a desktop and mobile video editing app that lets you create innovative videos from your computer or mobile phone. It enables you to control your creations with audio features and graphic templates. It allows you to capture, color-correct, change clip sequence, trim, add color filters, text overlays, and record voiceovers .
The feature of auto-reframe is also available in this software that allows you to adjust your video and do reframing. You can set the frames according to your needs and requirements through the application of Auto Reframe to your video without affecting its quality when uploaded on social media platforms.
Step 1: Download the Software
Download the software on your mobile or computer and launch it.
Step 2: Import a Video
Import a video to the software you want to edit and adjust its frames.
Step 3: Apply Auto Frame
Click Effects panel and then select Auto Reframe, which will automatically keep the most important parts of the shot in the frame, and then the process will be started.
Step 4: Adjust Frames and Add Effects
Click Adjust Frame to adjust frame size according to your needs. To add Pan and Zoom effects or other effects, click Effects, select Motion menu.
Step 4: Adjust and Export
Set the speed of the video and the clip duration, and then export your video when editing is done. Save it to your device and share it.
3. Adobe Premiere Pro
Supported OS: Windows and macOS
Pricing: $20.99 per month (annual plan monthly paid)
Adobe Premiere Pro is a video editing software that is flexible and efficient for professional videos. It consists of powerful creative tools for audio, graphics, and colors. It allows you to create simultaneous projects and use motion graphic templates to enhance your video. This software also provides the feature of VR audio editing, transitions, adding effects, etc.
Adobe has added the smart auto-reframe feature to the software, especially for the broadcasters to optimize their content for different social media platforms. Using the auto-reframe feature, they can edit video in both YouTube’s landscape interface and Instagram’s vertical format.
Step 1: Download and Launch Software
Download the software from its official website, install it and launch it to use.
Step 2: Select the Sequence
Right-click and select the Auto Reframe Sequence option. Click New Item and select Sequence to create a sequence or add an already shot sequence.
Step 3: Apply Auto Reframe Feature
Select Effects and double click Auto Reframe tab to apply its effects. Select Aspect Ratio for reframing the video.
Step 4: Export and Save
Export the file when the auto frame feature is applied. Save it and share it.
4. Final Cut Pro X
Supported OS: Mac OS
Pricing: Free trial, $299.99
Final Cut Pro X was developed by Apple. It is a video editing software that allows you to edit a simple video to a traditional one because it consists of the Object Tracker for adding dynamic text to the video.
You can also add colors to the moving footage. You can apply tracking data to other graphics and text files to enhance your work.
The smart auto-frame feature present in Final Cut Pro X allows you to adjust the aspect ratios of the video file. Smart Conform feature will enable you to Auto Reframe in this Apple’s software where it works on sequences.
Step 1: Download and Install Software
Download Final Cut Pro X from its official website, install and launch it.
Step 2: Create Project
Create a project with the aspect ratio you need, i.e., vertical, landscape, square, etc, and click Smart Conform to apply Auto Reframe, and then set frame size and set the aspect ratio to maximize image quality. In this way, Final Cut Pro will analyze all the clips, focus on the most interesting parts, and automatically conform each clip to fill the entire frame.
Step 3: Add File and Adjust
Add file to the timeline, and you will the video is auto reframed in the Preview window. You can skim through the project to check how the Smart Conform tool did on the rest of the clips.
If you find some frames are out of the edge, you can manually adjust its position with keyframing.
Step 4: Save File
After everything is finely adjusted, export the edited and adjusted video and save it to your device.
5. Kamua
Supported OS: Online tool available for all devices
Pricing: Free
Kamua is a video editing browser-based tool that does not require to be downloaded. It comes with a user-friendly interface that makes it easy to use and understand. You can add subtitles to your video using this tool. It allows you to add filters to your video to make it effective and gain the attention of your followers. Its Ai features let you crop the video efficiently.
You can change the dimensions of the video and aspect ratio from vertical to horizontal using the Auto Reframe feature. In this software, the Auto Reframe feature is enabled by the AutoCrop feature that allows you to resize and reframe your video or the clips that have movement.
Step 1: Visit the Official Website
Open the official website of Kamua to use it for reframing: https://kamua.com/ .
Step 2: Select Aspect Ratio
Open Crop Settings and set the Aspect ratio for your file
Step 3: Apply Feature
Toggle AutoCrop and click Generate AutoCrop Preview. Set the aspect ratio and video dimensions
Step 4: Export File
Export the edited file when you are done with the reframing and resizing step. Save the file and share it to your desired platform.
Note: Since 16 November, 2021, Kamua is part of Jellysmack and the services has been discontinued. If you didn’t register it before, you may can’t use the features mentioned above.
Conclusion
The modern video editing software comes with the feature of smart auto reframing. This feature allows you to upload your video according to the platform where you want to upload it. For example, if you need to upload a video on YouTube, you can set the aspect ratio in the landscape interface. And if you want to upload your video on Instagram, you can set the aspect ratio to vertical format. These tools also allow you to set video dimensions. They not only allow you to edit videos but also the images having motion.
Video Editing Made Easy: A Comprehensive Guide to Windows Movie Maker
How to Edit Videos in Windows Live Movie Maker

Ollie Mattison
Mar 27, 2024• Proven solutions
Microsoft has released Windows Live Movie Maker on August 19, 2009 as part of a refresh to their Windows Live Essentials download. Windows Live Movie Maker is the first application designed for Windows 7 and is built to make beautiful movies from your photos and videos. And the latest version is Windows Live Movie Maker 2011.
Update in 2017: Microsoft has stopped the Windows Essentials Suite support on January 10, 2017. It is claimed that it is no longer available for download. If you are looking for an alternative to windows essentials movie maker, or windows movie maker, try Filmora video editor, which is available on both Windows7, Windows8 and Windows 10.
Part 1: Best Alternative to Windows Movie Maker: Filmora [Windows7/8/10 & Mac]


Windows Live Movie Maker is a little bit limiting for video editing. In most cases, you need to run Windows 7. Fortunately, you do have other options. There is plenty of software which will do the same thing but better than Windows Live Movie Maker for you to edit your videos and burn videos to DVD. Among many of them, we recommend one Wondershare Filmora. You may wonder what’s so special with this Video Editor. First of all, it supports almost all kinds of video formats, such as AVI, MP4, MPG, MPEG, 3GP, WMV, ASF, RM, RMVB, DAT, MOV, MKV and HD video formats: MTS, M2TS(AVCHD ), TS(MPEG-2), HD MKV(, MPEG-2 HD), HD WMV(VC-1), and HD MOV(, MPEG-4). Secondly, it provides powerful video editing function, such as crop, trim, adjust video effect, add watermark, etc. Also, there are various title and text templates, filter/transition and effects presets for you to choose from. Thirdly, Windows Live Movie Maker can only generate WMV files directly, but this video editor supports burn video to DVD disc, DVD Folder and ISO file or save the video to most of the popular formats.
Part 2: How to Edit Videos in Windows Live Movie Maker [Step by Step]
1.Add Videos and Photos

While you are adding videos to Windows Live Movie Maker, you may encounter a problem like 3GP files can’t be added to Windows Live Movie Maker. Or it can’t be played in Window Live Movie Maker. And many other video files as well, such as RM, RMVB, DAT and HD video formats: MTS, TS, HD MKV, HD WMV, and HD MOV, etc. It’s quite necessary to get familiar with what all those files that could be imported to Windows Live Movie Maker.

Notes
- Video and music files that are protected with digital rights management (DRM) can’t be used in Windows Live Movie Maker.
- Support for using MPEG-2 and Microsoft Recorded TV Show video files in your movie is available only if your computer is running one of the following editions of Windows Vista or Windows 7: Windows Vista Home Premium, Windows Vista Ultimate, Windows 7 Home Premium, Windows 7 Professional, Windows 7 Enterprise, or Windows 7 Ultimate.
- AVCHD video files that contain Dolby Digital audio can be used in Windows Live Movie Maker if your computer is running one of the following editions of Windows 7: Windows 7 Home Premium, Windows 7 Professional, Windows 7 Enterprise, or Windows 7 Ultimate.
- MPEG-4 video files that contain audio can be used if you’re using Movie Maker on a computer running Windows 7.
- Some MPEG-4 video files can be used when you’re using Movie Maker on a computer running Windows Vista if the necessary audio and video codecs are installed.
After adding your photos or videos, you can also add audio or background music to your video clips by clicking the Add music option.
Learn details about How to Add and Edit Music in Windows Movie Maker
2. Video Editing
As we said before, Windows Live Movie Maker (later named Windows Movie Maker) is a simple and easy video editing software for Windows, it can complete some basic video editing and become a good choice for novices. Here, I will share with you about the basic video editing tutorial in the Movie Maker.

Cut & Trim & Split video in Windows Movie Maker
After adding videos and photos to the storyboard, you can now keep the useful sections and remove unwanted parts. To trim video, just place the playhead to the target position and right click the clip to select the Trim Set Start Point and move the playhead again to then end point and right click to select Set End Point. You can also go to the Edit tab and click the Split menu to split the video into parts. You can then delete and cut out unwanted sections or move it to the proper position.
Add Audio to Video: Record and add voiceover or Music
Windows Movie Maker also allows you to add narrations and background music to video footage. Just click the Add Music option and you can add music from online music libraries such as AudioMicro, Free Music Archive, and Vimeo or add music from the computer.

Add auto movie themes to Video
There is a built-in AutoMovie themes library in Movie Maker. You can use some popular themes such as Contemporary, Cinematic, Fade, Pan and Zoom, Black and White and Sepia.
Add texts &titles to Video
You can add titles, captions, and credits to video with windows movie maker, but it seems hard to add subtitles and customize its position. For more details about the text and title editing, check
Learn more details about How to Add Text to Video with Windows Movie Maker
Apply transitions & animations to video
The Movie Maker features lots of transitions under Animations tab. You can choose from wipes, cinematics, shatters, sweeps and curls, patterns and shapes, reveals, diagonals and dissolves.
Note: if you use the default themes, you won’t see all these transitions. Check the detailed steps about How to Add Transitions in Windows Movie Maker
Apply visual effects to video
We’ve introduced some of the best visual effects software before, but in Windows Movie Maker, you can also add effects such as 3D Ripple, Black and White, Blur, pixelate, mirrors, motions and fade effects.
Change video speed of video
The Movie Maker Edit tab allows you to adjust video volume, add fade in and fade out effects to video, or change video speed.
Learn more details about How to Speed Up Video in Windows Movie Maker
3. Save Video
After finish editing, you can upload your video clips to Facebook, YouTube, and other social media, or burn your videos to DVD with Windows DVD maker. You can also save your video clips on your computer.

You may also like: Windows Movie Maker VS Windows Live Movie Maker: What’s the Difference
While, if you find the windows movie maker editing features are limited based on your editing skills, you can try Wondershare Filmora. Below is a video tutorial about how to edit videos with Filmora.
Ollie Mattison
Ollie Mattison is a writer and a lover of all things video.
Follow @Ollie Mattison
Ollie Mattison
Mar 27, 2024• Proven solutions
Microsoft has released Windows Live Movie Maker on August 19, 2009 as part of a refresh to their Windows Live Essentials download. Windows Live Movie Maker is the first application designed for Windows 7 and is built to make beautiful movies from your photos and videos. And the latest version is Windows Live Movie Maker 2011.
Update in 2017: Microsoft has stopped the Windows Essentials Suite support on January 10, 2017. It is claimed that it is no longer available for download. If you are looking for an alternative to windows essentials movie maker, or windows movie maker, try Filmora video editor, which is available on both Windows7, Windows8 and Windows 10.
Part 1: Best Alternative to Windows Movie Maker: Filmora [Windows7/8/10 & Mac]
Windows Live Movie Maker is a little bit limiting for video editing. In most cases, you need to run Windows 7. Fortunately, you do have other options. There is plenty of software which will do the same thing but better than Windows Live Movie Maker for you to edit your videos and burn videos to DVD. Among many of them, we recommend one Wondershare Filmora. You may wonder what’s so special with this Video Editor. First of all, it supports almost all kinds of video formats, such as AVI, MP4, MPG, MPEG, 3GP, WMV, ASF, RM, RMVB, DAT, MOV, MKV and HD video formats: MTS, M2TS(AVCHD ), TS(MPEG-2), HD MKV(, MPEG-2 HD), HD WMV(VC-1), and HD MOV(, MPEG-4). Secondly, it provides powerful video editing function, such as crop, trim, adjust video effect, add watermark, etc. Also, there are various title and text templates, filter/transition and effects presets for you to choose from. Thirdly, Windows Live Movie Maker can only generate WMV files directly, but this video editor supports burn video to DVD disc, DVD Folder and ISO file or save the video to most of the popular formats.
Part 2: How to Edit Videos in Windows Live Movie Maker [Step by Step]
1.Add Videos and Photos
While you are adding videos to Windows Live Movie Maker, you may encounter a problem like 3GP files can’t be added to Windows Live Movie Maker. Or it can’t be played in Window Live Movie Maker. And many other video files as well, such as RM, RMVB, DAT and HD video formats: MTS, TS, HD MKV, HD WMV, and HD MOV, etc. It’s quite necessary to get familiar with what all those files that could be imported to Windows Live Movie Maker.
Notes
- Video and music files that are protected with digital rights management (DRM) can’t be used in Windows Live Movie Maker.
- Support for using MPEG-2 and Microsoft Recorded TV Show video files in your movie is available only if your computer is running one of the following editions of Windows Vista or Windows 7: Windows Vista Home Premium, Windows Vista Ultimate, Windows 7 Home Premium, Windows 7 Professional, Windows 7 Enterprise, or Windows 7 Ultimate.
- AVCHD video files that contain Dolby Digital audio can be used in Windows Live Movie Maker if your computer is running one of the following editions of Windows 7: Windows 7 Home Premium, Windows 7 Professional, Windows 7 Enterprise, or Windows 7 Ultimate.
- MPEG-4 video files that contain audio can be used if you’re using Movie Maker on a computer running Windows 7.
- Some MPEG-4 video files can be used when you’re using Movie Maker on a computer running Windows Vista if the necessary audio and video codecs are installed.
After adding your photos or videos, you can also add audio or background music to your video clips by clicking the Add music option.
Learn details about How to Add and Edit Music in Windows Movie Maker
2. Video Editing
As we said before, Windows Live Movie Maker (later named Windows Movie Maker) is a simple and easy video editing software for Windows, it can complete some basic video editing and become a good choice for novices. Here, I will share with you about the basic video editing tutorial in the Movie Maker.
Cut & Trim & Split video in Windows Movie Maker
After adding videos and photos to the storyboard, you can now keep the useful sections and remove unwanted parts. To trim video, just place the playhead to the target position and right click the clip to select the Trim Set Start Point and move the playhead again to then end point and right click to select Set End Point. You can also go to the Edit tab and click the Split menu to split the video into parts. You can then delete and cut out unwanted sections or move it to the proper position.
Add Audio to Video: Record and add voiceover or Music
Windows Movie Maker also allows you to add narrations and background music to video footage. Just click the Add Music option and you can add music from online music libraries such as AudioMicro, Free Music Archive, and Vimeo or add music from the computer.
Add auto movie themes to Video
There is a built-in AutoMovie themes library in Movie Maker. You can use some popular themes such as Contemporary, Cinematic, Fade, Pan and Zoom, Black and White and Sepia.
Add texts &titles to Video
You can add titles, captions, and credits to video with windows movie maker, but it seems hard to add subtitles and customize its position. For more details about the text and title editing, check
Learn more details about How to Add Text to Video with Windows Movie Maker
Apply transitions & animations to video
The Movie Maker features lots of transitions under Animations tab. You can choose from wipes, cinematics, shatters, sweeps and curls, patterns and shapes, reveals, diagonals and dissolves.
Note: if you use the default themes, you won’t see all these transitions. Check the detailed steps about How to Add Transitions in Windows Movie Maker
Apply visual effects to video
We’ve introduced some of the best visual effects software before, but in Windows Movie Maker, you can also add effects such as 3D Ripple, Black and White, Blur, pixelate, mirrors, motions and fade effects.
Change video speed of video
The Movie Maker Edit tab allows you to adjust video volume, add fade in and fade out effects to video, or change video speed.
Learn more details about How to Speed Up Video in Windows Movie Maker
3. Save Video
After finish editing, you can upload your video clips to Facebook, YouTube, and other social media, or burn your videos to DVD with Windows DVD maker. You can also save your video clips on your computer.
You may also like: Windows Movie Maker VS Windows Live Movie Maker: What’s the Difference
While, if you find the windows movie maker editing features are limited based on your editing skills, you can try Wondershare Filmora. Below is a video tutorial about how to edit videos with Filmora.
Ollie Mattison
Ollie Mattison is a writer and a lover of all things video.
Follow @Ollie Mattison
The Ultimate List of Free AVI Video Rotation Tools [Windows, MAC, Mobile, Online]
Did you rush to record a video in a mistaken direction? Or were you just excited to film the moments without noticing the position of your camera? Whatever the case, if you regret recording the clip at the incorrect angle, here’s your chance to do the alteration. The article includes the top 16 best free AVI video rotators you can use on MAC, Windows, iPhone, Android, and online. Plus, if you’re looking for a single platform to rotate or flip videos, you can learn the complete process by following the step-by-step Filmora Video Editor tutorial that works on MAC and Windows.
In this Article
Part 1: Best AVI Video Rotators to Rotate AVI Video on Windows and MAC – Filmora Video Editor [with steps]
Part 2: Top 3 Free Video Rotators on Windows
Part 3: Top 3 Free Video Rotators on MAC
Part 4: Top 3 Free Video Rotators on Android
Part 5: Top 3 Free Video Rotators on iPhone
Part 6: Top 3 Free Video Rotators Online
Part 7: Bottom Line
Part 8: FAQs
Part 1: Best AVI Video Rotators to Rotate AVI Video on Windows and MAC – Filmora Video Editor [with steps]
Heard about Filmora but never used it? Surely, you’re missing great fun if you’re a video professional or a beginner video editor.
Filmora is an award-winning video editing software that works for both PC and MAC users. While the tool comes at an affordable price, you can still download the free setup to start showing your creativity.
This video editor has dozens of new effects, transitions, and many more features, which can help you create engaging videos. You can also enjoy some more key features, including audio ducking, color matching, motion tracking, split screen, video filters and transitions, speed control, and multiple exporting formats.
And, of course, video rotation is as easy as ABC! You can follow this step-by-step tutorial to rotate or flip your videos using Filmora 10. You can apply the same procedure if you have a different version.
Step 1: Download and Install Filmora
Visit Filmora Video Editor’s official website to download the newest version. Click on the “Try it Free” button according to your operating system (look at the icons on the button to identify the OS).
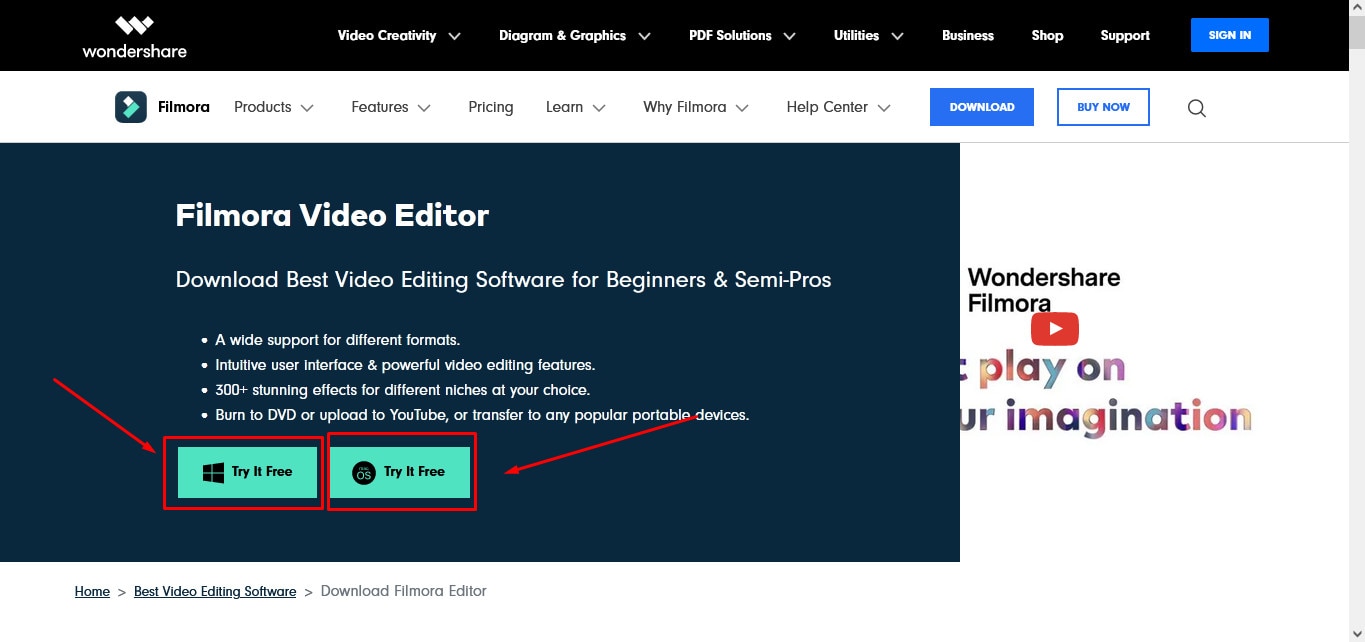
After downloading the setup, double-click the file to install the video editor. Then, open the program.
Feel free to judge the interface (see the image below), as it is pretty simple to understand. So, even if you’re a beginner, you can learn this tool within a few minutes of practice.
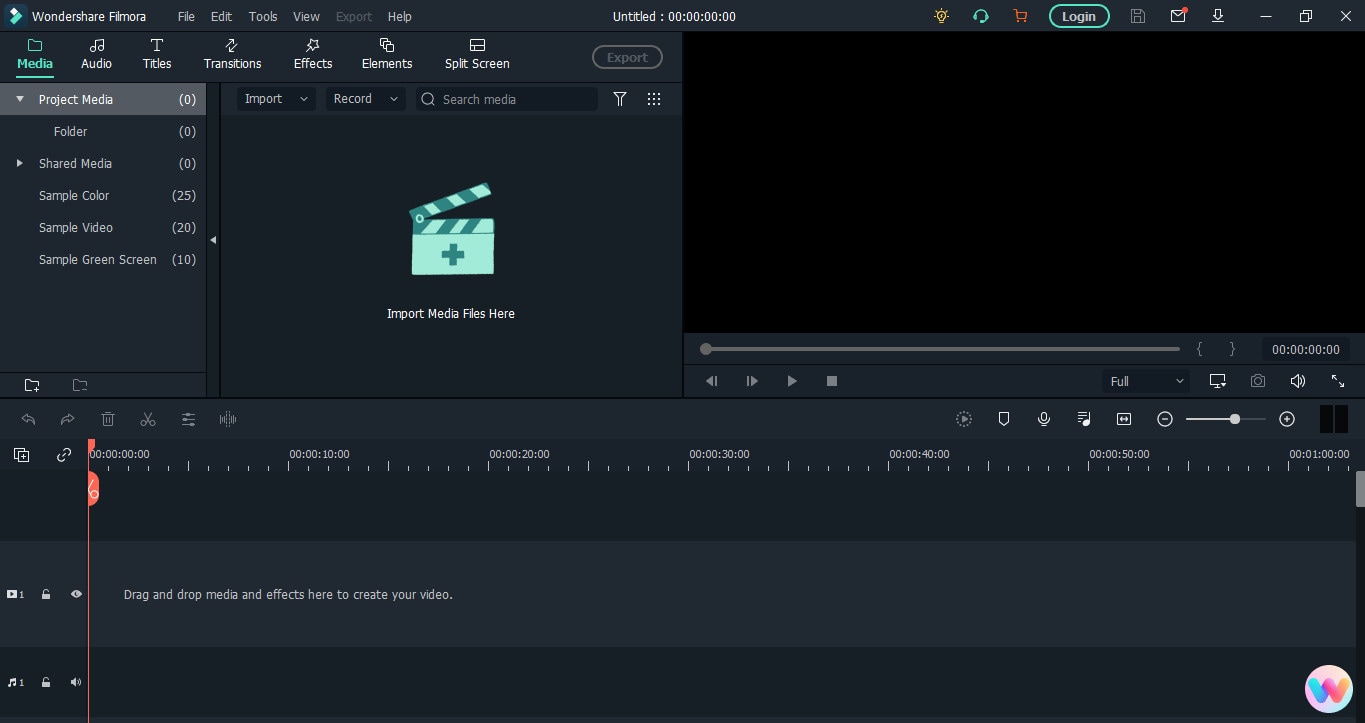
Step 2: Import the Video You Want to Rotate
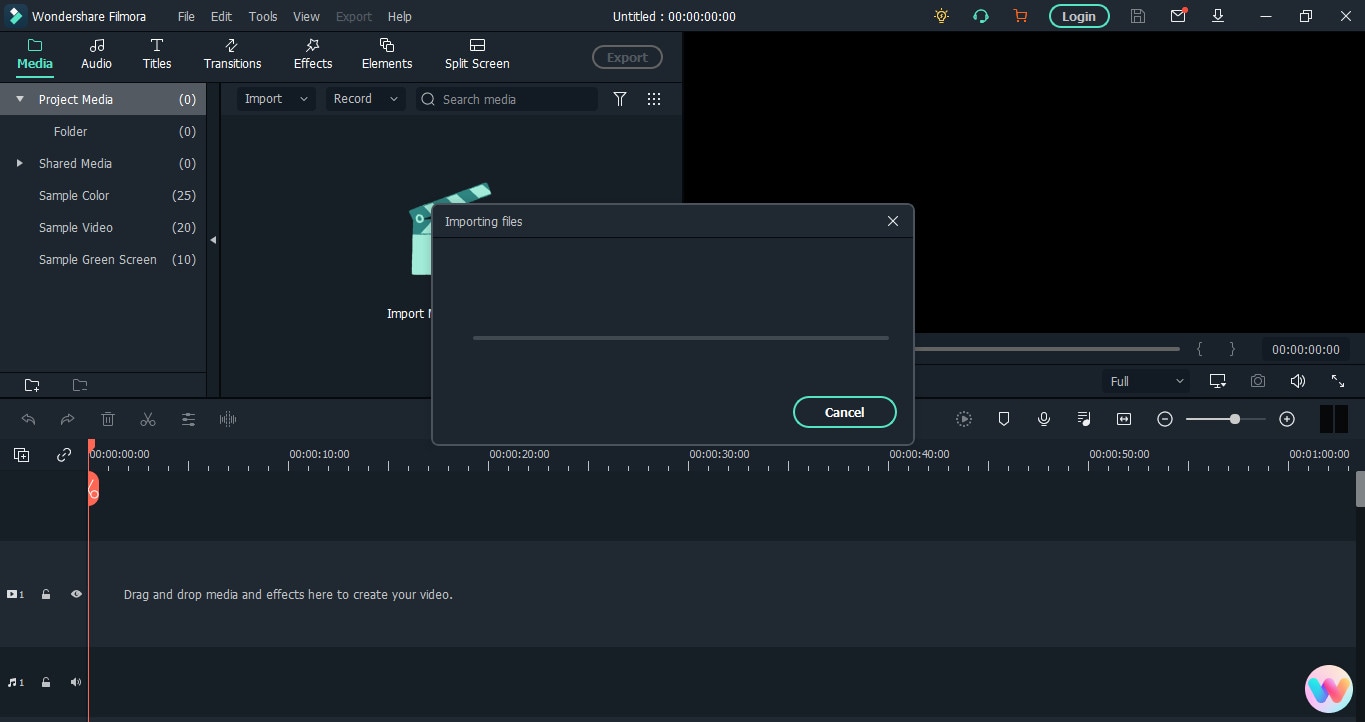
The next is to bring the video file to Filmora’s library before proceeding. To do that, click on the “Movie Clip” icon in the center of the interface to select the clip from your computer’s hard drive.

Double-click or select the video and click the “Open” button to import files. The importing process may take several seconds or a few minutes, depending on the video size.
If you’re using Filmora for the first time, you might see the “Create Proxy File” message popping up right after the video import. So, simply click on the “Yes” button to go ahead.
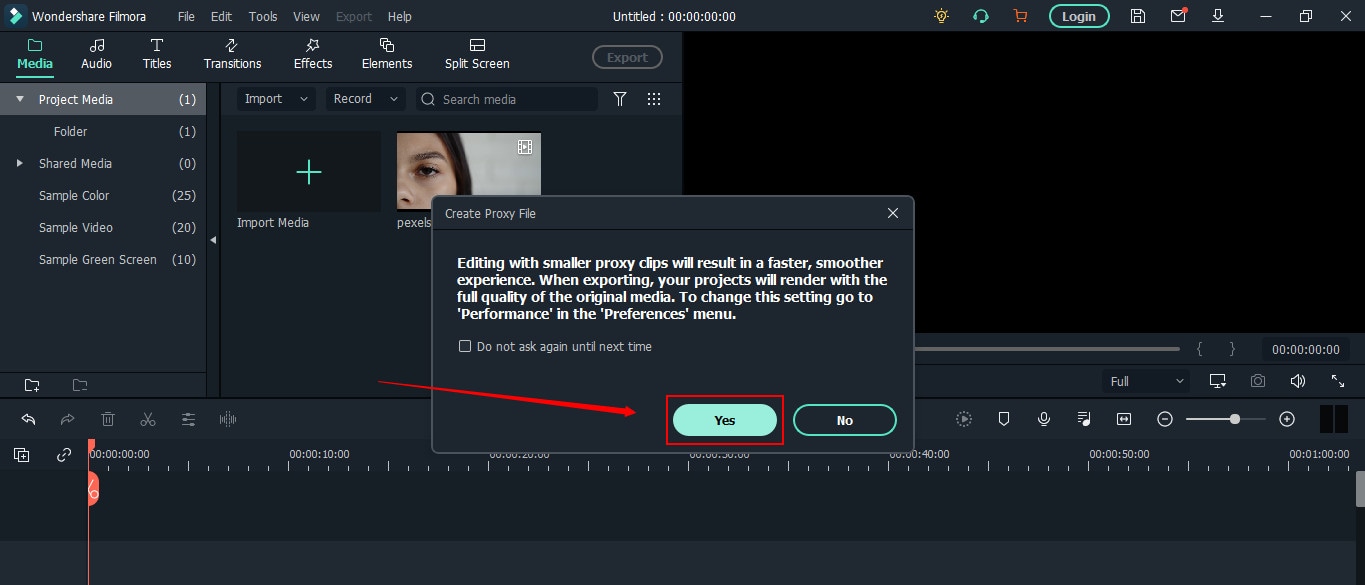
Your video will be stored in the “Project Media” tab and will be visible next to the preview window.
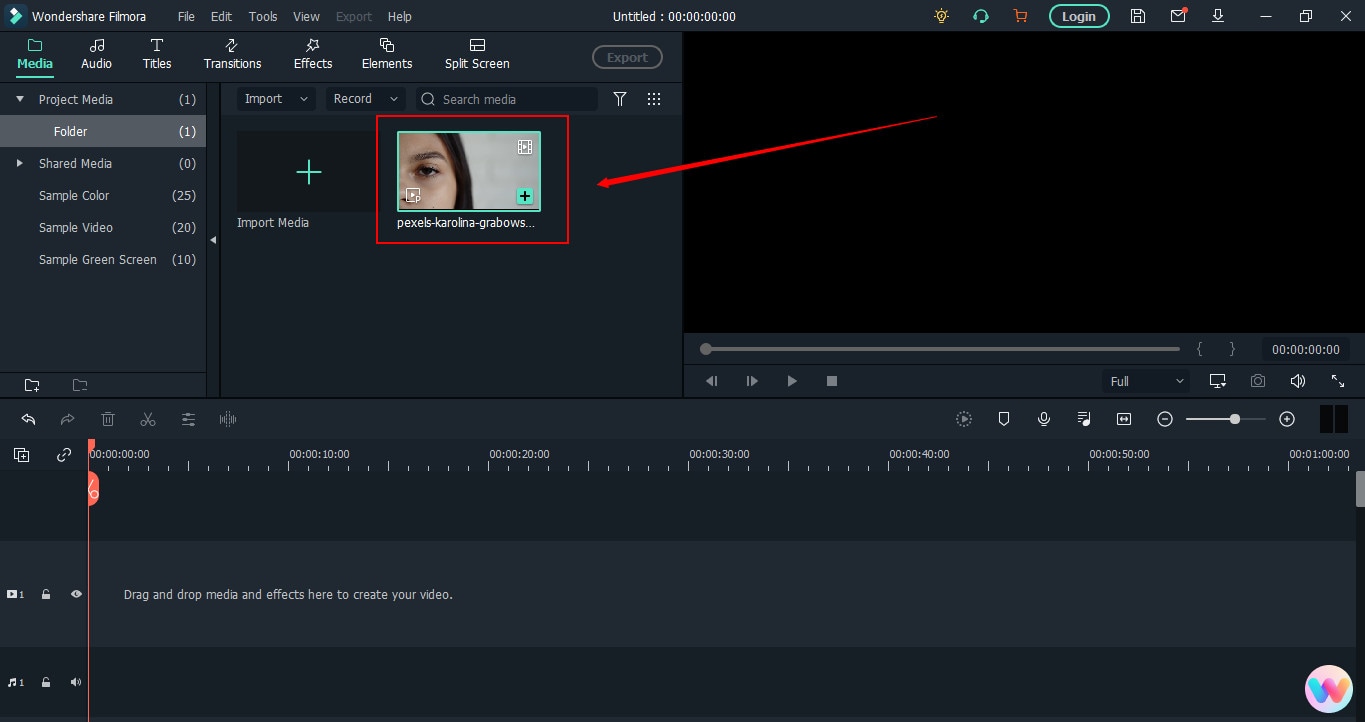
Step 3: Drag and Drop the Video on Filmora’s Timeline
To rotate the video, first, you need to add it to the track. For that, take your mouse on the video, and select it by clicking the right button on your mouse. Keep holding the button to drag the video on the timeline. Remove your finger from the button after placing the clip on the track.

Right after the above step, you will get another message to help you decide whether you want to keep the resolution of the video to its original settings or match the media. Choose “Match to Media” for fast rendering.
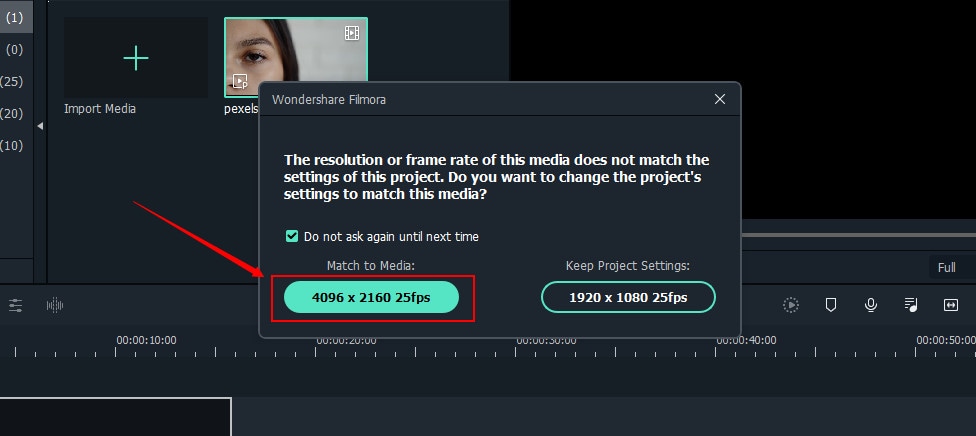
However, if you’re a professional video editor, feel free to select the option that suits you the most.
Step 4: Rotate Your Video with Filmora
Double-click anywhere on the video that is already on the timeline.

You will see three tabs – “Video,” “Color,” and “Animation.” So choose the “Video” tab and click on the “Transform” option.
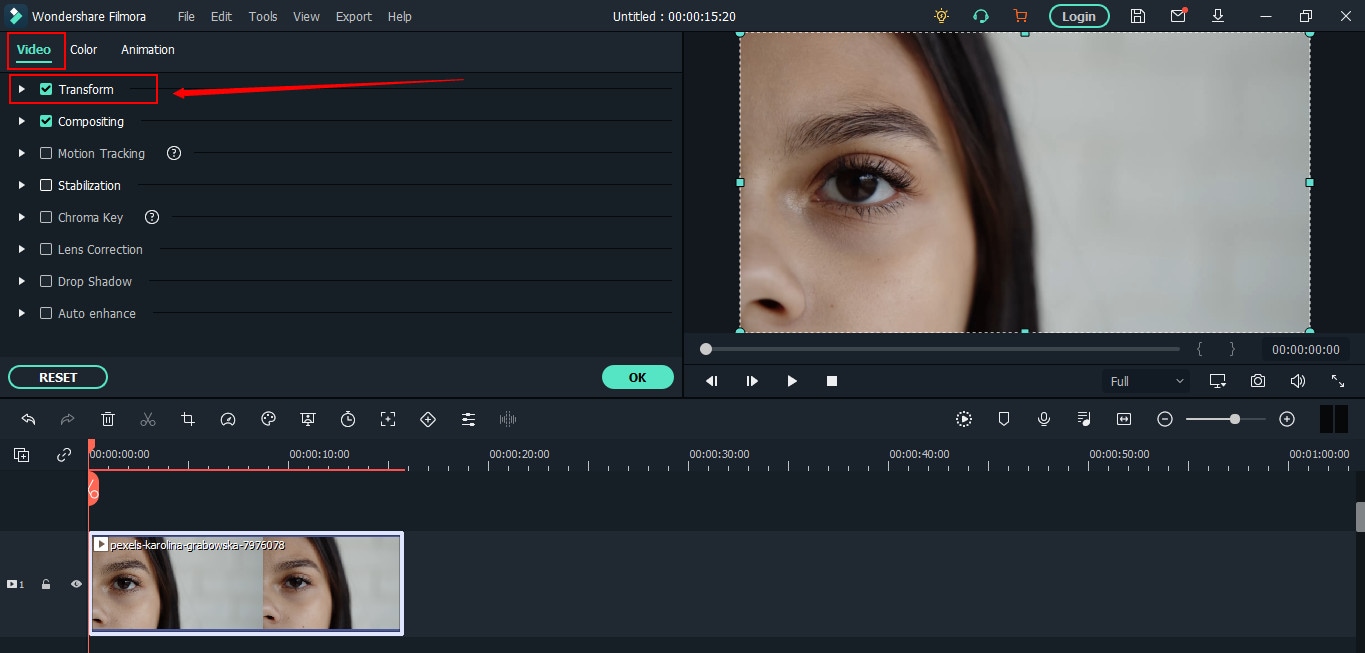
Once done, you will see three important options, which will help you rotate the video.
First, you will notice the “Rotate” option with an adjustment bar. This option will turn your video to different angles of your choice.
All you need to do is play with the adjustments by grabbing the “Round” knob-like button while keeping an eye on the preview window to see the results.
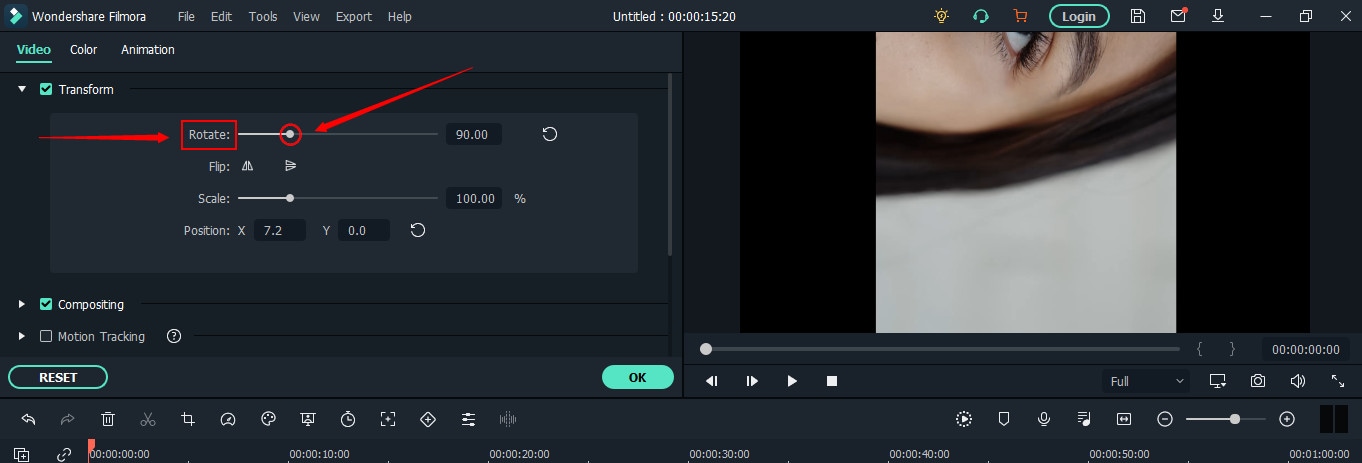
Just below “Rotate,” you will see the “Flip” option with “Horizontal” and “Vertical” mirror icons. Choosing any one of the icons will make your video mirror flip in horizontal or vertical directions.
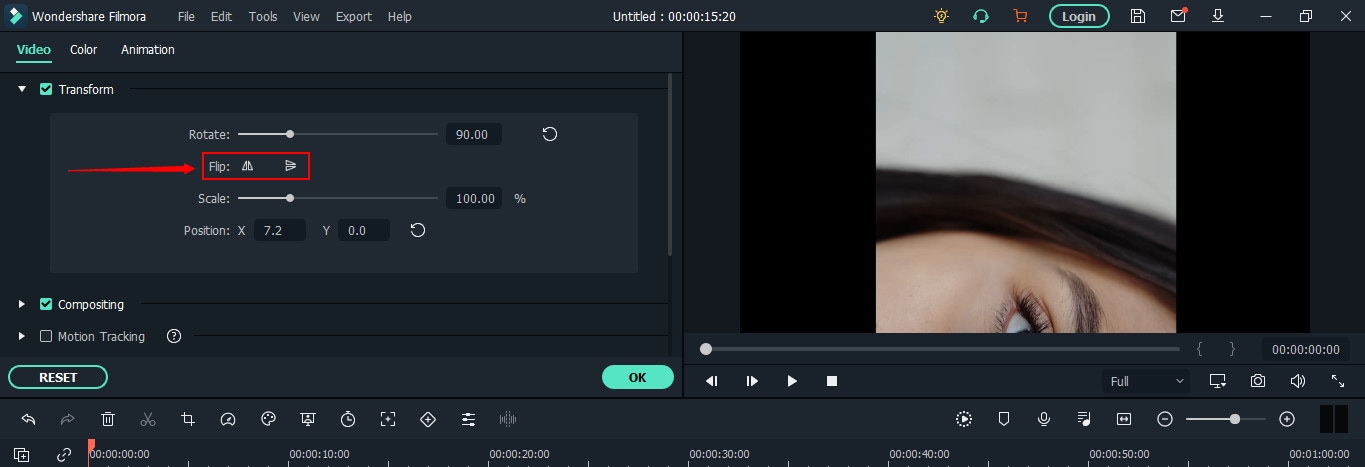
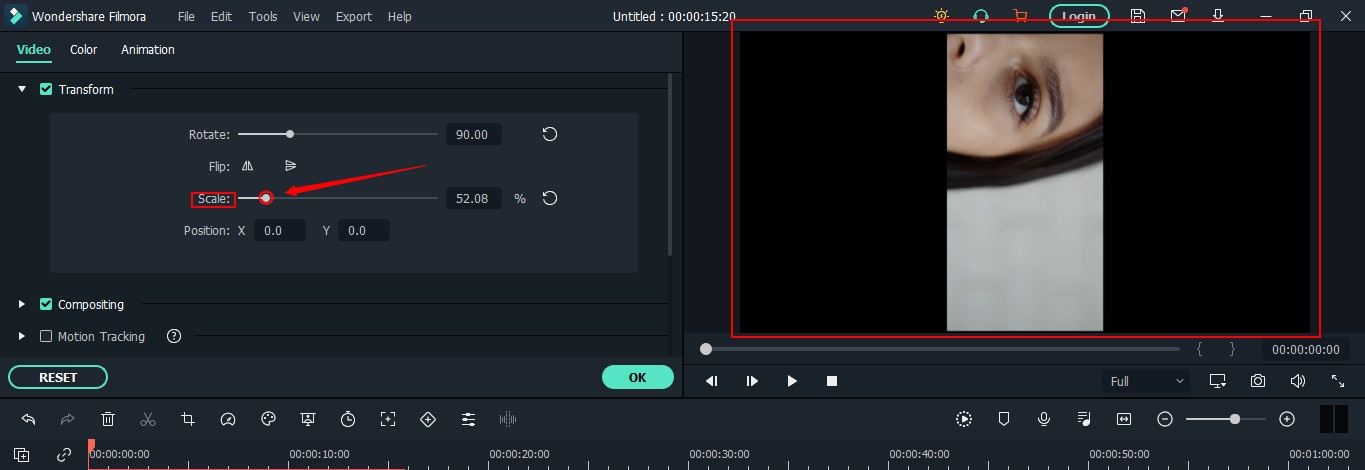
The third option is “Scale” beneath the “Flip” option. Similar to the rotate option, this tool also has an adjustment bar. You can make adjustments to magnify or de-magnify the clip to fit the screen. Although this option isn’t mandatory, you can still use it if you find the need.

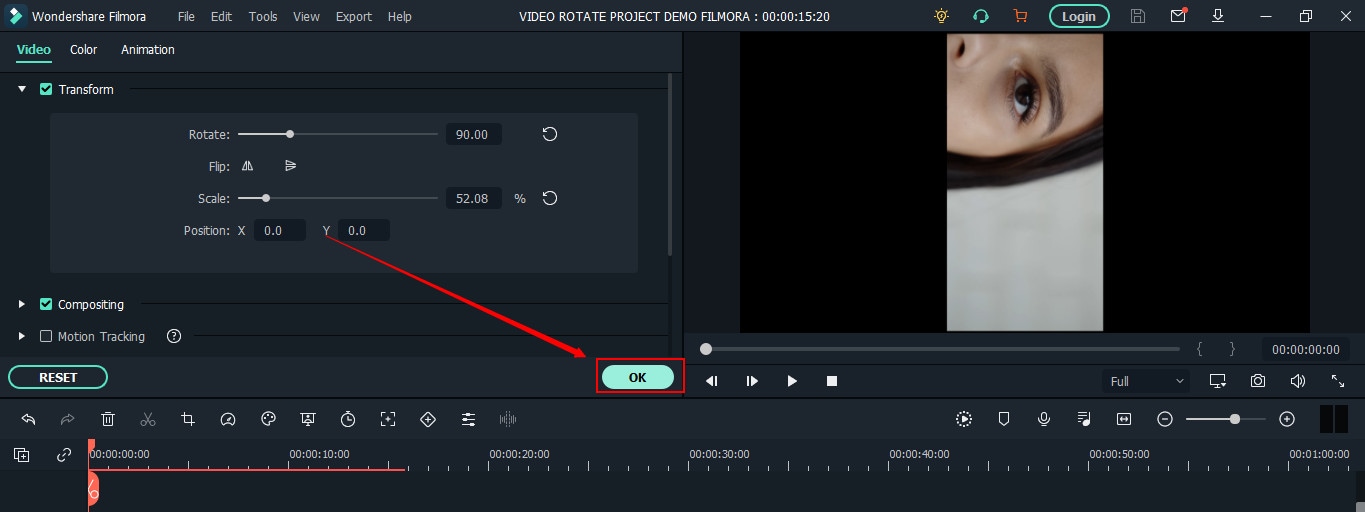
Now, click the “OK” button to apply rotation and return to the timeline.
Step 5: Save and Export Rotated Video to Your Widows or MAC
Here you will learn how to save the project and then export it. If you have already saved the project in the beginning, skip reading this part and directly hit the “Export” button.
Contrarily, you can also directly export your files without saving the project. But you won’t be able to make changes to the same project in the future as all source files will be lost. Therefore, saving the project and then exporting files is recommended.
So, if you’re done with step 4, save your project before going further.
You can go to the “File” tab, choose “Save Project,” and rename the video.
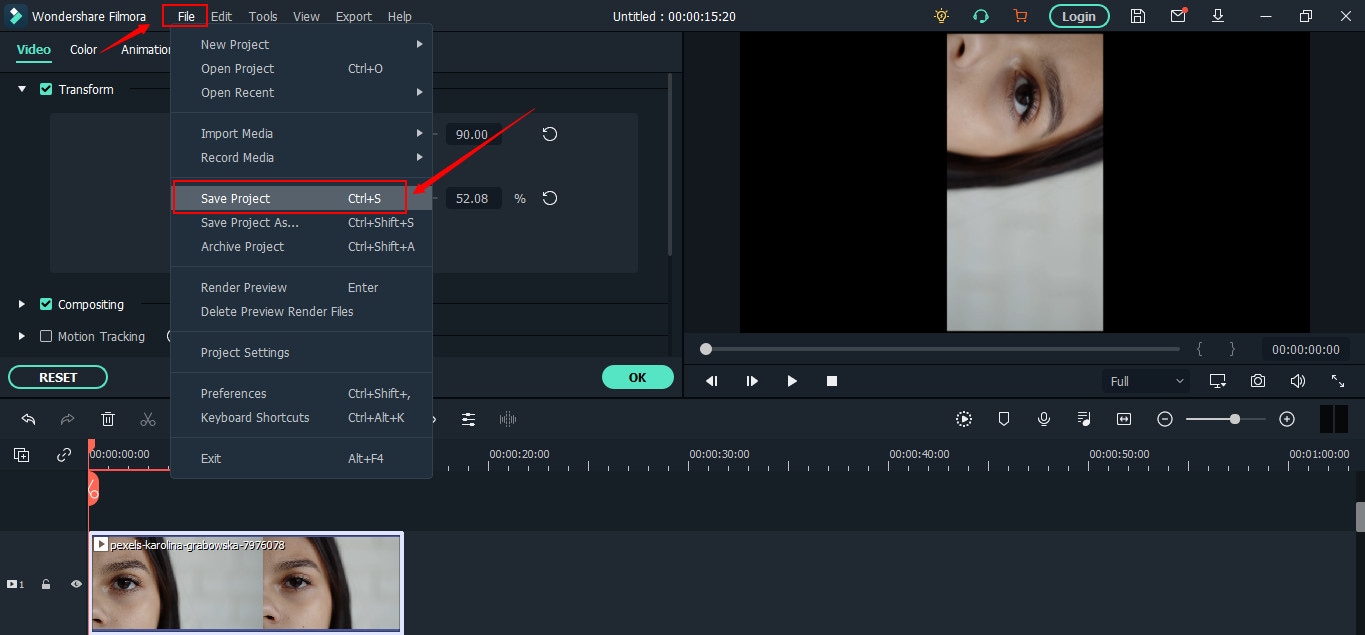
Rename your file and click on the “Save” button.
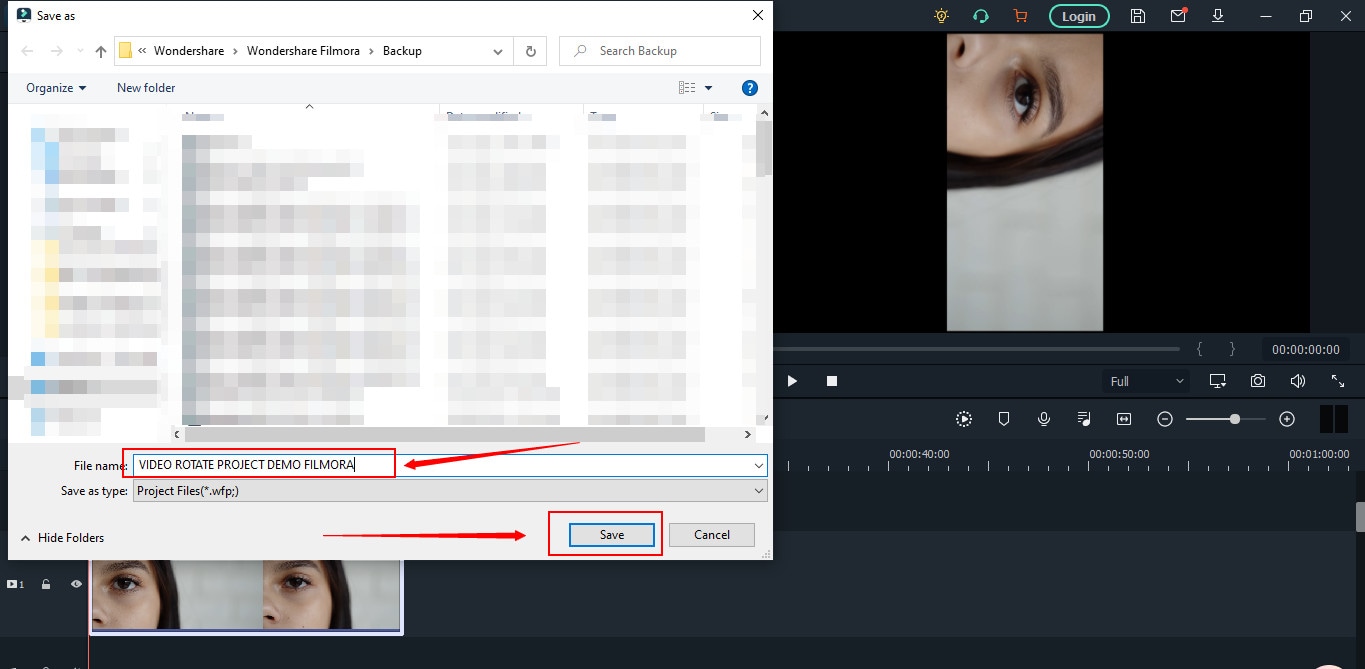
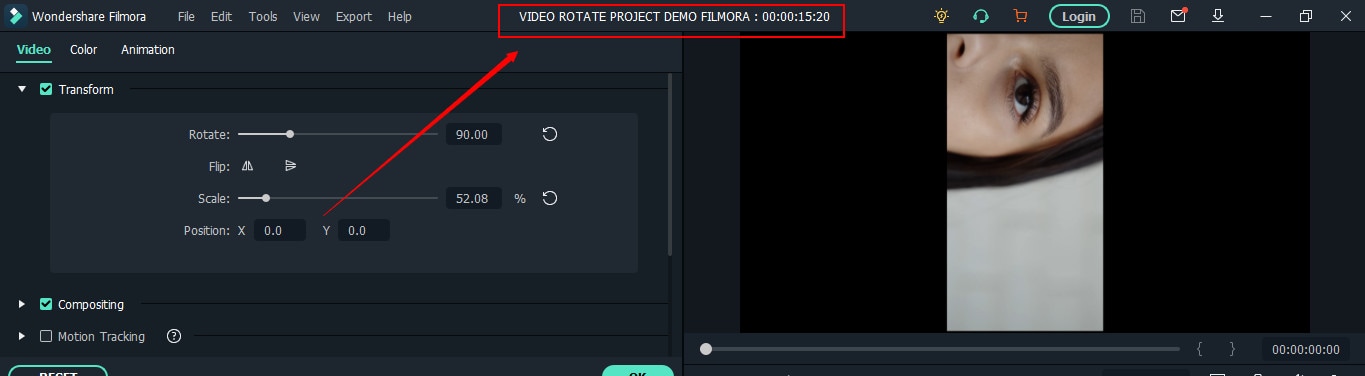
The new name will appear at the top of Filmora’s interface.
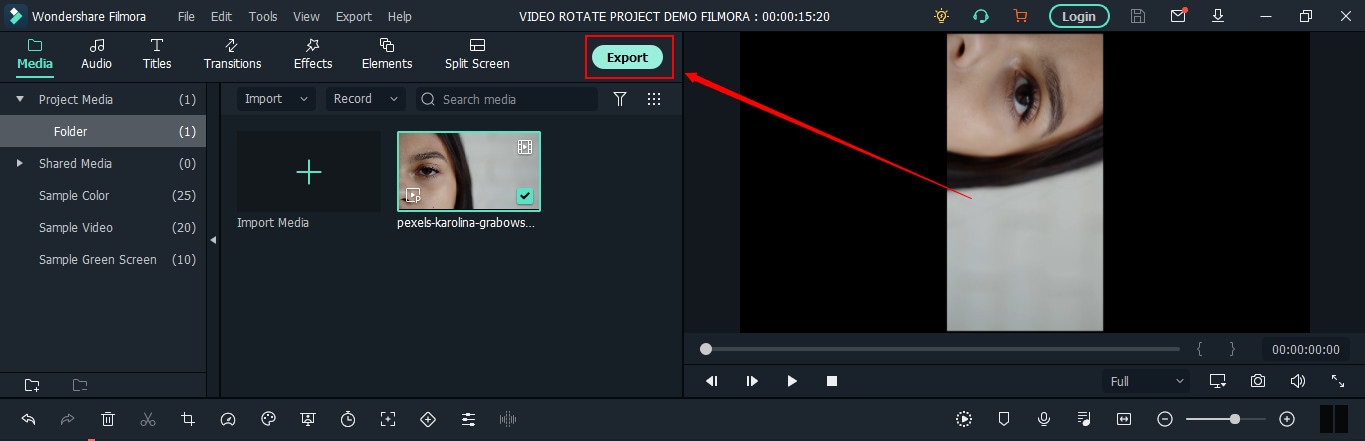
Lastly, click the “Export” button to save the file on your computer.
F 17
Part 2: Top 3 Free Video Rotators on Windows
No luck with finding free movie rotators for your Windows operating system? Don’t stress! These three AVI video rotators will solve your problem.
Free Video Flip and Rotate
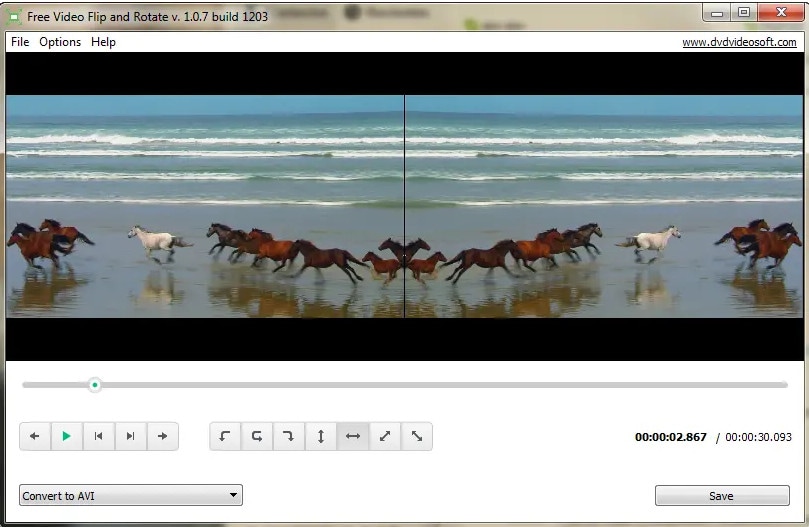
This tool could satisfy your requirements if you’re looking for a core video rotator. As the name sounds, the Free Video Flip and Rotate is software by DVD Video Soft that allows you to modify the orientation of your videos easily. In other words, this is one of the easiest video rotators for Windows users, which is also free to download and use.
It has a simple interface with user-friendly options, which permits you to rotate your videos from different angles. Besides, you can also use this software for mirroring your clips. Moreover, you can save your project in various video formats, such as AVI.
Features
- Vertical flip
- Horizontal flip
- 180° video rotation
- 90° clockwise video rotation
- 90° counter-clockwise video rotation
- Vertical flip with 90° clockwise video rotation
- Horizontal flip with 90° counter-clockwise video rotation
Pros
- One-click results
- Easy to install and run
- Free and user-friendly software
- Does not contain ads or spyware
- Requires 40.50 MB of hard disk space
- Supports AVI and other video formats
- Supports XP, Windows 7, 8, 10, and 11 versions
Cons
- Unavailable for MAC users
- Lack of additional features, such as color correction, cropping, etc.
XMedia Recode
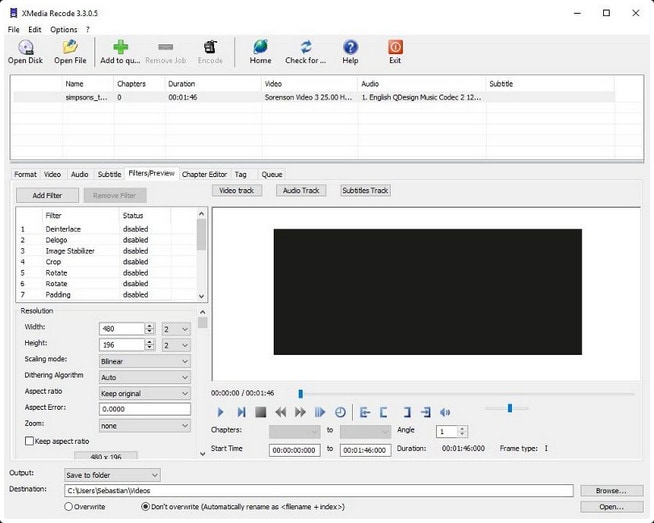
XMedia Recode is a free tool for Windows users. While the software is meant to convert videos into different formats, you can also use it for video rotation. Nevertheless, XMedia Recode has various other options, making it perfect for basic video editing.
Moreover, this software can convert unprotected Blue-rays/DVDs, create different chapters, import subtitle tracks, and many more. However, one of the best features of this video converter-cum-rotator is the video remux. That means you can convert the video container format without changing the original size.
Contrarily, XMedia Recode allows you to rotate and convert videos for countless devices, such as iPhone, iPad, Android, Xbox360, and more. But all this can be done only through Windows operating system. You can download this tool without any paid subscription. However, choose suitable processing for smooth installation, such as Windows 64bit, Windows 32bit, Vista, or XP SP3.
Features
- Blur
- Delogo
- Rotation
- Padding
- Denoise
- Cropping
- Image flip
- Swap U/V
- Clip speed
- Color curves
- Video fading
- Mirror effect
- Image stabilization
- Custom resolution
- Import 32 subtitle tracks
- Direct copy of video and audio stream into your desired format
Pros
- Free software
- Speedy conversion
- Fast batch processing
- Variety of video and audio features
- Works on Windows XP to Windows 10
- Supports 40+ video formats, including AVI
Cons
- A bit complex interface for new users
Altrasoft

Altrasoft is a small software for Windows to help rotate and convert your videos. The total size of the setup is just 971 KB.
This software is best for small video clips, which need to be rotated without wasting time. The program is free to download and use. However, the interface appears a bit old compared to new tools.
Also, unlike XMedia Recode, Altrasoft comes with limited options. So, if you only desire to rotate or flip your video and save it in the AVI or any other format, go ahead and download it.
Features
- Borders
- Zooming
- Rotation
- Color settings
- Audio formatting
- Video codec settings
- Audio codec settings
Pros
- Free to use
- Ideal for short videos
- Extremely light software
- Simple rotation options
- Rotation angle adjustments
Cons
- Outdated interface
- Lack of customer support
Part 3: Top 3 Free Video Rotators on MAC
Have you already lost your MAC storage on downloading some incompetent video rotators which claim to support AVI files? You can try these three video rotators for MAC, which are free and compatible with AVI video formats.
Kdenlive
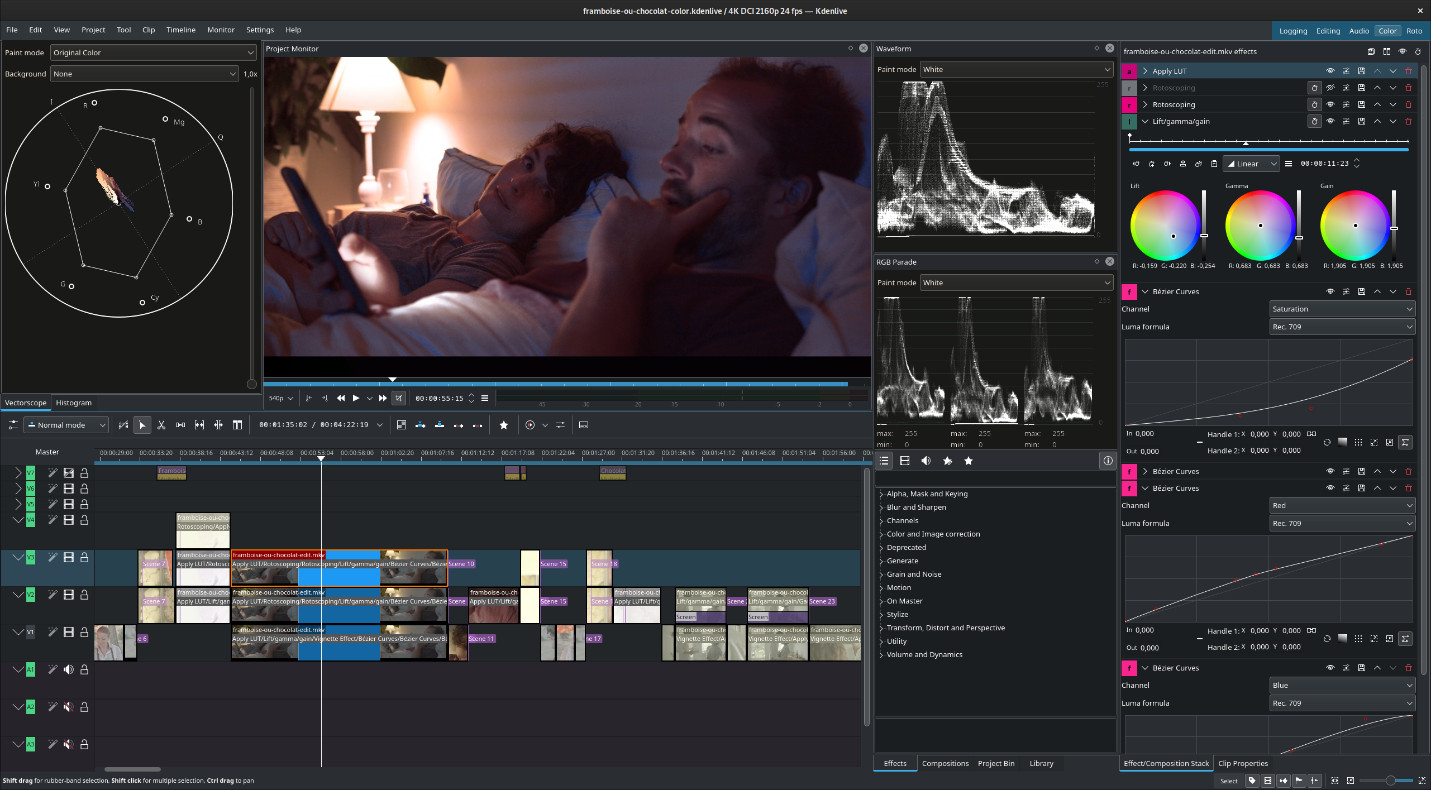
When it comes to free video rotators for MAC, it gets quite challenging to find the right tool. As a MAC OS user, you are left with limited options, especially when trying to rotate videos and save them in AVI format. However, Kdenlive appears to be a problem-solver.
Technically, Kdenlive is a free open source, cross-platform, non-linear video editor with a variety of features. Nevertheless, its Mac version works excellent compared to Windows or Linux.
You can use this software to rotate videos and save them in AVI or any other available format. Also, this program has an attractive interface with a rich library of transition templates and fonts.
Besides, from the video rotation point of view, Kdenlive allows you to turn your videos at any angle.
Features
- Rotate and zoom
- Waveform
- Histogram
- Audio meter
- Vectorscope
- Proxy editing
- Text animation
- Keyframe interpolation
- Color grading and correction
- RGB parade Multi-track video editing
- Custom shortcuts and interface layouts
- Easy line-spacing and letter-spacing adjustment
- Supports seven video formats, including AVI, MOV, HD, UHD, HDV, WEBM, and MP4
Pros
- Free to use
- Fast rendering
- Automatic backup
- Easy video rotation
- Regular bugs fixation
- Cross-platform availability
- Dozens of professional effects and transitions
Cons
- Extremely unstable on Windows OS
IMovie
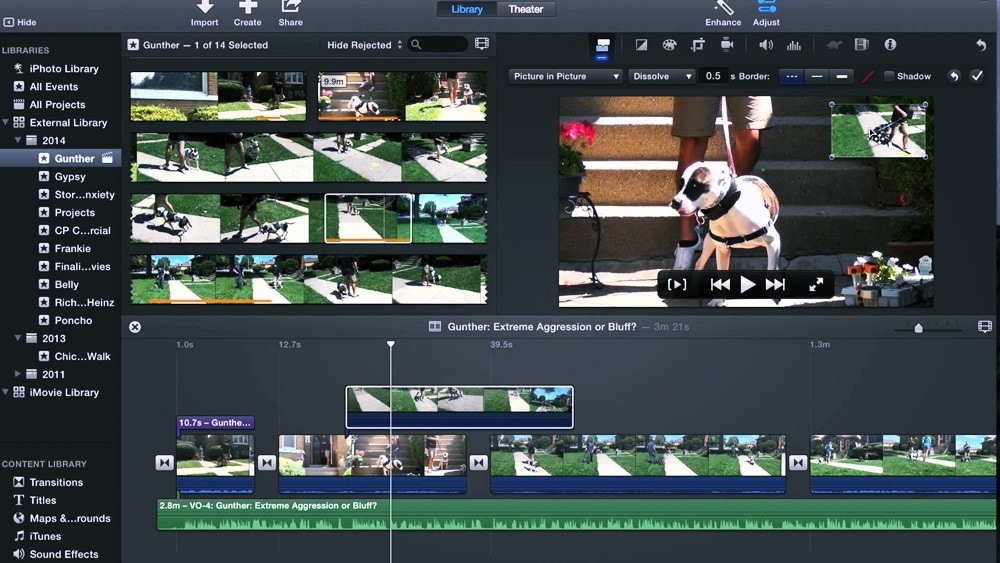
Want to get the job done quickly? Try iMovie in your MAC!
iMovie is a built-in video editing software to help create professional-level videos from your system. But you can also download iMovie if you can’t find it in the system.
Not just videos, but this software also allows you to cut and edit music without changing the files. Many filmmakers also love the tool, as they can add graphics to their projects to get remarkable results.
But that doesn’t stop new users from getting all the benefits the pros get with this software. How? Because it has a pretty straightforward look. You don’t need to click a hundred times to apply a simple effect, as all the options are right in front of you.
And when it’s about rotating a video in AVI format, feel free to rely on iMovie, as it supports several video file formats.
Features
- Video rotation and cropping
- Music and photo import
- 4K and HD video support
- Video transitions and effects
- Pre-installed backdrops and themes
- Supports working on multiple projects
Pros
- Free for MAC users
- Easy to learn
- User-friendly tools
- Extensive audio library
- Excellent movie templates
- Ideal Chroma-keying options
Cons
- Requires high storage space
- Lacks tagging and motion tracking
OpenShot
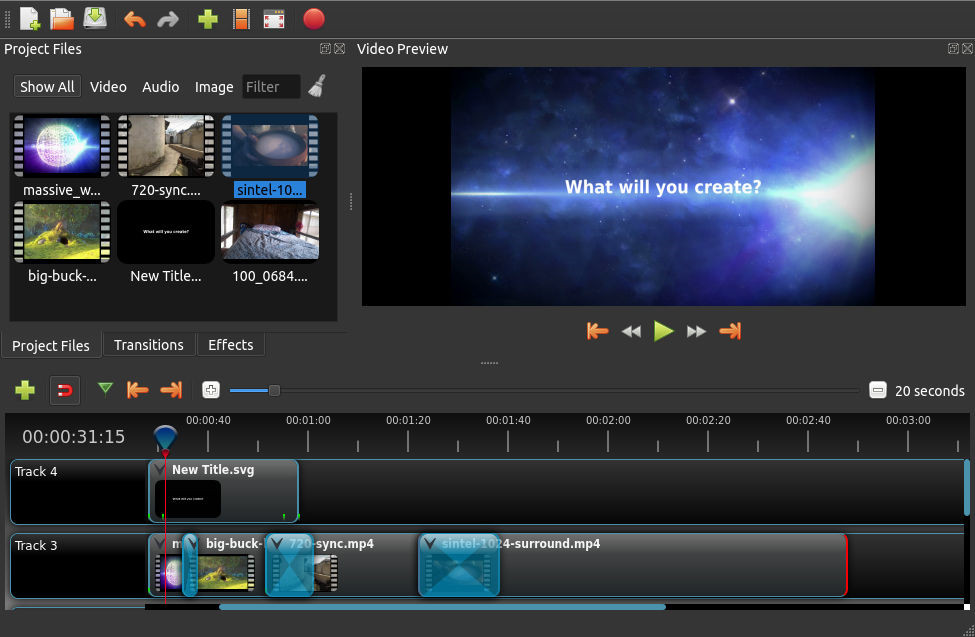
If complex video rotators make you ill, give OpenShot a shot!
It’s a free video editor which is incredibly simple to use. Most professionals around the world appreciate this powerful editing tool. Also, new users can do wonders by simply playing and understanding the options for a few minutes.
So if you plan to use OpenShot Video Editor , you would be glad to know that you can add animations, watermarks, and numerous other effects through this program. Plus, you can also enjoy audio editing within the same platform.
Although OpenShot can be installed for free on multiple operating systems, it still works best on MAC. So there’s no way to ignore this tool for rotating videos in MAC, especially when the options are limited.
Features
- Video rotation and resizing
- Drag and drop support
- Unlimited layers/tracks
- Color correction and settings
- 3D animated effects and titles
- Robust curve-based animations
- Video transitions and real-time previews
- Clip scaling, snapping, cutting, and trimming
- Image overlays, compositing, and watermarks
- Supports AVI and other audio, video, and image formats
Pros
- Free to use
- Easy editing
- No watermarking
- Available in 70+ languages
- Regular updates for improvement
- Stable performance on MAC systems
Cons
- Limited editing options for professionals
- Not suitable for old Windows OS versions
Part 4: Top 3 Free Video Rotators for Android
If using a PC to rotate your videos makes you lazy, you can change the angles of your clips through your Android phone.
So here are the three best video editing apps for Android lovers, which are free to use.
Rotate Video FX
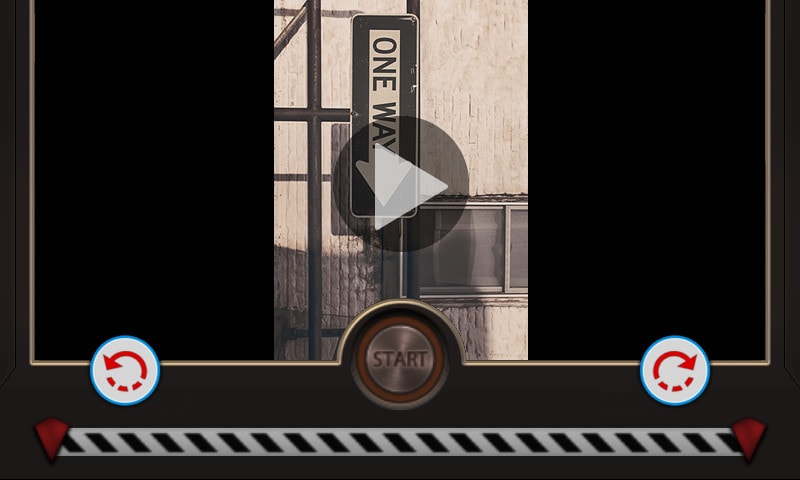
Rotate Video FX is developed by Bizo Mobile. Despite being a small company, it has proven its mettle by offering several apps to its users in more than 100 countries. The firm is also specialized in developing mobile games for multiple platforms.
However, Rotate Video FX is one of its best creations in the world of video rotating mobile applications. This app allows you to choose the video you want to turn directly from your phone’s gallery.
And once the clip has been uploaded, you can rotate it to three different degrees by just touching the “Rotate” button.
Features
- Video rotation to 90, 180, and 270-degree angles
- Clear preview screen with no overlapping options
- Simple play, rotate, and import in a single attempt
- Social media sharing button for quick sending of media
- Automatically saves the rotated video to your phone’s gallery
Pros
- The app is free to use
- More than 1 million downloads
- Works on all android versions
Cons
- No frequent updates
- Not a user-friendly app
- Changes video resolution without permission
Smart Video Rotate and Flip
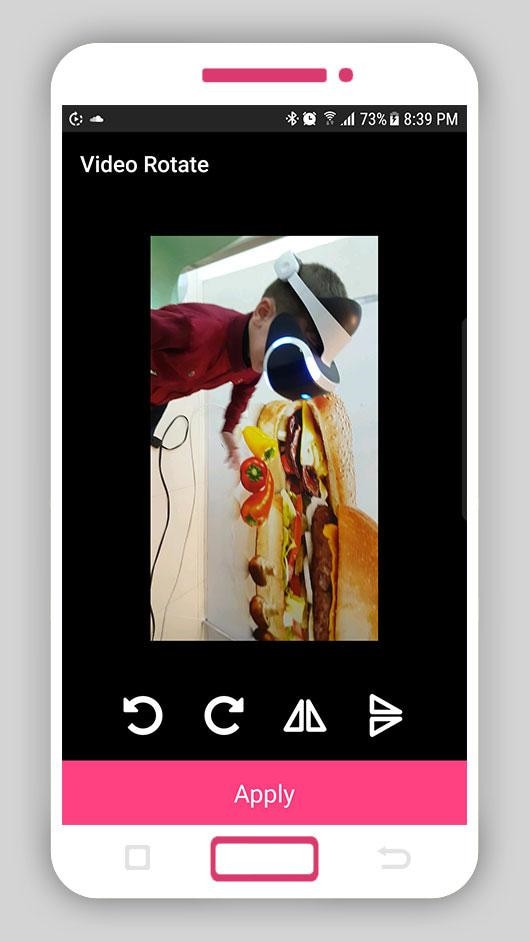
Clogica is the brainchild behind Smart Video Rotate and Flip video rotator for android. The company has been actively working in app development since 2014. And currently, it has more than 25 apps on the list, with 50 million total users.
Smart Video Rotate and Flip is a simple and smart tool to flip and rotate videos directly from your android device. So if you’re no longer interested in using desktop applications to do the job, here’s your chance to rotate your clips through your mobile phone or tablet.
This app offers a simple way to perform multiple flips and rotations simultaneously. The application works by re-encoding the media or by using the fast mode.
Features
- Allows video rotation and flips on different angles
- The output folder and renaming options
- Big preview screen and fast rendering
- Video recording directly from the application
- Permits you to make a video library within the app
Pros
- Free application
- Easy interface
- The app doesn’t change the video quality
- Allows you to mirror flip and rotate videos
- The latest update makes the app work faster
Cons
- The app contains ads
- Files become large after rotation
- Videos can only be saved to the phone’s internal memory
Rotate Video FREE
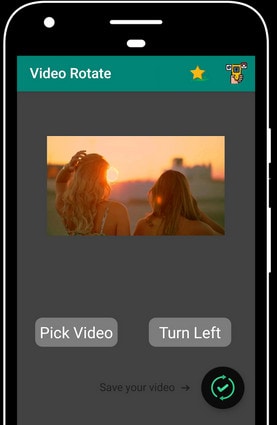
Rotate Video FREE is designed by LKR Studio. From 2014 till now, this app development company has produced seven mobile applications in the “Tools” category. And among its entire portfolio, the Rotate Video FREE app is one of the most popular creations.
Rotate Video FREE is a highly light and easy video rotator for Android devices. It has a simple interface with two main options: ‘ Pick Video’ to select the clip from your phone’s gallery. Then, the “Turn Left” button helps you rotate the video in multiple directions.
Features
- Rotates video to 90, 180, and 270 degrees
- HD video export quality
- Hassle-free rotate options
Pros
- Free of cost app
- Speedy video rotation process on large files
- Saves video directly to your phone’s memory
- Video rotation without affecting the resolution
Cons
- No mirror flipping
- The free version contains advertisements
- Hard to find the location of the saved videos
Part 5: Top 3 Free Video Rotators for iPhone
Are you struggling to find a good video rotator for iPhone? Here’s the list of three best iPhone apps to help you rotate your movies using your smartphone in AVI format.
Video Rotate + Flip Video Easy
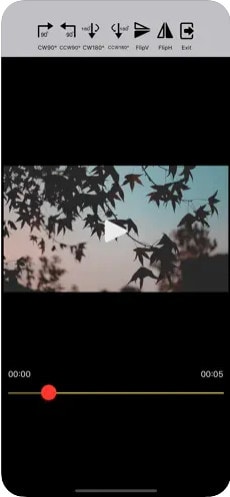
Finding a video rotator for iPhone is a bit difficult, as most valuable applications comes after paying the price. But Video Rotate + Flip Video Easy app is totally free to download and use.
The app includes all the basic functions to rotate and flip videos in different angles. After downloading the app, you will notice a simple interface with seven options. So all you need to do is to import your video from the phone’s gallery, use the options to rotate the video, and save the rotated video in your phone.
The app is also available in different languages, including German, French, Japanese, English, Portuguese, Simplified Chinese, Spanish, and Russian.
Features
- Vertical mirror flipping
- Horizontal mirror flipping
- Frame wise video rotation
- 90° degrees clockwise and counter clockwise rotations
- 180° degrees clockwise and counter clockwise rotations
Pros
- Fast video conversion
- Small app size (only 16.1 MB)
- Available in multiple languages
- Supports iOS 11.0 or later versions
- The app is free with no watermarks
- You can install the app on your iPad
- Rotated videos can be played on all media players
- It exports the rotated video directly to your camera roll
Cons
- You need to purchase the app to remove advertisements
RFV
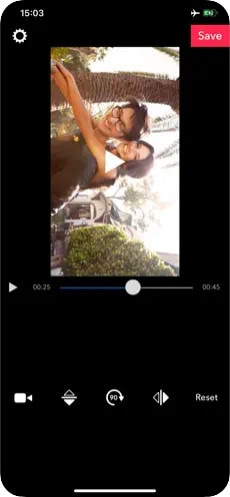
Here’s another free app to rotate and flip your videos. You can download RFV on both Android and iPhone smartphones. However, the iPhone version of the app works flawlessly. In fact, the ratings on both platforms also confirm that there are more happy iPhone users of this app than Android users.
RFV is a quick solution to correct your video orientation. So, if you have recorded the video through your iPhone at the wrong angle, you can use the app to flip and turn the clip’s position without much trouble. And you can do all of this just by selecting the options at the bottom of the app’s interface.
Features
- 90° degrees rotations
- Quick resetting
- Horizontal and vertical mirror flipping
- Turn photos into videos
- Video podcast
Pros
- RFV is a free video rotating app
- Easy installation on iPad
- Supports iOS 12.0 or later versions
- Direct loading of clip on the app from camera roll
Cons
- Large app size (41.7 MB)
- Unavailable for older iPhone versions
- It does not support file sizes above 200 MB
- Problems with saving the video on Android phones
Video Rotate – Flip Video
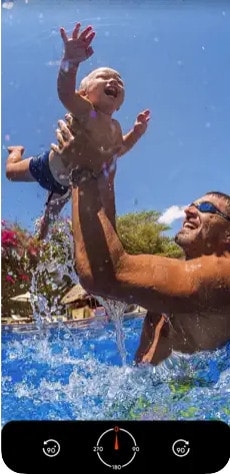
Video Rotate – Flip Video is the third in line when it comes to free video rotators for iPhones. The tool has pretty straightforward options regarding 90-degree clockwise and counter-clockwise rotations. Moreover, you can also play with different angles to adjust the orientation from 0 to 270 degrees.
Once you’re done rotating your video, you can save the new clip directly to your iPhone’s camera roll. At the same time, this app also allows you to share the rotated video on various social and communication platforms.
Features
- The app is specifically designed to rotate videos
- Uncomplicated app interface
- Live video preview
Pros
- Free and fast video rotator app for iPhone
- You can also install the app on an iPad
- Compatible with iOS 10.0 or later versions
Cons
- The app shows advertisements until you buy it
- No reset option – you have to start all over again
Part 6: Top 3 Free Video Rotators Online
Don’t want to fill your device’s storage with software? Well! You can rotate videos online for free in AVI format with ease. Here are the 3 best online video rotating tools.
Flixier
Flixier is a website that helps you create and edit videos through your internet browser. You can upload multiple videos or photos to add effects, text, and many more characteristics. This online platform allows you to add keyframes and transitions to your clips. Likewise, you can adjust your videos’ positioning, scaling, and resizing.
So can you rotate videos on Flixier?
Yes, you can and without paying a cent. The website offers a variety of options to rotate your clips. All you need to do is select the transform option and choose the rotation or flip option to see the results. And when you’re done rotating the video, simply export the file to your computer.
On the other hand, if you think you want to use Flixier frequently, you are required to buy a premium monthly or annual subscription. But until then, you can enjoy all the great traits for free.
Features
- Video rotation (90 degrees left and right)
- Video flipping (horizontal and vertical)
- Robust timeline
- 50+ transitions
- Green screen
- Live collaboration
- Screen recording
- Webcam recording
- Video effects
- Color correction
- Built-in media stock libraries
Pros
- Flixier is free
- No sign-up required
- Superfast rendering
- Variety of video templates
- Unlimited audio and video tracks
- Allows AVI media import and export
- Live video, microphone, and screen recording
Cons
- You need to purchase paid plans for team collaboration
- The free plan comes with limited projects, downloads, and storage
Clideo
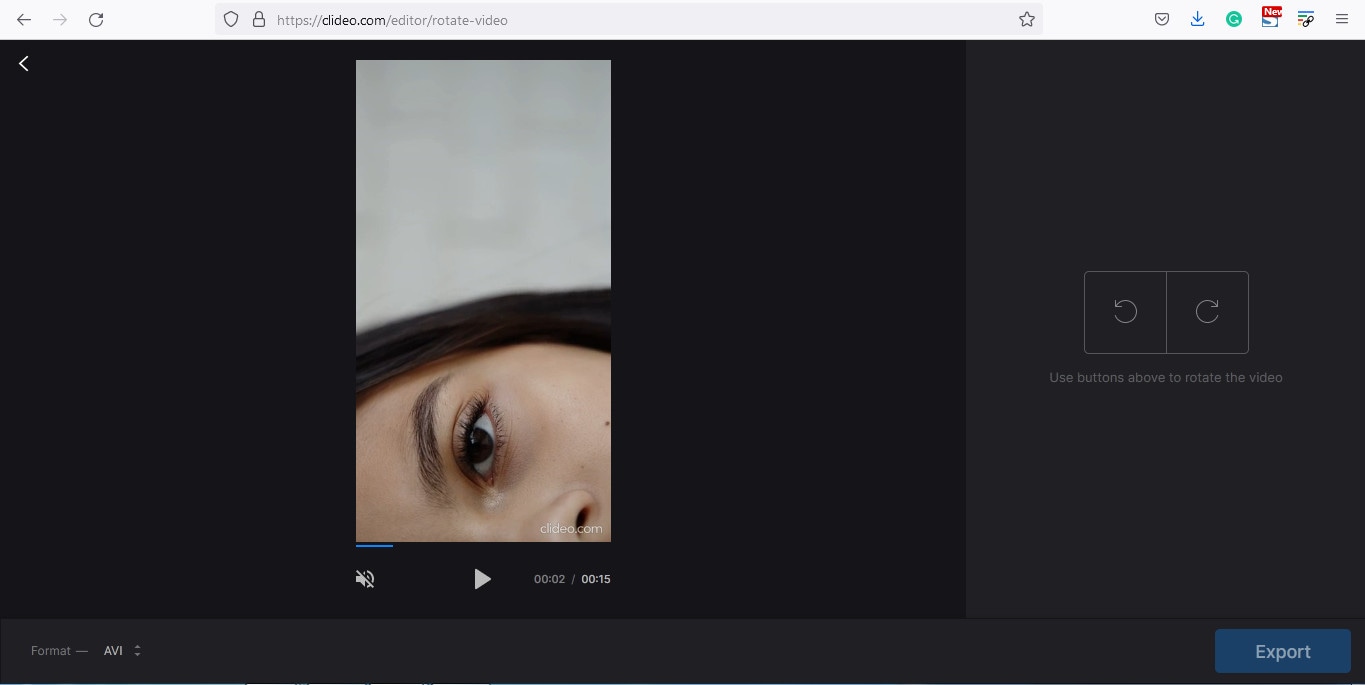
Clideo is a great online tool that allows you to create and edit images and videos in one place. This web-based program comes with a variety of features, including video rotation and flipping.
To make your videos unique, Clideo permits you to add text and music to attract the audience. Moreover, the program supports different video formats, like AVI, MPG, MP4, WMC, MOV, VOB, and more.
You can do everything right from your internet browser without installing the application on your computer. All video files that you import and export on Clideo are well-protected.
As a user, you can select different resolutions, formats, and other features to make exciting videos within a few clicks. And apart from video rotation, the tool offers numerous beneficial options, such as reverse, speed, flip, loop, stop motion, and even memes creation.
Features
- Easy video flipping and rotation
- DPI conversion
- Video compressing
- Speed adjustment
- Slideshow creation
- Filters and presets
- Audio and video cutting
- Video and audio merging
- Subtitles and personalized text
- Color correction and fading effects
Pros
- All basic features are free to use
- Best for beginners
- Non-technical interface
- Supports various video formats (including AVI)
Cons
- This online tool lacks design elements and themes
- You need to buy the premium version to use Clideo daily
Rotate My Video.Net
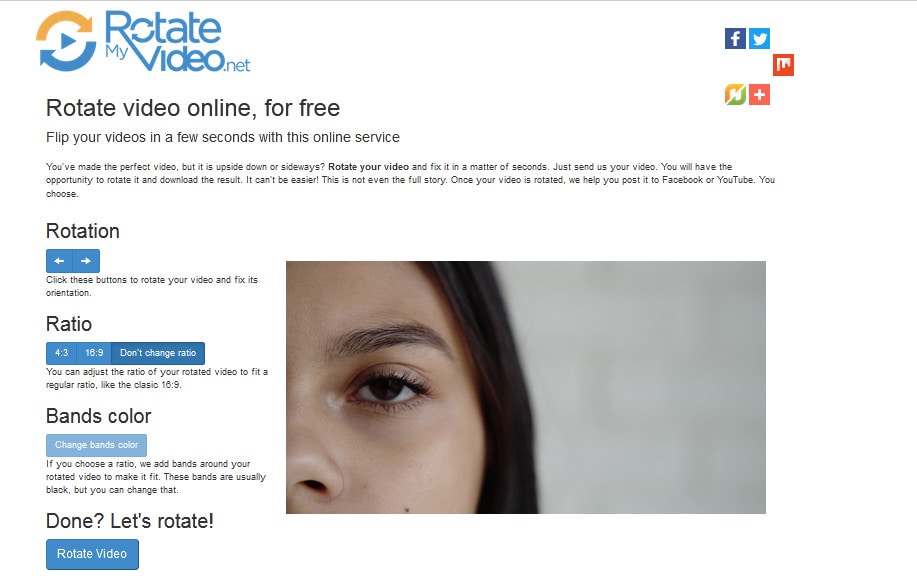
Last but not the least, the Rotate My Video.Net is a free online tool designed for video rotation only. So, if your video is upside down or shot in the wrong direction, feel free to use this tool.
This web-based video rotator allows you to share the video to different social platforms directly from the website. Contrarily, you also save the rotated clips on your system.
Another interesting fact about this tool is that it has no limit. That means you can upload videos on the interface and rotate them as often as possible. However, the tool does not offer other features to groom your videos.
Moreover, the developers claim that the videos are deleted automatically from the server in a few hours. Therefore, your videos stay private and safe.
Features
- 90 degrees clockwise and counter-clockwise rotation
- Video ratio adjustment options (4:3 and 16:9)
- Band color option to fill the empty black space with colors
Pros
- Entirely free – no monthly or yearly subscription required
- Easy and quick process
- Supports AVI video files
- Video quality is not disturbed after rotation
Cons
- Lacks video flipping option
- It does not include any other features
Part 7: Bottom Line
Despite a long list of free video editors, finding the right one that simplifies the task without any trouble is hard. But with these top 16 best free AVI video rotators, you can flip and rotate videos in a couple of minutes. You can find the most suitable rotator Windows, MAC, iPhone, and Android. Or, you can use the online platforms to enjoy rotations at different angles. However, regardless of device or operating system, each rotator has pros and cons. So don’t hesitate to opt for the tool that fulfills all your needs.
Part 8: FAQs
Q1. How do I rotate a video for free?
You can rotate a video for free by downloading a free video rotator according to your operating system. You can also look for online tools for video rotation. Likewise, you can also install Android and iPhone apps to rotate clips from your phone.
Q2. What software can rotate video?
There are many software that helps you rotate videos. However, most of them are paid. So, if you’re looking for some free video rotators on MAC or Windows, you can download Filmora. On the other hand, you can download programs like Altrasoft, XMedia Recode, and Free Video Flip and Rotate for Windows.
Q3. How can I rotate a video without losing quality?
Not all video rotators can promise high-quality results. So if you want to rotate your clip without damaging the quality, you must choose top-notch video editors, like Filmora or iMovie.
Q4. How do you rotate an AVI file on a MAC?
You need to download video rotators, such as Kdenlive, iMovie, or OpenShot, to rotate your AVI files for free. But, you can choose Filmora for MAC to flip and turn your AVI videos to different angles for exceptional results.
Q5. How do I rotate a video online?
To rotate an AVI video online, you need to be extremely picky, as even most online tools don’t support AVI files. But online video editors like Flixier, Clideo, and RotateMyVideo.Net allow you to rotate AVI videos easily.
Did you rush to record a video in a mistaken direction? Or were you just excited to film the moments without noticing the position of your camera? Whatever the case, if you regret recording the clip at the incorrect angle, here’s your chance to do the alteration. The article includes the top 16 best free AVI video rotators you can use on MAC, Windows, iPhone, Android, and online. Plus, if you’re looking for a single platform to rotate or flip videos, you can learn the complete process by following the step-by-step Filmora Video Editor tutorial that works on MAC and Windows.
In this Article
Part 1: Best AVI Video Rotators to Rotate AVI Video on Windows and MAC – Filmora Video Editor [with steps]
Part 2: Top 3 Free Video Rotators on Windows
Part 3: Top 3 Free Video Rotators on MAC
Part 4: Top 3 Free Video Rotators on Android
Part 5: Top 3 Free Video Rotators on iPhone
Part 6: Top 3 Free Video Rotators Online
Part 7: Bottom Line
Part 8: FAQs
Part 1: Best AVI Video Rotators to Rotate AVI Video on Windows and MAC – Filmora Video Editor [with steps]
Heard about Filmora but never used it? Surely, you’re missing great fun if you’re a video professional or a beginner video editor.
Filmora is an award-winning video editing software that works for both PC and MAC users. While the tool comes at an affordable price, you can still download the free setup to start showing your creativity.
This video editor has dozens of new effects, transitions, and many more features, which can help you create engaging videos. You can also enjoy some more key features, including audio ducking, color matching, motion tracking, split screen, video filters and transitions, speed control, and multiple exporting formats.
And, of course, video rotation is as easy as ABC! You can follow this step-by-step tutorial to rotate or flip your videos using Filmora 10. You can apply the same procedure if you have a different version.
Step 1: Download and Install Filmora
Visit Filmora Video Editor’s official website to download the newest version. Click on the “Try it Free” button according to your operating system (look at the icons on the button to identify the OS).
After downloading the setup, double-click the file to install the video editor. Then, open the program.
Feel free to judge the interface (see the image below), as it is pretty simple to understand. So, even if you’re a beginner, you can learn this tool within a few minutes of practice.
Step 2: Import the Video You Want to Rotate
The next is to bring the video file to Filmora’s library before proceeding. To do that, click on the “Movie Clip” icon in the center of the interface to select the clip from your computer’s hard drive.
Double-click or select the video and click the “Open” button to import files. The importing process may take several seconds or a few minutes, depending on the video size.
If you’re using Filmora for the first time, you might see the “Create Proxy File” message popping up right after the video import. So, simply click on the “Yes” button to go ahead.
Your video will be stored in the “Project Media” tab and will be visible next to the preview window.
Step 3: Drag and Drop the Video on Filmora’s Timeline
To rotate the video, first, you need to add it to the track. For that, take your mouse on the video, and select it by clicking the right button on your mouse. Keep holding the button to drag the video on the timeline. Remove your finger from the button after placing the clip on the track.
Right after the above step, you will get another message to help you decide whether you want to keep the resolution of the video to its original settings or match the media. Choose “Match to Media” for fast rendering.
However, if you’re a professional video editor, feel free to select the option that suits you the most.
Step 4: Rotate Your Video with Filmora
Double-click anywhere on the video that is already on the timeline.
You will see three tabs – “Video,” “Color,” and “Animation.” So choose the “Video” tab and click on the “Transform” option.
Once done, you will see three important options, which will help you rotate the video.
First, you will notice the “Rotate” option with an adjustment bar. This option will turn your video to different angles of your choice.
All you need to do is play with the adjustments by grabbing the “Round” knob-like button while keeping an eye on the preview window to see the results.
Just below “Rotate,” you will see the “Flip” option with “Horizontal” and “Vertical” mirror icons. Choosing any one of the icons will make your video mirror flip in horizontal or vertical directions.
The third option is “Scale” beneath the “Flip” option. Similar to the rotate option, this tool also has an adjustment bar. You can make adjustments to magnify or de-magnify the clip to fit the screen. Although this option isn’t mandatory, you can still use it if you find the need.
Now, click the “OK” button to apply rotation and return to the timeline.
Step 5: Save and Export Rotated Video to Your Widows or MAC
Here you will learn how to save the project and then export it. If you have already saved the project in the beginning, skip reading this part and directly hit the “Export” button.
Contrarily, you can also directly export your files without saving the project. But you won’t be able to make changes to the same project in the future as all source files will be lost. Therefore, saving the project and then exporting files is recommended.
So, if you’re done with step 4, save your project before going further.
You can go to the “File” tab, choose “Save Project,” and rename the video.
Rename your file and click on the “Save” button.
The new name will appear at the top of Filmora’s interface.
Lastly, click the “Export” button to save the file on your computer.
F 17
Part 2: Top 3 Free Video Rotators on Windows
No luck with finding free movie rotators for your Windows operating system? Don’t stress! These three AVI video rotators will solve your problem.
Free Video Flip and Rotate
This tool could satisfy your requirements if you’re looking for a core video rotator. As the name sounds, the Free Video Flip and Rotate is software by DVD Video Soft that allows you to modify the orientation of your videos easily. In other words, this is one of the easiest video rotators for Windows users, which is also free to download and use.
It has a simple interface with user-friendly options, which permits you to rotate your videos from different angles. Besides, you can also use this software for mirroring your clips. Moreover, you can save your project in various video formats, such as AVI.
Features
- Vertical flip
- Horizontal flip
- 180° video rotation
- 90° clockwise video rotation
- 90° counter-clockwise video rotation
- Vertical flip with 90° clockwise video rotation
- Horizontal flip with 90° counter-clockwise video rotation
Pros
- One-click results
- Easy to install and run
- Free and user-friendly software
- Does not contain ads or spyware
- Requires 40.50 MB of hard disk space
- Supports AVI and other video formats
- Supports XP, Windows 7, 8, 10, and 11 versions
Cons
- Unavailable for MAC users
- Lack of additional features, such as color correction, cropping, etc.
XMedia Recode
XMedia Recode is a free tool for Windows users. While the software is meant to convert videos into different formats, you can also use it for video rotation. Nevertheless, XMedia Recode has various other options, making it perfect for basic video editing.
Moreover, this software can convert unprotected Blue-rays/DVDs, create different chapters, import subtitle tracks, and many more. However, one of the best features of this video converter-cum-rotator is the video remux. That means you can convert the video container format without changing the original size.
Contrarily, XMedia Recode allows you to rotate and convert videos for countless devices, such as iPhone, iPad, Android, Xbox360, and more. But all this can be done only through Windows operating system. You can download this tool without any paid subscription. However, choose suitable processing for smooth installation, such as Windows 64bit, Windows 32bit, Vista, or XP SP3.
Features
- Blur
- Delogo
- Rotation
- Padding
- Denoise
- Cropping
- Image flip
- Swap U/V
- Clip speed
- Color curves
- Video fading
- Mirror effect
- Image stabilization
- Custom resolution
- Import 32 subtitle tracks
- Direct copy of video and audio stream into your desired format
Pros
- Free software
- Speedy conversion
- Fast batch processing
- Variety of video and audio features
- Works on Windows XP to Windows 10
- Supports 40+ video formats, including AVI
Cons
- A bit complex interface for new users
Altrasoft
Altrasoft is a small software for Windows to help rotate and convert your videos. The total size of the setup is just 971 KB.
This software is best for small video clips, which need to be rotated without wasting time. The program is free to download and use. However, the interface appears a bit old compared to new tools.
Also, unlike XMedia Recode, Altrasoft comes with limited options. So, if you only desire to rotate or flip your video and save it in the AVI or any other format, go ahead and download it.
Features
- Borders
- Zooming
- Rotation
- Color settings
- Audio formatting
- Video codec settings
- Audio codec settings
Pros
- Free to use
- Ideal for short videos
- Extremely light software
- Simple rotation options
- Rotation angle adjustments
Cons
- Outdated interface
- Lack of customer support
Part 3: Top 3 Free Video Rotators on MAC
Have you already lost your MAC storage on downloading some incompetent video rotators which claim to support AVI files? You can try these three video rotators for MAC, which are free and compatible with AVI video formats.
Kdenlive
When it comes to free video rotators for MAC, it gets quite challenging to find the right tool. As a MAC OS user, you are left with limited options, especially when trying to rotate videos and save them in AVI format. However, Kdenlive appears to be a problem-solver.
Technically, Kdenlive is a free open source, cross-platform, non-linear video editor with a variety of features. Nevertheless, its Mac version works excellent compared to Windows or Linux.
You can use this software to rotate videos and save them in AVI or any other available format. Also, this program has an attractive interface with a rich library of transition templates and fonts.
Besides, from the video rotation point of view, Kdenlive allows you to turn your videos at any angle.
Features
- Rotate and zoom
- Waveform
- Histogram
- Audio meter
- Vectorscope
- Proxy editing
- Text animation
- Keyframe interpolation
- Color grading and correction
- RGB parade Multi-track video editing
- Custom shortcuts and interface layouts
- Easy line-spacing and letter-spacing adjustment
- Supports seven video formats, including AVI, MOV, HD, UHD, HDV, WEBM, and MP4
Pros
- Free to use
- Fast rendering
- Automatic backup
- Easy video rotation
- Regular bugs fixation
- Cross-platform availability
- Dozens of professional effects and transitions
Cons
- Extremely unstable on Windows OS
IMovie
Want to get the job done quickly? Try iMovie in your MAC!
iMovie is a built-in video editing software to help create professional-level videos from your system. But you can also download iMovie if you can’t find it in the system.
Not just videos, but this software also allows you to cut and edit music without changing the files. Many filmmakers also love the tool, as they can add graphics to their projects to get remarkable results.
But that doesn’t stop new users from getting all the benefits the pros get with this software. How? Because it has a pretty straightforward look. You don’t need to click a hundred times to apply a simple effect, as all the options are right in front of you.
And when it’s about rotating a video in AVI format, feel free to rely on iMovie, as it supports several video file formats.
Features
- Video rotation and cropping
- Music and photo import
- 4K and HD video support
- Video transitions and effects
- Pre-installed backdrops and themes
- Supports working on multiple projects
Pros
- Free for MAC users
- Easy to learn
- User-friendly tools
- Extensive audio library
- Excellent movie templates
- Ideal Chroma-keying options
Cons
- Requires high storage space
- Lacks tagging and motion tracking
OpenShot
If complex video rotators make you ill, give OpenShot a shot!
It’s a free video editor which is incredibly simple to use. Most professionals around the world appreciate this powerful editing tool. Also, new users can do wonders by simply playing and understanding the options for a few minutes.
So if you plan to use OpenShot Video Editor , you would be glad to know that you can add animations, watermarks, and numerous other effects through this program. Plus, you can also enjoy audio editing within the same platform.
Although OpenShot can be installed for free on multiple operating systems, it still works best on MAC. So there’s no way to ignore this tool for rotating videos in MAC, especially when the options are limited.
Features
- Video rotation and resizing
- Drag and drop support
- Unlimited layers/tracks
- Color correction and settings
- 3D animated effects and titles
- Robust curve-based animations
- Video transitions and real-time previews
- Clip scaling, snapping, cutting, and trimming
- Image overlays, compositing, and watermarks
- Supports AVI and other audio, video, and image formats
Pros
- Free to use
- Easy editing
- No watermarking
- Available in 70+ languages
- Regular updates for improvement
- Stable performance on MAC systems
Cons
- Limited editing options for professionals
- Not suitable for old Windows OS versions
Part 4: Top 3 Free Video Rotators for Android
If using a PC to rotate your videos makes you lazy, you can change the angles of your clips through your Android phone.
So here are the three best video editing apps for Android lovers, which are free to use.
Rotate Video FX
Rotate Video FX is developed by Bizo Mobile. Despite being a small company, it has proven its mettle by offering several apps to its users in more than 100 countries. The firm is also specialized in developing mobile games for multiple platforms.
However, Rotate Video FX is one of its best creations in the world of video rotating mobile applications. This app allows you to choose the video you want to turn directly from your phone’s gallery.
And once the clip has been uploaded, you can rotate it to three different degrees by just touching the “Rotate” button.
Features
- Video rotation to 90, 180, and 270-degree angles
- Clear preview screen with no overlapping options
- Simple play, rotate, and import in a single attempt
- Social media sharing button for quick sending of media
- Automatically saves the rotated video to your phone’s gallery
Pros
- The app is free to use
- More than 1 million downloads
- Works on all android versions
Cons
- No frequent updates
- Not a user-friendly app
- Changes video resolution without permission
Smart Video Rotate and Flip
Clogica is the brainchild behind Smart Video Rotate and Flip video rotator for android. The company has been actively working in app development since 2014. And currently, it has more than 25 apps on the list, with 50 million total users.
Smart Video Rotate and Flip is a simple and smart tool to flip and rotate videos directly from your android device. So if you’re no longer interested in using desktop applications to do the job, here’s your chance to rotate your clips through your mobile phone or tablet.
This app offers a simple way to perform multiple flips and rotations simultaneously. The application works by re-encoding the media or by using the fast mode.
Features
- Allows video rotation and flips on different angles
- The output folder and renaming options
- Big preview screen and fast rendering
- Video recording directly from the application
- Permits you to make a video library within the app
Pros
- Free application
- Easy interface
- The app doesn’t change the video quality
- Allows you to mirror flip and rotate videos
- The latest update makes the app work faster
Cons
- The app contains ads
- Files become large after rotation
- Videos can only be saved to the phone’s internal memory
Rotate Video FREE
Rotate Video FREE is designed by LKR Studio. From 2014 till now, this app development company has produced seven mobile applications in the “Tools” category. And among its entire portfolio, the Rotate Video FREE app is one of the most popular creations.
Rotate Video FREE is a highly light and easy video rotator for Android devices. It has a simple interface with two main options: ‘ Pick Video’ to select the clip from your phone’s gallery. Then, the “Turn Left” button helps you rotate the video in multiple directions.
Features
- Rotates video to 90, 180, and 270 degrees
- HD video export quality
- Hassle-free rotate options
Pros
- Free of cost app
- Speedy video rotation process on large files
- Saves video directly to your phone’s memory
- Video rotation without affecting the resolution
Cons
- No mirror flipping
- The free version contains advertisements
- Hard to find the location of the saved videos
Part 5: Top 3 Free Video Rotators for iPhone
Are you struggling to find a good video rotator for iPhone? Here’s the list of three best iPhone apps to help you rotate your movies using your smartphone in AVI format.
Video Rotate + Flip Video Easy
Finding a video rotator for iPhone is a bit difficult, as most valuable applications comes after paying the price. But Video Rotate + Flip Video Easy app is totally free to download and use.
The app includes all the basic functions to rotate and flip videos in different angles. After downloading the app, you will notice a simple interface with seven options. So all you need to do is to import your video from the phone’s gallery, use the options to rotate the video, and save the rotated video in your phone.
The app is also available in different languages, including German, French, Japanese, English, Portuguese, Simplified Chinese, Spanish, and Russian.
Features
- Vertical mirror flipping
- Horizontal mirror flipping
- Frame wise video rotation
- 90° degrees clockwise and counter clockwise rotations
- 180° degrees clockwise and counter clockwise rotations
Pros
- Fast video conversion
- Small app size (only 16.1 MB)
- Available in multiple languages
- Supports iOS 11.0 or later versions
- The app is free with no watermarks
- You can install the app on your iPad
- Rotated videos can be played on all media players
- It exports the rotated video directly to your camera roll
Cons
- You need to purchase the app to remove advertisements
RFV
Here’s another free app to rotate and flip your videos. You can download RFV on both Android and iPhone smartphones. However, the iPhone version of the app works flawlessly. In fact, the ratings on both platforms also confirm that there are more happy iPhone users of this app than Android users.
RFV is a quick solution to correct your video orientation. So, if you have recorded the video through your iPhone at the wrong angle, you can use the app to flip and turn the clip’s position without much trouble. And you can do all of this just by selecting the options at the bottom of the app’s interface.
Features
- 90° degrees rotations
- Quick resetting
- Horizontal and vertical mirror flipping
- Turn photos into videos
- Video podcast
Pros
- RFV is a free video rotating app
- Easy installation on iPad
- Supports iOS 12.0 or later versions
- Direct loading of clip on the app from camera roll
Cons
- Large app size (41.7 MB)
- Unavailable for older iPhone versions
- It does not support file sizes above 200 MB
- Problems with saving the video on Android phones
Video Rotate – Flip Video
Video Rotate – Flip Video is the third in line when it comes to free video rotators for iPhones. The tool has pretty straightforward options regarding 90-degree clockwise and counter-clockwise rotations. Moreover, you can also play with different angles to adjust the orientation from 0 to 270 degrees.
Once you’re done rotating your video, you can save the new clip directly to your iPhone’s camera roll. At the same time, this app also allows you to share the rotated video on various social and communication platforms.
Features
- The app is specifically designed to rotate videos
- Uncomplicated app interface
- Live video preview
Pros
- Free and fast video rotator app for iPhone
- You can also install the app on an iPad
- Compatible with iOS 10.0 or later versions
Cons
- The app shows advertisements until you buy it
- No reset option – you have to start all over again
Part 6: Top 3 Free Video Rotators Online
Don’t want to fill your device’s storage with software? Well! You can rotate videos online for free in AVI format with ease. Here are the 3 best online video rotating tools.
Flixier
Flixier is a website that helps you create and edit videos through your internet browser. You can upload multiple videos or photos to add effects, text, and many more characteristics. This online platform allows you to add keyframes and transitions to your clips. Likewise, you can adjust your videos’ positioning, scaling, and resizing.
So can you rotate videos on Flixier?
Yes, you can and without paying a cent. The website offers a variety of options to rotate your clips. All you need to do is select the transform option and choose the rotation or flip option to see the results. And when you’re done rotating the video, simply export the file to your computer.
On the other hand, if you think you want to use Flixier frequently, you are required to buy a premium monthly or annual subscription. But until then, you can enjoy all the great traits for free.
Features
- Video rotation (90 degrees left and right)
- Video flipping (horizontal and vertical)
- Robust timeline
- 50+ transitions
- Green screen
- Live collaboration
- Screen recording
- Webcam recording
- Video effects
- Color correction
- Built-in media stock libraries
Pros
- Flixier is free
- No sign-up required
- Superfast rendering
- Variety of video templates
- Unlimited audio and video tracks
- Allows AVI media import and export
- Live video, microphone, and screen recording
Cons
- You need to purchase paid plans for team collaboration
- The free plan comes with limited projects, downloads, and storage
Clideo
Clideo is a great online tool that allows you to create and edit images and videos in one place. This web-based program comes with a variety of features, including video rotation and flipping.
To make your videos unique, Clideo permits you to add text and music to attract the audience. Moreover, the program supports different video formats, like AVI, MPG, MP4, WMC, MOV, VOB, and more.
You can do everything right from your internet browser without installing the application on your computer. All video files that you import and export on Clideo are well-protected.
As a user, you can select different resolutions, formats, and other features to make exciting videos within a few clicks. And apart from video rotation, the tool offers numerous beneficial options, such as reverse, speed, flip, loop, stop motion, and even memes creation.
Features
- Easy video flipping and rotation
- DPI conversion
- Video compressing
- Speed adjustment
- Slideshow creation
- Filters and presets
- Audio and video cutting
- Video and audio merging
- Subtitles and personalized text
- Color correction and fading effects
Pros
- All basic features are free to use
- Best for beginners
- Non-technical interface
- Supports various video formats (including AVI)
Cons
- This online tool lacks design elements and themes
- You need to buy the premium version to use Clideo daily
Rotate My Video.Net
Last but not the least, the Rotate My Video.Net is a free online tool designed for video rotation only. So, if your video is upside down or shot in the wrong direction, feel free to use this tool.
This web-based video rotator allows you to share the video to different social platforms directly from the website. Contrarily, you also save the rotated clips on your system.
Another interesting fact about this tool is that it has no limit. That means you can upload videos on the interface and rotate them as often as possible. However, the tool does not offer other features to groom your videos.
Moreover, the developers claim that the videos are deleted automatically from the server in a few hours. Therefore, your videos stay private and safe.
Features
- 90 degrees clockwise and counter-clockwise rotation
- Video ratio adjustment options (4:3 and 16:9)
- Band color option to fill the empty black space with colors
Pros
- Entirely free – no monthly or yearly subscription required
- Easy and quick process
- Supports AVI video files
- Video quality is not disturbed after rotation
Cons
- Lacks video flipping option
- It does not include any other features
Part 7: Bottom Line
Despite a long list of free video editors, finding the right one that simplifies the task without any trouble is hard. But with these top 16 best free AVI video rotators, you can flip and rotate videos in a couple of minutes. You can find the most suitable rotator Windows, MAC, iPhone, and Android. Or, you can use the online platforms to enjoy rotations at different angles. However, regardless of device or operating system, each rotator has pros and cons. So don’t hesitate to opt for the tool that fulfills all your needs.
Part 8: FAQs
Q1. How do I rotate a video for free?
You can rotate a video for free by downloading a free video rotator according to your operating system. You can also look for online tools for video rotation. Likewise, you can also install Android and iPhone apps to rotate clips from your phone.
Q2. What software can rotate video?
There are many software that helps you rotate videos. However, most of them are paid. So, if you’re looking for some free video rotators on MAC or Windows, you can download Filmora. On the other hand, you can download programs like Altrasoft, XMedia Recode, and Free Video Flip and Rotate for Windows.
Q3. How can I rotate a video without losing quality?
Not all video rotators can promise high-quality results. So if you want to rotate your clip without damaging the quality, you must choose top-notch video editors, like Filmora or iMovie.
Q4. How do you rotate an AVI file on a MAC?
You need to download video rotators, such as Kdenlive, iMovie, or OpenShot, to rotate your AVI files for free. But, you can choose Filmora for MAC to flip and turn your AVI videos to different angles for exceptional results.
Q5. How do I rotate a video online?
To rotate an AVI video online, you need to be extremely picky, as even most online tools don’t support AVI files. But online video editors like Flixier, Clideo, and RotateMyVideo.Net allow you to rotate AVI videos easily.
Also read:
- New 2024 Approved Bring Your Vision to Life 10 Best Music Video Production Companies
- 2024 Approved The Ultimate List 10 Best Movie Intro Creators for You
- New The Ultimate List 5 Free Video Stabilizer Apps for Android Users for 2024
- Updated Adobe Showdown After Effects vs Premiere Pro - Which One Reigns Supreme, In 2024
- Updated In 2024, No Plugins How to Add a Skin Smoother Effect with FCPX
- Updated In 2024, Accelerate or Slow Down Clips in Camtasia
- Unlock Cinematic Storytelling How to Apply the Ken Burns Effect in Final Cut Pro for 2024
- 2024 Approved Unlock Your Creative Potential Video Editing Tips for Home Movies
- Updated Get the Most Out of Your Audio Files Top 12 Converters for 2024
- New Repeat, Repeat, Repeat Best Free Video Looping Software for 2024
- Updated Mastering VLC How to Watch Videos in Slow Mo
- New In 2024, 9 Best Free Video Cutting Software for MP4 Format
- New 2024 Approved The Best Zero-Cost Video Editors for Cutting and Merging Videos
- Updated 2024 Approved Effortless Video Editing 8 Software Options with Low System Requirements
- Updated 2024 Approved The Best of the Best Explainer Video Software
- Updated In 2024, The Ultimate List 10 Best Webcam Recorders for Windows 10
- New 2024 Approved 5 Best VOB Video Editors That Wont Break the Bank
- In 2024, Unlock Viral Success TikTok Aspect Ratio Secrets
- New 2024 Approved The Ultimate Guide to Video Editing on a Mac
- New 2024 Approved S Hottest iPhone Apps Unbiased Reviews and Rankings
- 2024 Approved The Best Free MKV Editors for Cutting and Trimming
- New Top-Rated PC Intro Makers Online and Offline Options Compared for 2024
- New 2024 Approved Free Images for Business Tips and Tricks for Commercial Use
- New In 2024, Essential Adobe Premiere Plugins for Creators Top Picks (Free & Premium)
- New From Amateur to Pro Top 6 Windows Movie Editing Software for 2024
- Updated 2024 Approved Discover the Top Audio Converters for Your Music Library
- New 2024 Approved Macs Finest Top-Rated MP3 Converter Software
- New In 2024, Latest Free Game Video Editing Software You Need to Try
- Updated Merge Videos Without Logos Best 7 Software Options for 2024
- New 2024 Approved Best Mobile Animation Tools Free 3D Apps for Android and iOS
- In 2024, The Best of the Best 3D Video Production Tools You Must Use
- New In 2024, The Complete Handbook to Converting Audio Files Like a Pro
- New Top 10 Explainer Video Tools to Boost Your Brand
- New 2024 Approved Rotating Your Video Is a Snap if You Choose One of the Top 5 Free MOV Video Rotators Below
- New In 2024, 10 Essential Video Editing Tools for Android Users
- Updated Top Motion Tracking Tools for Text Animation for 2024
- In 2024, How to Transfer Apps from Motorola Moto G84 5G to Another | Dr.fone
- Bypass iCloud Activation Lock with IMEI Code On Apple iPhone 15 Plus
- How To Pause Life360 Location Sharing For Oppo A56s 5G | Dr.fone
- What is Fake GPS Location Pro and Is It Good On Honor X50? | Dr.fone
- How to Mirror PC Screen to Samsung Galaxy F34 5G Phones? | Dr.fone
- In 2024, Easy Guide How To Bypass Samsung Galaxy F34 5G FRP Android 10/11/12/13
- How do I reset my Honor X50 GT Phone without technical knowledge? | Dr.fone
- Full Guide How To Fix Connection Is Not Private on Realme GT Neo 5 | Dr.fone
- New Are You Looking for the Best Premiere Pro Slideshow Template Online for Free? If Yes, You Can Find a Few Exciting Slideshow Templates Here. They Are Worth Using for 2024
- In 2024, How To Erase an Apple iPhone 12 mini Without Apple ID Password?
- A Working Guide For Pachirisu Pokemon Go Map On Vivo Y100A | Dr.fone
- 5 Hassle-Free Solutions to Fake Location on Find My Friends Of Infinix Note 30 Pro | Dr.fone
- In 2024, Full Guide on Mirroring Your Oppo Reno 8T to Your PC/Mac | Dr.fone
- Android Screen Stuck General Tecno Spark 20 Pro Partly Screen Unresponsive | Dr.fone
- In 2024, Vivo X Flip ADB Format Tool for PC vs. Other Unlocking Tools Which One is the Best?
- Bypassing Google Account With vnROM Bypass For Asus ROG Phone 7
- Full Guide on Mirroring Your Xiaomi 14 Pro to Your PC/Mac | Dr.fone
- In 2024, How to Change/Add Location Filters on Snapchat For your Honor X7b | Dr.fone
- Can I recover permanently deleted photos from A18
- How to get back lost photos from Oppo Find X6 Pro.
- Best 10 Mock Location Apps Worth Trying On Apple iPhone 8 | Dr.fone
- Google Play Services Wont Update? 12 Fixes are Here on Oppo Reno 11 Pro 5G | Dr.fone
- Rootjunky APK To Bypass Google FRP Lock For Oppo A59 5G
- Additional Tips About Sinnoh Stone For Realme GT 3 | Dr.fone
- In 2024, How to Change Google Play Location On Realme GT 5 | Dr.fone
- In 2024, Learn How To Lock Stolen Your iPhone XS Properly | Dr.fone
- New How To Make Pinterest Slideshow in Simple Ways for 2024
- How to Fix Videos Not Playing on Google ?
- Title: Unlock Free Images for Your Business A Beginners Guide for 2024
- Author: Ava
- Created at : 2024-05-19 14:41:58
- Updated at : 2024-05-20 14:41:58
- Link: https://video-content-creator.techidaily.com/unlock-free-images-for-your-business-a-beginners-guide-for-2024/
- License: This work is licensed under CC BY-NC-SA 4.0.
