
:max_bytes(150000):strip_icc():format(webp)/how-to-increase-internet-speed-5181475-b6fd84098c634a04a6934302184c5b1b.jpg)
New In 2024, Play Videos at a Slower Pace with VLC Media Player
Play Videos at a Slower Pace with VLC Media Player
While the files of the most common formats like MP4, WAV, etc. may look identical, they might be compiled using varied codecs which may or may not support any random player that you install on your PC. The reason why VLC media player is used by the majority of users worldwide is the versatility in the codecs that it supports natively.
Furthermore, the app is available for almost every platform, i.e., Windows, Mac, Linux, iOS, and Android, and is absolutely free to download and use.
With that said, the following sections explain how to manage the playback speed of a video while using VLC media player to add a slow motion effect to video. Here you will learn how to play slow motion on VLC on Windows, Mac, and iOS/Android, and also how to set the default speed for the app so that every time a video is played, the speed remains according to your preference.
In this article
01 How to Play Video in Slow Motion Effects on Windows with VLC?
02 How to Play Slow Motion Effects on Mac with VLC?
03 How to Control Playback Speed in VLC Media Player on Android and iOS?
04 How to Set up the Default Playback Speed on VLC?
Part 1: How to Play Video in Slow Motion Effects on Windows with VLC?
VLC is one of the best media players to play videos in slow motion . You can follow the instructions that are given below to learn how to play a video in slow motion in VLC on a Windows PC:
Step 1: Start Video Playback
Launch VLC on your Windows computer (a Windows 11 PC is used here for illustrations), click Media from the menu bar at the top, click Open File from the menu, and locate and open a video that you want to watch in slow motion. If VLC is your default media player, simply double-clicking the clip automatically opens the file in the app.

Step 2: Reduce the Playback Speed (In Decrements of 0.10x)
Once the playback begins, press the Spacebar on the keyboard to pause the video. Next, go to the Playback menu from the top, go to Speed, and click Slower (fine) once. This will reduce the speed to 0.90x. Clicking Slower (fine) again will further slow down the video to 0.80x speed. You can repeat this process until you reduce the speed to your desired level. Press Spacebar again to resume the playback in slow motion.
Note: The lowest speed that you can go to using this process is 0.03x.

Step 3: Reduce the Playback Speed (In Decrements in Percentage)
Pause the playback and go to Playback > Speed as explained in the previous step. From the list that comes up, click Slower (the last option). This will reduce the speed to 0.67x. Click Slower again and the speed will further go down to 0.50x. You can repeat this process until you reach your desired playback speed. Press Spacebar to resume the playback in slow motion. With this method, you can reduce the speed to as low as 0.02x.
Note: You can click Normal from the Speed submenu to play the video at normal speed.

Step 4: Using the Shortcut Keys (Optional)
You can press the left square bracket ‘[‘ on your keyboard to reduce the speed in decrements of 0.10x. To get back to the normal speed, press the equals to ‘=’ key. Likewise, pressing the right square bracket ‘]’ increases the speed by 0.10x.
Note: As it is with the Slower (fine) and Slower options, you can use Faster (fine) to add 0.10x increments to the speed, and Faster to increase percentage-wise. Also, if Faster (fine) is clicked repeatedly or its shortcut key is used multiple times, the speed can be increased up to 31.25x. On the other hand, by using the Faster option repeatedly, the speed can be increased to more than 100x.
Part 2: How to Play Slow Motion Effects on Mac with VLC?
The process of slowing down the video playback in VLC on a Mac computer is almost identical to that in Windows. You can learn how to get this done by following the steps that are given below:
Step 1: Open and Pause the Video
Locate and right-click the video that you want to play in slow motion, go to Open With from the context menu, and click VLC from the submenu. Once the clip opens, click the Pause button from the bottom as explained in the previous section.
Step 2: Reduce the Playback Speed
Click Playback from the menu bar at the top, and drag the Playback Speed slider to the left to reduce the speed of the video.

Step 3: Resume the Playback
Click anywhere on the screen to close the Playback menu, and then click the Play button from the bottom to resume the video playback in slow motion.
Part 3: How to Control Playback Speed in VLC Media Player on Android and iOS?
Although the playback speed of a video on both Android and iOS devices can be controlled with a slider, the location where the controller is placed on the two platforms varies, and so does the process of reaching there. Both the methods are explained below for your convenience:
Play Video in Slow Motion on Android with VLC
Step 1: Pause the Playback
Launch VLC on your Android phone (Samsung Galaxy Note 10+ is used here for illustrations), locate and open the video in VLC, tap anywhere on the screen, and tap the Pause button from the bottom to pause the playback.
Step 2: Set a Slower Playback Speed
Tap the More icon from the bottom-right corner, tap Playback speed from the menu that appears, and drag the slider that is present at the bottom to the left to reduce the speed. Alternatively, you can also repeatedly tap the down arrow that is present at the right of the slider to slow down the speed in the decrements of 0.05x.

Step 3: Resume the Playback
Tap anywhere on the screen, and when the Playback speed slider disappears, tap the screen one more time. Now, tap the Play icon from the bottom to resume the video playback.
Play Video in Slow Motion on iPhone with VLC
Step 1: Pause the Playback
Assuming that you have already added the video to the VLC library by connecting it to iTunes, launch the app on your iOS device (iPhone 13 Pro Max is used here for illustrations). Tap the video that you want to play in slow motion, and then tap the Pause icon from the bottom.
Step 2: Reduce the Playback Speed
Tap anywhere on the screen, and tap the Clock icon from the lower-left corner. Next, drag the Playback speed slider to the left to reduce the playback speed.

Step 3: Resume the Playback
Right after decreasing the speed, tap the Play icon from the bottom to resume the playback. If the controllers disappear, you can tap anywhere on the screen again, and then tap the Play icon.
Part 4: How to Set up the Default Playback Speed on VLC?
The processes of setting up default playback speed on different platforms and devices vary. For your convenience, all of them are explained below:
Set up Default Playback Speed in VLC on Windows
- Go to Tools > Preferences in VLC media player, and then click the All button from the Show settings section at the bottom.
- Select Input / Codecs from the left pane of the Advanced Preferences box, and then specify your preferred speed in the Playback speed field that is present under the Playback control section on the right window
- Click Save to save the changes

Set up Default Playback Speed in VLC on Mac
- Launch VLC, and go to VLC media player from the menu bar, and then click Preferences; and then click Show All from the bottom of the Preferences box to display all preferences setting options;

- Click the Input / Codecs from the left pane, and then define your preferred speed in the Playback speed field under the Playback control section in the right window, and then click Save to save the changes.

How to Change VLC Media Player Default Speed on Android
Note: At the time of this writing, the Android version of VLC doesn’t allow you to set a global default playback speed. However, you can set it on a per video basis. This means that every time that video is played, the playback speed will remain what you set for it. You must do this for each video in your VLC library individually.
- Launch VLC, and then tap More from the bottom-right corner; next, tap SETTINGS from the upper-left area;
- Tap Video from the Extra settings section, and then check the Save Playback Speed box

How to Change VLC Media Player Default Speed on iOS and iPhone
- Tap Settings from the Home screen, and then scroll down and tap VLC
- Tap Default playback speed from the GENERIC section, and then tap to select a playback speed from the available list to set it as the default.

Conclusion
It is pretty convenient to reduce the playback speed in VLC media player regardless of the platform or device you are using. While the processes of getting the job might be different, the principle behind it remains the same. When on Windows, the playback speed can be decreased to 0.02x and can be increased to more than 100x. This facility is not available on Mac, iOS, or Android platforms. Also, if you want, you can set the default playback speed for the videos so that every time a clip is played, the pace remains what you specified as default.
02 How to Play Slow Motion Effects on Mac with VLC?
03 How to Control Playback Speed in VLC Media Player on Android and iOS?
04 How to Set up the Default Playback Speed on VLC?
Part 1: How to Play Video in Slow Motion Effects on Windows with VLC?
VLC is one of the best media players to play videos in slow motion . You can follow the instructions that are given below to learn how to play a video in slow motion in VLC on a Windows PC:
Step 1: Start Video Playback
Launch VLC on your Windows computer (a Windows 11 PC is used here for illustrations), click Media from the menu bar at the top, click Open File from the menu, and locate and open a video that you want to watch in slow motion. If VLC is your default media player, simply double-clicking the clip automatically opens the file in the app.
Step 2: Reduce the Playback Speed (In Decrements of 0.10x)
Once the playback begins, press the Spacebar on the keyboard to pause the video. Next, go to the Playback menu from the top, go to Speed, and click Slower (fine) once. This will reduce the speed to 0.90x. Clicking Slower (fine) again will further slow down the video to 0.80x speed. You can repeat this process until you reduce the speed to your desired level. Press Spacebar again to resume the playback in slow motion.
Note: The lowest speed that you can go to using this process is 0.03x.
Step 3: Reduce the Playback Speed (In Decrements in Percentage)
Pause the playback and go to Playback > Speed as explained in the previous step. From the list that comes up, click Slower (the last option). This will reduce the speed to 0.67x. Click Slower again and the speed will further go down to 0.50x. You can repeat this process until you reach your desired playback speed. Press Spacebar to resume the playback in slow motion. With this method, you can reduce the speed to as low as 0.02x.
Note: You can click Normal from the Speed submenu to play the video at normal speed.
Step 4: Using the Shortcut Keys (Optional)
You can press the left square bracket ‘[‘ on your keyboard to reduce the speed in decrements of 0.10x. To get back to the normal speed, press the equals to ‘=’ key. Likewise, pressing the right square bracket ‘]’ increases the speed by 0.10x.
Note: As it is with the Slower (fine) and Slower options, you can use Faster (fine) to add 0.10x increments to the speed, and Faster to increase percentage-wise. Also, if Faster (fine) is clicked repeatedly or its shortcut key is used multiple times, the speed can be increased up to 31.25x. On the other hand, by using the Faster option repeatedly, the speed can be increased to more than 100x.
Part 2: How to Play Slow Motion Effects on Mac with VLC?
The process of slowing down the video playback in VLC on a Mac computer is almost identical to that in Windows. You can learn how to get this done by following the steps that are given below:
Step 1: Open and Pause the Video
Locate and right-click the video that you want to play in slow motion, go to Open With from the context menu, and click VLC from the submenu. Once the clip opens, click the Pause button from the bottom as explained in the previous section.
Step 2: Reduce the Playback Speed
Click Playback from the menu bar at the top, and drag the Playback Speed slider to the left to reduce the speed of the video.
Step 3: Resume the Playback
Click anywhere on the screen to close the Playback menu, and then click the Play button from the bottom to resume the video playback in slow motion.
Part 3: How to Control Playback Speed in VLC Media Player on Android and iOS?
Although the playback speed of a video on both Android and iOS devices can be controlled with a slider, the location where the controller is placed on the two platforms varies, and so does the process of reaching there. Both the methods are explained below for your convenience:
Play Video in Slow Motion on Android with VLC
Step 1: Pause the Playback
Launch VLC on your Android phone (Samsung Galaxy Note 10+ is used here for illustrations), locate and open the video in VLC, tap anywhere on the screen, and tap the Pause button from the bottom to pause the playback.
Step 2: Set a Slower Playback Speed
Tap the More icon from the bottom-right corner, tap Playback speed from the menu that appears, and drag the slider that is present at the bottom to the left to reduce the speed. Alternatively, you can also repeatedly tap the down arrow that is present at the right of the slider to slow down the speed in the decrements of 0.05x.
Step 3: Resume the Playback
Tap anywhere on the screen, and when the Playback speed slider disappears, tap the screen one more time. Now, tap the Play icon from the bottom to resume the video playback.
Play Video in Slow Motion on iPhone with VLC
Step 1: Pause the Playback
Assuming that you have already added the video to the VLC library by connecting it to iTunes, launch the app on your iOS device (iPhone 13 Pro Max is used here for illustrations). Tap the video that you want to play in slow motion, and then tap the Pause icon from the bottom.
Step 2: Reduce the Playback Speed
Tap anywhere on the screen, and tap the Clock icon from the lower-left corner. Next, drag the Playback speed slider to the left to reduce the playback speed.
Step 3: Resume the Playback
Right after decreasing the speed, tap the Play icon from the bottom to resume the playback. If the controllers disappear, you can tap anywhere on the screen again, and then tap the Play icon.
Part 4: How to Set up the Default Playback Speed on VLC?
The processes of setting up default playback speed on different platforms and devices vary. For your convenience, all of them are explained below:
Set up Default Playback Speed in VLC on Windows
- Go to Tools > Preferences in VLC media player, and then click the All button from the Show settings section at the bottom.
- Select Input / Codecs from the left pane of the Advanced Preferences box, and then specify your preferred speed in the Playback speed field that is present under the Playback control section on the right window
- Click Save to save the changes
Set up Default Playback Speed in VLC on Mac
- Launch VLC, and go to VLC media player from the menu bar, and then click Preferences; and then click Show All from the bottom of the Preferences box to display all preferences setting options;
- Click the Input / Codecs from the left pane, and then define your preferred speed in the Playback speed field under the Playback control section in the right window, and then click Save to save the changes.
How to Change VLC Media Player Default Speed on Android
Note: At the time of this writing, the Android version of VLC doesn’t allow you to set a global default playback speed. However, you can set it on a per video basis. This means that every time that video is played, the playback speed will remain what you set for it. You must do this for each video in your VLC library individually.
- Launch VLC, and then tap More from the bottom-right corner; next, tap SETTINGS from the upper-left area;
- Tap Video from the Extra settings section, and then check the Save Playback Speed box
How to Change VLC Media Player Default Speed on iOS and iPhone
- Tap Settings from the Home screen, and then scroll down and tap VLC
- Tap Default playback speed from the GENERIC section, and then tap to select a playback speed from the available list to set it as the default.
Conclusion
It is pretty convenient to reduce the playback speed in VLC media player regardless of the platform or device you are using. While the processes of getting the job might be different, the principle behind it remains the same. When on Windows, the playback speed can be decreased to 0.02x and can be increased to more than 100x. This facility is not available on Mac, iOS, or Android platforms. Also, if you want, you can set the default playback speed for the videos so that every time a clip is played, the pace remains what you specified as default.
Unlock Pro-Quality Jump Cuts in Final Cut Pro X
How to Do Jump Cuts Like a Pro in Final Cut Pro X?

Benjamin Arango
Aug 18, 2022• Proven solutions
Being criticized for years due to its simplified technology and features, FCPX or Final Cut Pro is the next possible option other than iMovie that comes to rescue Mac users’. With surplus features like clean user-interface, video effects, transitions, and a lot more, Apple has concerted efforts, like other NLEs. Although some users find difficulty identifying specific Final Cut Pro X tools, some incredibly potent but frequently overlooked tools are still under the lid.
Yes, certain top-notch features like optical flow, jump cut at markers, markers as subtitles, adjustment layers, and still a lot more video editing abilities are hidden where today, we will expose a technique on how to jump-cut like a pro with FCPX. Make sure you stick till the last so that you can get to know other options related to Final Cut Pro jump cuts as well.
Part 1: How to Create Jump Cuts with Markers in Final Cut Pro X?
Jump cuts are a sort of split edit performed on your video where you can jump over your video clips to keep the desire and delete the unwanted. Although it might seem similar to cut operation, jump cuts are preferable by YouTubers and vloggers. Here is a guide to teach how to do jump cuts in the Final Cut Pro with markers.
Step 1: Create a fresh project and import media files
Launch the Final Cut Pro X app, and once opened, create a new project by executing “File > New > Project”. Type the name of your project or video, and press “OK“.
Now, you can start to import the video file to add the jump cuts.
Step 2: Add markers
Bring the video into the timeline, and play the video. To add markers before creating jump cuts on the timeline, bring the pointer to the clip where you need to divide it into segments and press “M“.
A blue marker will be on the video timeline. Similarly, you can place markers on places wherever required.
Step 3: Apply jump cuts
Lastly, to apply quick jump cuts in the Final Cut Pro, tap the speed icon from the timeline where you will get various options from which you need to click the “Jump Cuts at Markers” option.
You can specify the frame range based on which the jump cuts will get executed in the video.
Thus, this is how to do jump cuts in the Final Cut Pro by speeding up the clips based on frames hence helping the action happen in just a fraction of seconds.
Part 2: How to Fix a Jump Cut in Final Cut Pro X?
If you do jump cuts with markers in FCPX, you do not need to fix it, but if you opt for the other way of cut and delete, you must set them for a smoother process. Let’s take a look at how to fix a jump cut by transition addition.
Step 1. After importing your media files, perform jump cuts by following the previous section.
Step 2. To fix jump cuts, place the pointer on the clip, and tap the transition icon from the timeline menu with various options. Primarily “Flow“ transition option is used in FCPX.
Tap any option, and Final Cut Pro X will automatically apply it to the clip.
Part 3: How to Hide Jump Cuts in Final Cut Pro X?
Want to hide jump cuts in Final Cut Pro X? Then, here is the session to know how to hide jump cuts in FCPX with two options: resizing the video clip and synchronizing clips.
Method 1: Resizing the clip
To do this method, select a clip. It could be the first one or the latter. Now, click on the “Resize” icon.
You can resize the clip using the circle resize option near the video preview or the “Scale” option on the right corner.
Doing so will add effects to the video clip hiding the jump cuts added.
Method 2: Synchronizing clips
Another way to hide jump cuts in Final Cut Pro X is to synchronize the clip with the other relevant clip.
You can add another video to the timeline and place it where you created the jump cut.
When you prefer this method, you have to ensure that the synchronized video’s audio is on mute to avoid disturbing the actual one.
Conclusion
After going through this blog, we know and hope you have now found how well Final Cut Pro X can help you create a jump cut like a pro. Yes, guys, are you in awe to find that your FCPX can do wonders? While many more functionalities are still under the carpet, I believe you would find out today’s article on how to do jump cuts in Final Cut Pro quite helpful. Want to make quick jump cuts? Try it out next time with Final Cut Pro X!
Benjamin Arango
Benjamin Arango is a writer and a lover of all things video.
Follow @Benjamin Arango
Benjamin Arango
Aug 18, 2022• Proven solutions
Being criticized for years due to its simplified technology and features, FCPX or Final Cut Pro is the next possible option other than iMovie that comes to rescue Mac users’. With surplus features like clean user-interface, video effects, transitions, and a lot more, Apple has concerted efforts, like other NLEs. Although some users find difficulty identifying specific Final Cut Pro X tools, some incredibly potent but frequently overlooked tools are still under the lid.
Yes, certain top-notch features like optical flow, jump cut at markers, markers as subtitles, adjustment layers, and still a lot more video editing abilities are hidden where today, we will expose a technique on how to jump-cut like a pro with FCPX. Make sure you stick till the last so that you can get to know other options related to Final Cut Pro jump cuts as well.
Part 1: How to Create Jump Cuts with Markers in Final Cut Pro X?
Jump cuts are a sort of split edit performed on your video where you can jump over your video clips to keep the desire and delete the unwanted. Although it might seem similar to cut operation, jump cuts are preferable by YouTubers and vloggers. Here is a guide to teach how to do jump cuts in the Final Cut Pro with markers.
Step 1: Create a fresh project and import media files
Launch the Final Cut Pro X app, and once opened, create a new project by executing “File > New > Project”. Type the name of your project or video, and press “OK“.
Now, you can start to import the video file to add the jump cuts.
Step 2: Add markers
Bring the video into the timeline, and play the video. To add markers before creating jump cuts on the timeline, bring the pointer to the clip where you need to divide it into segments and press “M“.
A blue marker will be on the video timeline. Similarly, you can place markers on places wherever required.
Step 3: Apply jump cuts
Lastly, to apply quick jump cuts in the Final Cut Pro, tap the speed icon from the timeline where you will get various options from which you need to click the “Jump Cuts at Markers” option.
You can specify the frame range based on which the jump cuts will get executed in the video.
Thus, this is how to do jump cuts in the Final Cut Pro by speeding up the clips based on frames hence helping the action happen in just a fraction of seconds.
Part 2: How to Fix a Jump Cut in Final Cut Pro X?
If you do jump cuts with markers in FCPX, you do not need to fix it, but if you opt for the other way of cut and delete, you must set them for a smoother process. Let’s take a look at how to fix a jump cut by transition addition.
Step 1. After importing your media files, perform jump cuts by following the previous section.
Step 2. To fix jump cuts, place the pointer on the clip, and tap the transition icon from the timeline menu with various options. Primarily “Flow“ transition option is used in FCPX.
Tap any option, and Final Cut Pro X will automatically apply it to the clip.
Part 3: How to Hide Jump Cuts in Final Cut Pro X?
Want to hide jump cuts in Final Cut Pro X? Then, here is the session to know how to hide jump cuts in FCPX with two options: resizing the video clip and synchronizing clips.
Method 1: Resizing the clip
To do this method, select a clip. It could be the first one or the latter. Now, click on the “Resize” icon.
You can resize the clip using the circle resize option near the video preview or the “Scale” option on the right corner.
Doing so will add effects to the video clip hiding the jump cuts added.
Method 2: Synchronizing clips
Another way to hide jump cuts in Final Cut Pro X is to synchronize the clip with the other relevant clip.
You can add another video to the timeline and place it where you created the jump cut.
When you prefer this method, you have to ensure that the synchronized video’s audio is on mute to avoid disturbing the actual one.
Conclusion
After going through this blog, we know and hope you have now found how well Final Cut Pro X can help you create a jump cut like a pro. Yes, guys, are you in awe to find that your FCPX can do wonders? While many more functionalities are still under the carpet, I believe you would find out today’s article on how to do jump cuts in Final Cut Pro quite helpful. Want to make quick jump cuts? Try it out next time with Final Cut Pro X!
Benjamin Arango
Benjamin Arango is a writer and a lover of all things video.
Follow @Benjamin Arango
Top 10 Webcam Capture Tools for Windows 10 Users
10 Best Webcam Recording Software for Windows 10

Richard Bennett
Mar 27, 2024• Proven solutions
Which webcam softwarehave you installed on your laptop or desktop? Using the right webcam software to live stream videos, screen record videos, or chat on Skype results in high-quality images, smooth streaming, and high-quality images and videos.
There is a huge number of free webcam software with advanced features yet free for you to download, and use on your PC.
But how would you determine the best webcam software to use?
Before you mounted that webcam on your desktop or laptop, you had a reason. It’s your webcam features and purpose that should guide you to select the right software for the webcam camera.
In this article, we will show you 10 webcam software for Windows in this guide. Included are the most useful factors to consider as you make your choice – complexity of use, free/paid, integrations, editing tools, and more. You will learn:
- Part 1: The Best Webcam & Screen Recorder for Windows and Mac [Video Tutorial]
- Part 2: Top 10 Best Free Webcam Software for Windows
First take a quick look of the 10 best webcam software that is available on your Windows from a video:
For Win 7 or later (64-bit)
 Secure Download
For macOS 10.14 or later
Secure Download
Part 1: The Best Webcam & Screen Recorder for Computer
You need a sound and webcam recorder to record your video tutorials, streaming videos, presentations, or any other type of video. Wondershare Filmora is the software to use. Other than its most admired friendly intuitive interface, it’s simple and easy to use-suitable for both beginners and professionals.
For Win 7 or later (64-bit)
Secure Download
For macOS 10.14 or later
Secure Download
Among the outstanding features, you’ll find in Filmora include,
- Fast-paced recording speed of up to 120 fps
- Adverse professional editing tools that are easy to use
- Simultaneous recording from both webcam and computer screen
- Compatible with 50+ different file formats
- Rich title text and tutorial features
It’s free to download. Have a try now! Join in the Wondershare Video Community and get some inspiration from other Filomora users.
Part 2: Top 10 Best Free Webcam Software for Windows
To help you evaluate which webcam software best suits your needs, I’ve featured the strengths, shortcomings, and support services in each software review.
This is the list of the best free webcam software for Windows 10.
| 1 - Logitech Capture | 2 - CyberLink Youcam |
|---|---|
| 3 - ManyCam | 4 - SplitCam |
| 5 - Bandicam | 6 - NCH - Video Capture Software |
| 7 - YAWCAM | 8 - Windows Camera |
| 9 - Fake Webcam | 10 - IP Camera Viewer |
1. Logitech Capture
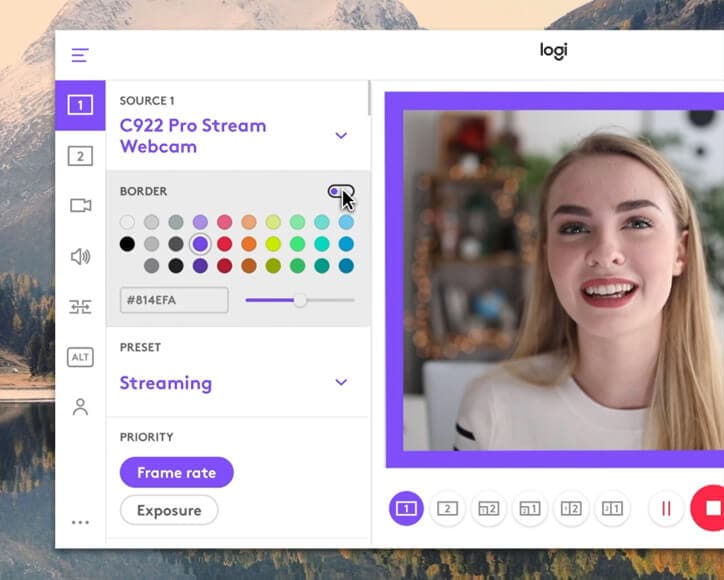
The multiple source recording feature and direct streaming app are the key strengths of this software. According to its mission statement- All-In-One Content Creation- you can use this software to record, edit, customize, and stream to your favorite channel.
Operating systems: Windows 10/8/7
Price: Free
Supported webcams: 1080P PRO STREAM, BRIO STREAM, C920s HD PRO, C922 PRO STREAM
Logitech Capture is among the few free webcam recording software for Windows 10 with studio controls applicable during recording. You can use this feature to adjust your image, create frames, adjust focus and transitions, and enable ChromaKey as you record.
In case you want to create a picture-in-picture presentation, this software allows you to use two webcams simultaneously. With the source switching and the auto-focus features, you can record the best tutorials or guides that show all dimensions and your image.
Pros
- Rich in transitions and effects
- Portrait optimization for mobile devices
- Its Capture app offers direct streaming to YouTube
- You can take passports or still images
Cons
- Limited to YouTube channel
- Account registration is mandatory
2. CyberLink Youcam
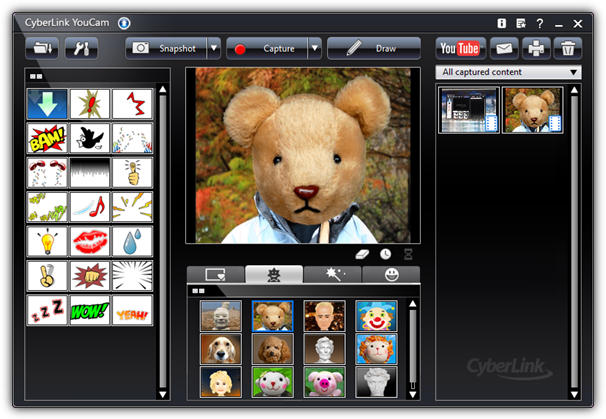
If you are used to video chatting and video recording, then, you’ll have 200+ fun effects to make your real-time videos as interesting as possible. In fact, the seamless app integration feature will keep your live streaming chats without buffering for long.
Operating systems: Windows 10/8/1.8/7
Price: Free/ Paid
Supported file formats: WMV, MP4, AVI
YouCam is the best free webcam software Windows 10 for YouTubers, business professionals, Streamers, home users, and Vloggers. It seamlessly integrates with live streaming media channels like Twitch, Wirecast, OBS Studio, Facebook Live, Xsplit, and YouTube Live.
The YouCam’s AR technology is one of its hidden treasures that will lighten up your skin by applying a natural-looking makeup. If your room is badly light, use the Live Skin Smoothing feature. Just below it is the TrueTheater Enhancement option to help you automatically adjust your facial sharpness and lighting.
Pros
- Hundreds of animated emojis
- Suitable for video conferencing services
- Plenty of interactive colorful particles and distortions
- Availability of face beautification tool
Cons
- Only limited to the Windows operating system
- Very few features for the free plan
3. ManyCam
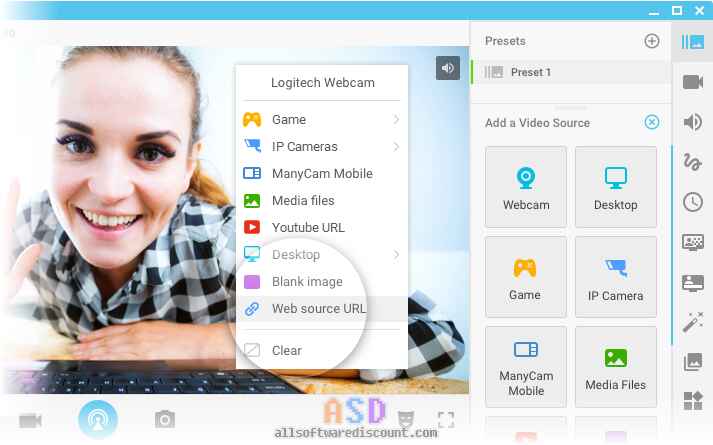
Downloading this webcam software guarantees you smooth streaming and effortless recording of videos. Also, this software will help you during game steaming, online education, mobile live streaming, and live telehealth communication.
Operating systems: Windows 10/8/7 and macOS X
Price: Free /Paid
Supported file formats: MJPEG, IP, MP4, AVI, MPEG, MOV
ManyCam is a free webcam recording software for windows 10 . It’s among the most widely used software internationally-not for many reasons, but because of its friendly intuitive user interface and live streaming tools for lessons and lecturers.
So, if you are a lecturer/teacher, you can use the Software Development Kit (SDK) to integrate the webcam with any online teaching platform. Among the features designed to facilitate better online teaching include the picture in picture, Chroma Key, multiple video sources, and screen sharing.
Pro
- Ability to stream 4K videos
- Real-time camera control settings
- No watermark even on the free plan
- Screencasting and screen recording feature
- Real-time drop and drag effects
Cons
- Expensive business subscription plans
- No Light enhancement features
- Most features are manual as opposed to being automatic

Filmora WebCame & Screen Recorder
Filmora - WebCame & Screen Recorder
• No-time delay to record webcam and screen while live streaming or gaming
• Edit recording video for marketing replay or adding game commentary
• Cross-platform supported - (Windows, Mac, iOS, Android)
Start Webcam & Screen Record Start Webcam & Screen Record Start Webcam & Screen Record Learn More >
4. SplitCam
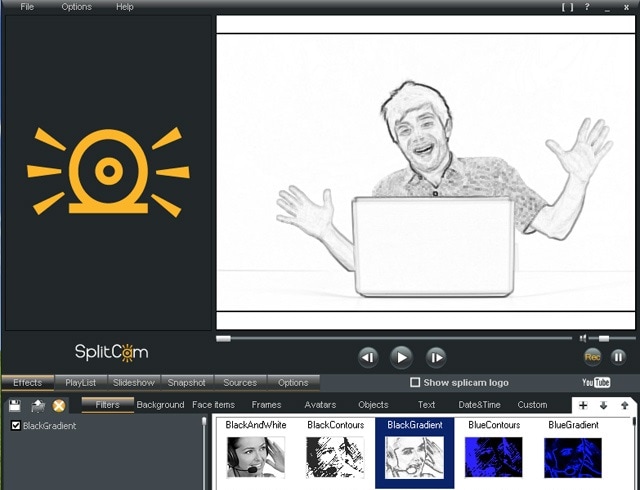
To stream your desktop/laptop screen SplitCam is the most appropriate software. With only the inbuilt virtual webcam, you can share your screen videos to media channels and IMS. Other uses of this software are recording webcam chatting , streaming live videos, and messaging.
Operating systems: Windows 10/8/7
Price: Free
SplitCam is not as popular as the other free webcam software windows 10 like ManyCam and YouCam. This is because it doesn’t integrate with some of the world’s renowned social media platforms- Facebook and Instagram. However, you can use this software to stream, take snapshots, and record videos for YouTube, Skype, Justin.tv, Gtalk, and Windows Live Messenger.
SplitCam is rich in fantastic webcam effects. Haven’t you been surprised to see someone appear to be streaming from the ocean or the Amazon Mountain? This is what you can do with SplitCam. Other cool effects are frames, texts on videos, filters, and facial items like masks and fake face glasses.
Pros
- Open and simple interface
- Integratable with the messaging apps
- Supports a wide range of resolutions ( between 320x180 and 2048x1536)
Cons
- Applicable to a small number of channels
- Supported file formats not defined
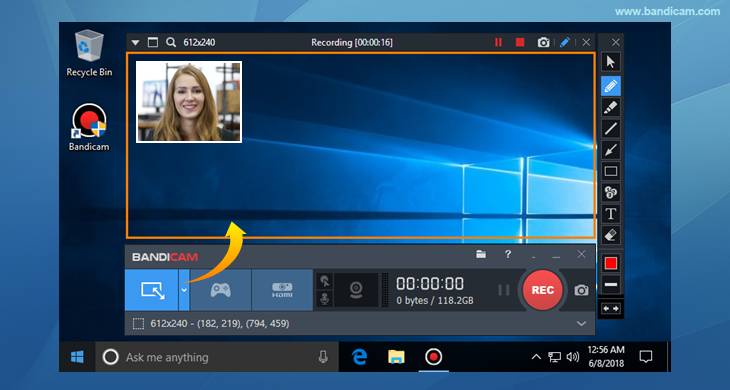
5. Bandicam
Do you want a recorder for screen recording, recording your gameplay, or capturing videos from devices like smartphones and PlayStation? Look for no other software but BandiCam. You can also merge two or more video files, remove unwanted parts, and select the only part to screen record.
Operating systems: Windows Vista, 10/8/7
Price: Free/paid
Supported file format: AVI, MP4, JPEG, TIF, GIF, PNG
Supported graphics cards: Nvidia NVENC, Nvidia NVENC (),
BandiCam is another HD webcam software Windows 10 with the capability of capturing high compression videos and games on your PC screen videos without compromising the video quality. Don’t forget to record all webinars aired in your niche.
Netflix is becoming more popular each day due to the thrilling videos. With the BandiCam screen recorder, you can record live-streamed videos on Netflix for over 24hrs. These are the tools to edit your recorded video: real-time drawing tool, webcam overlay, sound mixer, and Chroma Key.
Pros
- No hidden features
- Widescreen capture
- Can record 2D/3D videos in HD mode
- Can capture fast-paced videos of up to 144 FPS
Cons
- Not suitable for beginners
- Cannot be used to live stream videos
6. NCH - Video Capture Software

Of all the listed webcam software in this review, this software has the most diverse functions. You can record streaming videos, record your computer screen, record from external devices, and record from a webcam. It’s also perfect for recording audios and simultaneous recording from screen and webcam.
Operating systems: Windows 10, 8, 8.1, 7, XP, Vista 64 bit and Mac OS X 10.5 and above
Price: Free/paid
Supported file formats: MP4, WMV, AVI, MPG, FLV, MOV
Debut Video Capture is the only free webcam recording software for Windows 10 believed to capture or record videos from any external source. It has also preset settings for HD and TV with pre-production enhancement features like color adjustment settings, overlay buttons and frame rate, aspect ratio, and resolution settings.
If you always think of becoming rich, the Express Burn Disc Burner is the tool that will help you make money. Record the most trending videos and use this tool to burn DVDs and CDs.
Pros
- Can record videos for any social media platform
- Supports a wide range of audio and video file formats
- All features are open and easy to use
- Availability of video editing software
Cons
- Only monthly subscriptions for paid plans
- Watermark for the free download
- Difficult to record a full-screen movie
Try Filmora to Smoothly Record WebCame and Screen!
Filmora Web Camera & Screen Recorder can capture any area of the PC screen and webcam. It’s perfect to capture and record while making a live gaming match, marketing promotion, guiding a tour, and more. Plus, you can edit the recording video files in Filmora directly! Worth to have a try!
Start Webcam & Screen Recording Start Webcam & Screen Recording Start Webcam & Screen Recording Learn More >
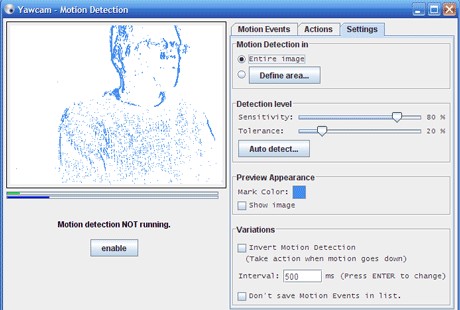
7. YAWCAM
This webcam software can be referred to as the simplest for all beginners with the will to start streaming and recording videos for personal or home use.
Supported file formats: PNG, JPG, MJPEG, GIF, JavaScript
Price: Free
Supported operating systems: Windows 2000/10/8/7/ Vista and XP
YAWCAM is an absolutely free webcam software windows 10. Why is it the simplest software to use? Just download and you will find all features on one page. Simple language commands aligned in a drop-down menu ready to be used with only one click.
Some of the best features include overlay texts and images, scheduler, motion detection, and an inbuilt webserver. For you to use this webcam software, use these supported devices; DirectX compatible webcams, DV-camera, or video capture devices.
Pros
- No watermark
- Easy to use
- Friendly user interface
Cons
- Few transitions and effects
8. Windows Camera
We all trust any app or software by Microsoft over others! If you also do, then you can download Windows Camera and use it to record videos, take snapshots and shoot videos.
Operating system: Windows 10
Price: Free
Supported devices: Xbox One, Windows, mobile
Windows Camera is among the best free webcam software for Windows 10. This is because of the software’s few but easy-to-use and effective features that are expertly designed for PCs and tablets installed with Windows 10.
The automatic photo back combined with the photo-shoot timer makes it perfect for taking selfies and passports. Using the panorama feature, you can take photos of the best scenes and share them on media platforms.
Pros
- Simplicity is its main strength
- Supports resolutions above 1080p
- Good for photographers
Cons
- Has no built-in virtual webcam
- Requires a camera to support 4K videos
9. Fake Webcam

Supported file formats: AVI, MPEG, DVD, VCD, WMV, 3GP, MP4, SVCD, MOV, ASF,
Price: Free /paid
Operating systems: Windows 7/8/10 (32/64 bit)
Fake Webcam is a free webcam software Windows 10 whose name is creatively used to suggest it almost functions like a webcam. This doesn’t fall far from the truth! You can truly use this software to broadcast, add effects and filters, record on full screen, and fake your voice.
To share or stream your photos and videos on Skype, YIM, or Gtalk, using the screen recorder would give the best results. What makes Fake Webcam stand out is the free video converter and the free video toolkit.
Pros
- Free support tools
- Supports all video and audio formats
- Can convert file formats and stream to any channel
- Availability of the screen recorder
- Integratable with almost all instant messengers
Cons
- Major tools not free(Fake Webcam and Screen recorder)
10. IP Camera Viewer
Do you run a supermarket store, mall or you’ve installed security surveillance cameras in your compound? IP Camera Viewer is the most effective webcam software for video monitoring systems.
Supported file formats: JPEG, MPEG-4, MJPEG, and
Price: Free
Operating systems: Windows 10 / 8 / 7 /2012 /Vista and XP
IP Camera Viewer is the most used free webcam recording software for windows 10 as its compatible with almost all IP camera models like Panasonic, Toshiba, Canon, D-Link, Sony, and more the 2000 others. With the capability of viewing and controlling 4 camera feeds at once, you can use this software to monitor your entire compound.
Some of the important advanced IP Camera Viewer functions include listening to webcam audios, adjust image settings, zoom or tilt images, schedule monitoring times, and detect motions.
Pros
- Automatically uploads recorded videos and photos to a server
- Compatible with almost all IP camera models
- Simple and easy to use
Cons
- No inbuilt media player
- Cannot adjust the image or video quality
You may also want to read >>> 10 Best Webcams | A Buyer’s Guide
![]()
A cross-platform for making videos anywhere for all creators

Why your video editing isn’t good enough? How about some creative inspo?
- 100 Million+ Users
- 150+ Countries and Regions
- 4 Million+ Social Media Followers
- 5 Million+ Stock Media for Use
* Secure Download

FAQs about Webcam Software for Windows
1. What is Webcam Software?
A webcam is a video camera that feeds or streams images or video in real-time to or over a computer network. And webcam software enables users to record video or stream video over the Internet.
Webcam software is an application that allows you to capture video from your laptop/desktop webcam and record or stream video over the Internet. You can use them to deliver professional videos, streaming, and online courses easily.
2. Does Windows have built-in webcam software?
Windows 10 has an in-built webcam app called Camera that lets you record videos and take pictures with your webcam. This is definitely better than downloading 3rd party webcam recording software where spyware/malware is rampant.
3. Does a webcam need software?
Yes, if the camera hardware offers depth, low-light support, night vision, etc. If you use any software on the camera, these functions are only available if the driver is installed.
Conclusion
After a keen of all the webcam software above, it’s evident that every developer had an intended purpose. You cannot therefore just randomly wake up and download any without considering its functions, supported devices, file formats, and the auxiliary apps available. All this information is contained herein.
According to some users, there are free webcam software Windows 10 that more often would not show any video images but the audio is absolutely clear. To help your fellow user, what bad experience have you ever had after recording a game using webcam software ? Kindly share your comment or suggestion on our social media platforms.


Richard Bennett
Richard Bennett is a writer and a lover of all things video.
Follow @Richard Bennett
Richard Bennett
Mar 27, 2024• Proven solutions
Which webcam softwarehave you installed on your laptop or desktop? Using the right webcam software to live stream videos, screen record videos, or chat on Skype results in high-quality images, smooth streaming, and high-quality images and videos.
There is a huge number of free webcam software with advanced features yet free for you to download, and use on your PC.
But how would you determine the best webcam software to use?
Before you mounted that webcam on your desktop or laptop, you had a reason. It’s your webcam features and purpose that should guide you to select the right software for the webcam camera.
In this article, we will show you 10 webcam software for Windows in this guide. Included are the most useful factors to consider as you make your choice – complexity of use, free/paid, integrations, editing tools, and more. You will learn:
- Part 1: The Best Webcam & Screen Recorder for Windows and Mac [Video Tutorial]
- Part 2: Top 10 Best Free Webcam Software for Windows
First take a quick look of the 10 best webcam software that is available on your Windows from a video:
For Win 7 or later (64-bit)
Secure Download
For macOS 10.14 or later
Secure Download
Part 1: The Best Webcam & Screen Recorder for Computer
You need a sound and webcam recorder to record your video tutorials, streaming videos, presentations, or any other type of video. Wondershare Filmora is the software to use. Other than its most admired friendly intuitive interface, it’s simple and easy to use-suitable for both beginners and professionals.
For Win 7 or later (64-bit)
Secure Download
For macOS 10.14 or later
Secure Download
Among the outstanding features, you’ll find in Filmora include,
- Fast-paced recording speed of up to 120 fps
- Adverse professional editing tools that are easy to use
- Simultaneous recording from both webcam and computer screen
- Compatible with 50+ different file formats
- Rich title text and tutorial features
It’s free to download. Have a try now! Join in the Wondershare Video Community and get some inspiration from other Filomora users.
Part 2: Top 10 Best Free Webcam Software for Windows
To help you evaluate which webcam software best suits your needs, I’ve featured the strengths, shortcomings, and support services in each software review.
This is the list of the best free webcam software for Windows 10.
| 1 - Logitech Capture | 2 - CyberLink Youcam |
|---|---|
| 3 - ManyCam | 4 - SplitCam |
| 5 - Bandicam | 6 - NCH - Video Capture Software |
| 7 - YAWCAM | 8 - Windows Camera |
| 9 - Fake Webcam | 10 - IP Camera Viewer |
1. Logitech Capture
The multiple source recording feature and direct streaming app are the key strengths of this software. According to its mission statement- All-In-One Content Creation- you can use this software to record, edit, customize, and stream to your favorite channel.
Operating systems: Windows 10/8/7
Price: Free
Supported webcams: 1080P PRO STREAM, BRIO STREAM, C920s HD PRO, C922 PRO STREAM
Logitech Capture is among the few free webcam recording software for Windows 10 with studio controls applicable during recording. You can use this feature to adjust your image, create frames, adjust focus and transitions, and enable ChromaKey as you record.
In case you want to create a picture-in-picture presentation, this software allows you to use two webcams simultaneously. With the source switching and the auto-focus features, you can record the best tutorials or guides that show all dimensions and your image.
Pros
- Rich in transitions and effects
- Portrait optimization for mobile devices
- Its Capture app offers direct streaming to YouTube
- You can take passports or still images
Cons
- Limited to YouTube channel
- Account registration is mandatory
2. CyberLink Youcam
If you are used to video chatting and video recording, then, you’ll have 200+ fun effects to make your real-time videos as interesting as possible. In fact, the seamless app integration feature will keep your live streaming chats without buffering for long.
Operating systems: Windows 10/8/1.8/7
Price: Free/ Paid
Supported file formats: WMV, MP4, AVI
YouCam is the best free webcam software Windows 10 for YouTubers, business professionals, Streamers, home users, and Vloggers. It seamlessly integrates with live streaming media channels like Twitch, Wirecast, OBS Studio, Facebook Live, Xsplit, and YouTube Live.
The YouCam’s AR technology is one of its hidden treasures that will lighten up your skin by applying a natural-looking makeup. If your room is badly light, use the Live Skin Smoothing feature. Just below it is the TrueTheater Enhancement option to help you automatically adjust your facial sharpness and lighting.
Pros
- Hundreds of animated emojis
- Suitable for video conferencing services
- Plenty of interactive colorful particles and distortions
- Availability of face beautification tool
Cons
- Only limited to the Windows operating system
- Very few features for the free plan
3. ManyCam
Downloading this webcam software guarantees you smooth streaming and effortless recording of videos. Also, this software will help you during game steaming, online education, mobile live streaming, and live telehealth communication.
Operating systems: Windows 10/8/7 and macOS X
Price: Free /Paid
Supported file formats: MJPEG, IP, MP4, AVI, MPEG, MOV
ManyCam is a free webcam recording software for windows 10 . It’s among the most widely used software internationally-not for many reasons, but because of its friendly intuitive user interface and live streaming tools for lessons and lecturers.
So, if you are a lecturer/teacher, you can use the Software Development Kit (SDK) to integrate the webcam with any online teaching platform. Among the features designed to facilitate better online teaching include the picture in picture, Chroma Key, multiple video sources, and screen sharing.
Pro
- Ability to stream 4K videos
- Real-time camera control settings
- No watermark even on the free plan
- Screencasting and screen recording feature
- Real-time drop and drag effects
Cons
- Expensive business subscription plans
- No Light enhancement features
- Most features are manual as opposed to being automatic
Filmora WebCame & Screen Recorder
Filmora - WebCame & Screen Recorder
• No-time delay to record webcam and screen while live streaming or gaming
• Edit recording video for marketing replay or adding game commentary
• Cross-platform supported - (Windows, Mac, iOS, Android)
Start Webcam & Screen Record Start Webcam & Screen Record Start Webcam & Screen Record Learn More >
4. SplitCam
To stream your desktop/laptop screen SplitCam is the most appropriate software. With only the inbuilt virtual webcam, you can share your screen videos to media channels and IMS. Other uses of this software are recording webcam chatting , streaming live videos, and messaging.
Operating systems: Windows 10/8/7
Price: Free
SplitCam is not as popular as the other free webcam software windows 10 like ManyCam and YouCam. This is because it doesn’t integrate with some of the world’s renowned social media platforms- Facebook and Instagram. However, you can use this software to stream, take snapshots, and record videos for YouTube, Skype, Justin.tv, Gtalk, and Windows Live Messenger.
SplitCam is rich in fantastic webcam effects. Haven’t you been surprised to see someone appear to be streaming from the ocean or the Amazon Mountain? This is what you can do with SplitCam. Other cool effects are frames, texts on videos, filters, and facial items like masks and fake face glasses.
Pros
- Open and simple interface
- Integratable with the messaging apps
- Supports a wide range of resolutions ( between 320x180 and 2048x1536)
Cons
- Applicable to a small number of channels
- Supported file formats not defined
5. Bandicam
Do you want a recorder for screen recording, recording your gameplay, or capturing videos from devices like smartphones and PlayStation? Look for no other software but BandiCam. You can also merge two or more video files, remove unwanted parts, and select the only part to screen record.
Operating systems: Windows Vista, 10/8/7
Price: Free/paid
Supported file format: AVI, MP4, JPEG, TIF, GIF, PNG
Supported graphics cards: Nvidia NVENC, Nvidia NVENC (),
BandiCam is another HD webcam software Windows 10 with the capability of capturing high compression videos and games on your PC screen videos without compromising the video quality. Don’t forget to record all webinars aired in your niche.
Netflix is becoming more popular each day due to the thrilling videos. With the BandiCam screen recorder, you can record live-streamed videos on Netflix for over 24hrs. These are the tools to edit your recorded video: real-time drawing tool, webcam overlay, sound mixer, and Chroma Key.
Pros
- No hidden features
- Widescreen capture
- Can record 2D/3D videos in HD mode
- Can capture fast-paced videos of up to 144 FPS
Cons
- Not suitable for beginners
- Cannot be used to live stream videos
6. NCH - Video Capture Software
Of all the listed webcam software in this review, this software has the most diverse functions. You can record streaming videos, record your computer screen, record from external devices, and record from a webcam. It’s also perfect for recording audios and simultaneous recording from screen and webcam.
Operating systems: Windows 10, 8, 8.1, 7, XP, Vista 64 bit and Mac OS X 10.5 and above
Price: Free/paid
Supported file formats: MP4, WMV, AVI, MPG, FLV, MOV
Debut Video Capture is the only free webcam recording software for Windows 10 believed to capture or record videos from any external source. It has also preset settings for HD and TV with pre-production enhancement features like color adjustment settings, overlay buttons and frame rate, aspect ratio, and resolution settings.
If you always think of becoming rich, the Express Burn Disc Burner is the tool that will help you make money. Record the most trending videos and use this tool to burn DVDs and CDs.
Pros
- Can record videos for any social media platform
- Supports a wide range of audio and video file formats
- All features are open and easy to use
- Availability of video editing software
Cons
- Only monthly subscriptions for paid plans
- Watermark for the free download
- Difficult to record a full-screen movie
Try Filmora to Smoothly Record WebCame and Screen!
Filmora Web Camera & Screen Recorder can capture any area of the PC screen and webcam. It’s perfect to capture and record while making a live gaming match, marketing promotion, guiding a tour, and more. Plus, you can edit the recording video files in Filmora directly! Worth to have a try!
Start Webcam & Screen Recording Start Webcam & Screen Recording Start Webcam & Screen Recording Learn More >
7. YAWCAM
This webcam software can be referred to as the simplest for all beginners with the will to start streaming and recording videos for personal or home use.
Supported file formats: PNG, JPG, MJPEG, GIF, JavaScript
Price: Free
Supported operating systems: Windows 2000/10/8/7/ Vista and XP
YAWCAM is an absolutely free webcam software windows 10. Why is it the simplest software to use? Just download and you will find all features on one page. Simple language commands aligned in a drop-down menu ready to be used with only one click.
Some of the best features include overlay texts and images, scheduler, motion detection, and an inbuilt webserver. For you to use this webcam software, use these supported devices; DirectX compatible webcams, DV-camera, or video capture devices.
Pros
- No watermark
- Easy to use
- Friendly user interface
Cons
- Few transitions and effects
8. Windows Camera
We all trust any app or software by Microsoft over others! If you also do, then you can download Windows Camera and use it to record videos, take snapshots and shoot videos.
Operating system: Windows 10
Price: Free
Supported devices: Xbox One, Windows, mobile
Windows Camera is among the best free webcam software for Windows 10. This is because of the software’s few but easy-to-use and effective features that are expertly designed for PCs and tablets installed with Windows 10.
The automatic photo back combined with the photo-shoot timer makes it perfect for taking selfies and passports. Using the panorama feature, you can take photos of the best scenes and share them on media platforms.
Pros
- Simplicity is its main strength
- Supports resolutions above 1080p
- Good for photographers
Cons
- Has no built-in virtual webcam
- Requires a camera to support 4K videos
9. Fake Webcam
Supported file formats: AVI, MPEG, DVD, VCD, WMV, 3GP, MP4, SVCD, MOV, ASF,
Price: Free /paid
Operating systems: Windows 7/8/10 (32/64 bit)
Fake Webcam is a free webcam software Windows 10 whose name is creatively used to suggest it almost functions like a webcam. This doesn’t fall far from the truth! You can truly use this software to broadcast, add effects and filters, record on full screen, and fake your voice.
To share or stream your photos and videos on Skype, YIM, or Gtalk, using the screen recorder would give the best results. What makes Fake Webcam stand out is the free video converter and the free video toolkit.
Pros
- Free support tools
- Supports all video and audio formats
- Can convert file formats and stream to any channel
- Availability of the screen recorder
- Integratable with almost all instant messengers
Cons
- Major tools not free(Fake Webcam and Screen recorder)
10. IP Camera Viewer
Do you run a supermarket store, mall or you’ve installed security surveillance cameras in your compound? IP Camera Viewer is the most effective webcam software for video monitoring systems.
Supported file formats: JPEG, MPEG-4, MJPEG, and
Price: Free
Operating systems: Windows 10 / 8 / 7 /2012 /Vista and XP
IP Camera Viewer is the most used free webcam recording software for windows 10 as its compatible with almost all IP camera models like Panasonic, Toshiba, Canon, D-Link, Sony, and more the 2000 others. With the capability of viewing and controlling 4 camera feeds at once, you can use this software to monitor your entire compound.
Some of the important advanced IP Camera Viewer functions include listening to webcam audios, adjust image settings, zoom or tilt images, schedule monitoring times, and detect motions.
Pros
- Automatically uploads recorded videos and photos to a server
- Compatible with almost all IP camera models
- Simple and easy to use
Cons
- No inbuilt media player
- Cannot adjust the image or video quality
You may also want to read >>> 10 Best Webcams | A Buyer’s Guide
![]()
A cross-platform for making videos anywhere for all creators
Why your video editing isn’t good enough? How about some creative inspo?
- 100 Million+ Users
- 150+ Countries and Regions
- 4 Million+ Social Media Followers
- 5 Million+ Stock Media for Use
* Secure Download
FAQs about Webcam Software for Windows
1. What is Webcam Software?
A webcam is a video camera that feeds or streams images or video in real-time to or over a computer network. And webcam software enables users to record video or stream video over the Internet.
Webcam software is an application that allows you to capture video from your laptop/desktop webcam and record or stream video over the Internet. You can use them to deliver professional videos, streaming, and online courses easily.
2. Does Windows have built-in webcam software?
Windows 10 has an in-built webcam app called Camera that lets you record videos and take pictures with your webcam. This is definitely better than downloading 3rd party webcam recording software where spyware/malware is rampant.
3. Does a webcam need software?
Yes, if the camera hardware offers depth, low-light support, night vision, etc. If you use any software on the camera, these functions are only available if the driver is installed.
Conclusion
After a keen of all the webcam software above, it’s evident that every developer had an intended purpose. You cannot therefore just randomly wake up and download any without considering its functions, supported devices, file formats, and the auxiliary apps available. All this information is contained herein.
According to some users, there are free webcam software Windows 10 that more often would not show any video images but the audio is absolutely clear. To help your fellow user, what bad experience have you ever had after recording a game using webcam software ? Kindly share your comment or suggestion on our social media platforms.
Richard Bennett
Richard Bennett is a writer and a lover of all things video.
Follow @Richard Bennett
Final Cut Pro Tutorial: Adding Emotional Depth with the Ken Burns Effect (Updated 2023)
How to Use Ken Burns Effect in Final Cut Pro with Detailed Steps
Benjamin Arango
Mar 27, 2024• Proven solutions
Those new to the Final Cut Pro or Pro X programs will be finding it a little challenging to add effects or edit videos. It’s a complex film editing software that takes a while to use. With our help, however, we can have you mastering the Ken Burns effect in Final Cut Pro. Do you want to know how to make ken burns effect in final cut pro? Listen closely.
- Part 1: How to Make Ken Burns Effect Final Cut Pro
- Part 2: How to Zoom in Final Cut Pro Using Keyframing
Part 1: How to Make Ken Burns Effect Final Cut Pro
To make a Ken Burns Effect, Final Cut Pro X (or a Ken Burns Effect on Final Cut, since they are both extensions of one another) simply follow our guide.
First, let’s talk about what Ken Burns is and why he has an effect named after him in Final Cut programs!
What is the Ken Burns Effect
Ken Burns is a world-famous American documentary filmmaker. He is well known for producing documentaries that take a candid if somewhat old-world-feeling look into different worlds. He has covered Baseball, the Civil War, and other fascinating times and places. Arguably, he is best known for using archival footage as film footage. How does he do this? By using the Ken Burns Effect, of course.
The Ken Burns Effect in Final Cut Pro X allows the editor to zoom in and out, slow pan, and scroll across archive photography and still film. This will enable you to substitute whole parts of the program you are making with photographs if you haven’t taken enough footage. It is commonly used in editing, particularly when making things like wedding videos , which often feature lots of photos of the happy couple.
Anyway, let’s look at how you implement the Ken Burns Effect in Final Cut Pro.
Steps to Making the Ken Burns Effect Final Cut Pro
Now that we know what is Ken Burns Effect. Let’s go over the steps to making the Ken Burns Effect in Final Cut Pro.
Step 1 – Import your video. From your timeline workspace, select the clip, or highlight the section of the clip, that you want to apply the Ken Burns Effect to.

Step 2 – Enter into the viewer mode to do this. From here, select the pop-up menu from the list of options at the bottom of the screen.
Step 3 – Hold down both the shift key and the letter C. This is the fast way to cut out what you need. You can always stick to the right-click to cut a clip if you are more comfortable with this.
Step 4 – scroll down until you find the Ken Burns Effect option in the control panel. The effect should now appear on your page, in the area you selected.
Ken Burns Customization
You can also customize the ken burns effects in Final Cut.
Step 1 – To transform from the Ken Burns Effect into customization mode, drag the green box in the viewer.
Step 2 – Adjust the green box’s size, shape, and height until you are happy with where it is placed.

Step 3 – Checking what you have already put in place using the preview option is a good idea at this stage. You can edit mistakes out later, but when you are trying to edit for speed, it is best to get it right the first time around!
Step 4 – Adjust the viewer to accommodate any changes you need to make – don’t click the done button until you are sure. That being said, you can always back-step should you mis-click. You can also just start over with the effect customization if you messed up.
Part 2: How to Zoom in Final Cut Pro Using Keyframing
Now that we know how to open and apply the Ken Burns Effect in Final Cut Pro. Let’s examine how we zoom in Final Cut Pro using keyframing. Keyframing, of course, involves basic animation that allows movement to be added to a still frame. So how do you use the Ken Burns Effect in Final Cut Pro X in conjunction with keyframing? Let’s talk you through it.
You can use keyframing to zoom and pan. We will talk you through how you use it to zoom in, and you should be able to work out the rest from there.
Step 1 – Set the playhead at the start of the chosen clip. This is where you want the zoom effect to start from.
Step 2 – Click to select the effects menu. It should be at the bottom of the screen.
Step 3 – Seek out the scale and position tools. You can use these to size your animation, decide how much of a zoom you like, and how fast it will go.

Step 4 – Follow keyframe > size > position and ensure your clip is covered as you need it. You can always come back to this step a few times if you don’t get it immediately right.
Step 5 – Set the playhead where you want the clip and animation to end. Remember – if you zoom or pan too fast, you might glitch in your footage. Do it on time for the best results.
As a Pro Tip: you will be baled to view all keyframes on your clip if you select show video animation from your timeline.
The Ken Burns Conclusion
The Ken Burns Effect is famous for a reason. It allows you to fill up space if you don’t have footage for certain things. It can be used to depict ancient battles without the use of CGI.
The Ken Burns Effect, Final Cut Pro (X) technique lets filmmakers go to places that they wouldn’t otherwise get to. It is excellent for both glimpsing into the past, and for flashing forward into imagined futures. Best of all, it lets you go there when you aren’t a big-budget Hollywood film producer. We love anything that saves a buck or two while we edit.
Benjamin Arango
Benjamin Arango is a writer and a lover of all things video.
Follow @Benjamin Arango
Benjamin Arango
Mar 27, 2024• Proven solutions
Those new to the Final Cut Pro or Pro X programs will be finding it a little challenging to add effects or edit videos. It’s a complex film editing software that takes a while to use. With our help, however, we can have you mastering the Ken Burns effect in Final Cut Pro. Do you want to know how to make ken burns effect in final cut pro? Listen closely.
- Part 1: How to Make Ken Burns Effect Final Cut Pro
- Part 2: How to Zoom in Final Cut Pro Using Keyframing
Part 1: How to Make Ken Burns Effect Final Cut Pro
To make a Ken Burns Effect, Final Cut Pro X (or a Ken Burns Effect on Final Cut, since they are both extensions of one another) simply follow our guide.
First, let’s talk about what Ken Burns is and why he has an effect named after him in Final Cut programs!
What is the Ken Burns Effect
Ken Burns is a world-famous American documentary filmmaker. He is well known for producing documentaries that take a candid if somewhat old-world-feeling look into different worlds. He has covered Baseball, the Civil War, and other fascinating times and places. Arguably, he is best known for using archival footage as film footage. How does he do this? By using the Ken Burns Effect, of course.
The Ken Burns Effect in Final Cut Pro X allows the editor to zoom in and out, slow pan, and scroll across archive photography and still film. This will enable you to substitute whole parts of the program you are making with photographs if you haven’t taken enough footage. It is commonly used in editing, particularly when making things like wedding videos , which often feature lots of photos of the happy couple.
Anyway, let’s look at how you implement the Ken Burns Effect in Final Cut Pro.
Steps to Making the Ken Burns Effect Final Cut Pro
Now that we know what is Ken Burns Effect. Let’s go over the steps to making the Ken Burns Effect in Final Cut Pro.
Step 1 – Import your video. From your timeline workspace, select the clip, or highlight the section of the clip, that you want to apply the Ken Burns Effect to.
Step 2 – Enter into the viewer mode to do this. From here, select the pop-up menu from the list of options at the bottom of the screen.
Step 3 – Hold down both the shift key and the letter C. This is the fast way to cut out what you need. You can always stick to the right-click to cut a clip if you are more comfortable with this.
Step 4 – scroll down until you find the Ken Burns Effect option in the control panel. The effect should now appear on your page, in the area you selected.
Ken Burns Customization
You can also customize the ken burns effects in Final Cut.
Step 1 – To transform from the Ken Burns Effect into customization mode, drag the green box in the viewer.
Step 2 – Adjust the green box’s size, shape, and height until you are happy with where it is placed.
Step 3 – Checking what you have already put in place using the preview option is a good idea at this stage. You can edit mistakes out later, but when you are trying to edit for speed, it is best to get it right the first time around!
Step 4 – Adjust the viewer to accommodate any changes you need to make – don’t click the done button until you are sure. That being said, you can always back-step should you mis-click. You can also just start over with the effect customization if you messed up.
Part 2: How to Zoom in Final Cut Pro Using Keyframing
Now that we know how to open and apply the Ken Burns Effect in Final Cut Pro. Let’s examine how we zoom in Final Cut Pro using keyframing. Keyframing, of course, involves basic animation that allows movement to be added to a still frame. So how do you use the Ken Burns Effect in Final Cut Pro X in conjunction with keyframing? Let’s talk you through it.
You can use keyframing to zoom and pan. We will talk you through how you use it to zoom in, and you should be able to work out the rest from there.
Step 1 – Set the playhead at the start of the chosen clip. This is where you want the zoom effect to start from.
Step 2 – Click to select the effects menu. It should be at the bottom of the screen.
Step 3 – Seek out the scale and position tools. You can use these to size your animation, decide how much of a zoom you like, and how fast it will go.
Step 4 – Follow keyframe > size > position and ensure your clip is covered as you need it. You can always come back to this step a few times if you don’t get it immediately right.
Step 5 – Set the playhead where you want the clip and animation to end. Remember – if you zoom or pan too fast, you might glitch in your footage. Do it on time for the best results.
As a Pro Tip: you will be baled to view all keyframes on your clip if you select show video animation from your timeline.
The Ken Burns Conclusion
The Ken Burns Effect is famous for a reason. It allows you to fill up space if you don’t have footage for certain things. It can be used to depict ancient battles without the use of CGI.
The Ken Burns Effect, Final Cut Pro (X) technique lets filmmakers go to places that they wouldn’t otherwise get to. It is excellent for both glimpsing into the past, and for flashing forward into imagined futures. Best of all, it lets you go there when you aren’t a big-budget Hollywood film producer. We love anything that saves a buck or two while we edit.
Benjamin Arango
Benjamin Arango is a writer and a lover of all things video.
Follow @Benjamin Arango
Also read:
- New TikTok Visuals Unlocked A Complete Aspect Ratio Guide for 2024
- New In 2024, Boost Your Visibility LinkedIn Video Size and Aspect Ratio Tips
- New Free Video Stabilizer Software for Windows and macOS A Review for 2024
- Updated In 2024, Say Goodbye to Shaky Videos The Best Free Online Stabilizers
- Updated In 2024, Top Video Editing Apps for Mac Users
- In 2024, Transform Photos Into Videos The Top 5 Slideshow Makers
- New Unleash Your Potential Top Video Resume Creators with Free Templates and Tips for 2024
- 2024 Approved Tone It Up 5 Easy-to-Use Online Generators No Charge
- New 2024 Approved Add a Personal Touch Top Free Video Watermarking Apps
- New No Copyright Worries Best Sites for Public Domain Video Downloads for 2024
- New 2024 Approved Seamless Transitions How to Match Colors Between Video Clips in Final Cut Pro
- Updated In 2024, Mac Users, Rejoice! Top Alternatives to Pinnacle Studio
- 2024 Approved MPEG Video Splitting Made Easy Top 5 Free Tools Compared
- In 2024, The Art of Bokeh Top Mobile Apps for Creating Stunning Blur Effects
- Updated Unleash Your Creativity 5 Must-Know Facts About 16X9 Ratio Calculators
- New Project Protection Learn How to Save Your Final Cut Pro Files
- 2024 Approved Trim, Cut, and Edit Videos for Free - No Watermark Required
- New 2024 Approved The Funniest in the Business 5 Reaction Video Makers Youll Love
- Updated Edit Videos Like a Pro on Mac with MKVtoolnix for 2024
- Updated 2024 Approved The Article Coming Ahead Is a Complete Pack of Information. You Will Get to Learn About 6 Different Movie Maker Software for Windows
- 2024 Approved Premiere Elements Not for You? Try These 10 Exceptional Alternatives Instead
- Updated In 2024, Top-Notch AVCHD Video Editing Software Our 2023 Rankings
- New 2024 Approved Free Video Editing Software for Windows 10 Top 10 Trimming Tools
- Updated 2024 Approved Ranking the Best 4K Video Editing Tools Features, Pricing, and More
- Updated 2024 Approved Capture Your Screen A Beginners Guide to Recording with Filmora Scrn
- New The Ultimate List of iMovie Alternatives for Android Users
- New 2024 Approved Save Money, Get Great Images Free Commercial Use Resources
- In 2024, The Art of Chroma Keying in FCP X Expert Techniques for Stunning Results
- Updated XML Mastery in FCPX Tips, Tricks, and Best Practices for 2024
- Updated S Most Entertaining Video Dubbing Apps for Mobile Devices
- New Microsoft Video Editor Easily Edit Videos in Windows 10/8/7 for 2024
- New 2024 Approved Transform Your Videos with Slow Motion A Free Guide to Filmora
- New 2024 Approved License-Free Images for Business Top Sources Revealed
- Updated 2024 Approved From Camera to Computer A Beginners Guide to Editing Nikon Videos
- Updated 2024 Approved Effortless 4K Video Editing Top Proxy Editing Apps for Creators
- Updated 2024 Approved S Best Android Video Editors A Mix of Free and Paid Options
- Updated 2024 Approved Effortless Video Editing A Step-by-Step Guide to GoPro Quik on MacBook
- Updated Free and Fantastic The Best VOB Video Editors for 2024
- New Discover the Secret to Easy Transcription Best Free Mac Speech to Text Tools (No Downloads Needed) for 2024
- New Beyond FCPX 10 Video Editing Solutions for Every Budget for 2024
- Updated From Sideways to Right-Side Up How to Flip Videos Quickly for 2024
- Updated In 2024, Mastering Jump Cuts in FCPX A Step-by-Step Guide
- New 2024 Approved From AVI to MP4 How to Cast Any Video File to Chromecast
- In 2024, Top 10 Animation Software for Creating Stunning Animated Videos
- Updated Slow Motion Magic on Kapwing A Step-by-Step Guide to Editing Like a Pro for 2024
- Updated Unleash Your Creativity Top Free Video Editing Apps
- New In 2024, Discover the Power of VR Converting Videos Made Easy
- Updated 2024 Approved Edit M4A Files for Free 5 Best Software Options
- Updated In 2024, The Ultimate Mac Video Editing Experience AVS
- New 2024 Approved Cloud-Based Video Editors for Creating Music-Infused Content
- In 2024, Android Unlock Code Sim Unlock Your Samsung Galaxy F04 Phone and Remove Locked Screen
- Pokemon Go Error 12 Failed to Detect Location On Nubia Z50 Ultra? | Dr.fone
- 4 Ways to Sync Contacts from Apple iPhone X to iPad Easily | Dr.fone
- In 2024, How and Where to Find a Shiny Stone Pokémon For Poco X5 Pro? | Dr.fone
- Hassle-Free Ways to Remove FRP Lock on Xiaomi Redmi Note 13 Pro 5G Phones with/without a PC
- How To Exit DFU Mode on Apple iPhone 12? | Dr.fone
- Factory Reset Apple iPhone SE (2022) | Dr.fone
- Can Life360 Track You When Your Poco X6 Pro is off? | Dr.fone
- Updated In 2024, Best GIF to MOV Converters
- How to Track a Lost Xiaomi 13T Pro for Free? | Dr.fone
- Top 7 Skype Hacker to Hack Any Skype Account On your Apple iPhone 14 Pro Max | Dr.fone
- In 2024, The Most Useful Tips for Pokemon Go Ultra League On Google Pixel Fold | Dr.fone
- Apple ID Locked for Security Reasons On iPhone 14? Find the Best Solution Here
- Unlock Your Infinix GT 10 Pros Potential The Top 20 Lock Screen Apps You Need to Try
- 9 Mind-Blowing Tricks to Hatch Eggs in Pokemon Go Without Walking On Xiaomi Redmi Note 12 4G | Dr.fone
- In 2024, What Does Jailbreaking iPhone 7 Plus i Do? Get Answers here | Dr.fone
- 2024 Approved Windows 10 Webcam Recording Essentials Top 10 Software Picks
- Complete guide for recovering photos files on Nord CE 3 5G.
- About Tecno Phantom V Fold FRP Bypass
- How to Reset a ZTE Nubia Flip 5G Phone That Is Locked | Dr.fone
- In 2024, 3 Ways of How to Get Someones Apple ID Off iPhone 13 Pro Max without Password
- Hassle-Free Ways to Remove FRP Lock on Oppo Reno 11F 5Gwith/without a PC
- Repair Video Tool - Repair all your damaged video files of Lenovo ThinkPhone on Windows
- New In 2024, My Top Criteria for Selecting the Best Video to Audio Converter
- In 2024, 5 Ways to Move Contacts From Xiaomi Mix Fold 3 to iPhone (13/14/15) | Dr.fone
- How to Reset Gmail Password on Xiaomi Redmi Note 13 Pro 5G Devices
- How to Unlock Apple iPhone 11 with IMEI Code?
- In 2024, How to Track a Lost Oppo K11x for Free? | Dr.fone
- Prevent Cross-Site Tracking on ZTE Blade A73 5G and Browser | Dr.fone
- In 2024, How to Spy on Text Messages from Computer & Oppo A79 5G | Dr.fone
- New In 2024, IMovie Review – Is It The Best Video Editor for Mac Users?
- In 2024, Is pgsharp legal when you are playing pokemon On Honor Play 40C? | Dr.fone
- Title: New In 2024, Play Videos at a Slower Pace with VLC Media Player
- Author: Ava
- Created at : 2024-05-19 14:42:24
- Updated at : 2024-05-20 14:42:24
- Link: https://video-content-creator.techidaily.com/new-in-2024-play-videos-at-a-slower-pace-with-vlc-media-player/
- License: This work is licensed under CC BY-NC-SA 4.0.
