
:max_bytes(150000):strip_icc():format(webp)/gopro-2619915_1920-2ca3364339c348e5ba44afb3fa79458b.jpg)
2024 Approved Smooth Transitions Mastering L-Cuts and J-Cuts in Final Cut Pro X
Smooth Transitions: Mastering L-Cuts and J-Cuts in Final Cut Pro X
Final Cut Pro X Tutorial: L-Cuts and J-Cuts

Benjamin Arango
Aug 18, 2022• Proven solutions
If you wish to edit or create videos like a pro, you do not need to be a professional. Instead, be creative, learn new things, and think out of the box. You could draw inspiration from videos and films for their great clips and animations. If you are already familiar with video making, you would know basic editing tasks like trim, crop, transitions, filters, and so on. Ever knew the term J-Cuts, and L-Cuts?
It could be surprising, but yes, your well-known Final Cut Pro X has this powerful feature still overlooked by many people. So, today, we take it on hand and shall share what L-Cuts and J-Cuts mean. You will be able to create it on your own by the end of this article.
Part 1: The Use of L-Cuts and J-Cuts in Video Editing
Ordinary images, text, subtitles, and GIF doesn’t work anymore to get followers or likes on a video on YouTube channel or Instagram. Thus, video creators are tired of trying the same filters, transitions on the video editor tool. To create amazing videos like the ones played on your television and favorite movies, all you need is the split edit type techniques, a powerful editing tool used by professional editors. Although called professional, it isn’t difficult for a beginner if you know J-Cuts and L-Cuts.
They are nothing but the transition between the video and audio at different times and are entirely separate from wipes and fades. Such video editing technique helps in maintaining visual continuity. These super basic cuts are a combination of dialogue and imagery, thus keeping the video flow without a monotonous feeling.
When you look at the above interface, you will see the basic phenomenon behind the two split cuts. In L-Cuts, although the first video ends, the audio continues to clip two as well.
Then, what is a J cut in Final Cut Pro? It is ultimately reverse or opposite of L-Cuts. Yes, the second clip’s audio starts a while before the scene of the first video ends.
Part 2: Step-by-step Guide on Using L-Cuts and J-Cuts in Final Cut Pro X
As Final Cut Pro X comes overloaded with advanced, powerful tools, you can find it a little tricky. Hence, we are here to help you perform the Final Cut Pro L-Cuts in this session. And, yes, the Final Cut Pro J-Cuts as well.
Step 1: Import media files
Once you launch Final Cut Pro X on your Mac device, create a new project by tapping project under the new section of the “File” menu.
You can now import the video file to the workspace by executing “File > Export > Media” or by tapping the “Import Media” option on the welcome screen.
Step 2: Expand audio in video
Now, drag the videos to the timeline in the respective order, and expand or detach the video’s audio on the timeline for easy or precise working.
Step 3: Drag the second video to the left
To create the Final Cut Pro L-Cuts, make sure that the first clip’s edit point or audio fades out at the end.
Finally, drag the second clip’s edit point to the left so that the video gets the audio of the first video.
L-Cuts are now in Final Cut Pro X.
Note: Here, the L-Cuts added video clip has no audio and has related well enough to the first video clip. If the second video has audio, it must be detached first, and then you should drag the edit point.
Step 4: Final Cut Pro J-Cuts
In the case of Final Cut Pro J-Cuts, the process is reverse, where you need to detach the audio of the preceding or following video clip and drag the first video to the right.
When you look at the transition closely, you can see that it resembles the letter J.
Part 3: Final Cut Pro X Keyboard Shortcuts for L-Cuts and J-Cuts
Final Cut Pro X offers specific keyword shorts to perform Final Cut Pro L-Cuts and Final Cut Pro J-Cuts.
1. As the first step, trim the clips shorter to get the media handles. To detach audio from the video clip, you need to press “Ctrl + S” which will expand the audio.
2. Now, move or place the playhead at the endpoint of both the video clips where here are the keyboard shortcuts:
- To shift the playhead to the earlier edit point: press “Semicolon (;) or up arrow key”.
- To move the playhead to the next edit point: press “Apostrophe (‘) or down arrow key”.
3. To choose the audio or the video edit point, you can do one of the following:
- Press “**Shift-Backslash (\)**” to select both sides of the audio endpoint.
- Press “**Backslash (\)**” to pick both sides of the video endpoint.
4. Here is the actual process or the keyboard shortcut that helps accomplish final cut pro-L-cuts or final cut pro-J-cuts by nudging the edit points.
- To nudge or push the edit point to the left or right: press “**Comma (,) or period (.)**”.
- To move the edit point to the left or right with ten frames: press “**Shift-Comma (,) or Sift-Period (.)**”.
- Using timecode to add or subtract the present edit: press the “**Plus (+)” or “Minus (-)**” key with the timecode duration.
Conclusion
Are you wondering and puzzled that you are a popular Final Cut Pro X user but weren’t aware of this powerful split edit tool till now? It isn’t too late for you to start yet. Finally, as assured at the beginning of the article, we gave you detailed information on what are J-Cuts in Final Cut Pro along with L-Cuts. With practical implementation on creating Final Cut Pro L-Cuts and J-Cuts, all the best for your first video project!
Benjamin Arango
Benjamin Arango is a writer and a lover of all things video.
Follow @Benjamin Arango
Benjamin Arango
Aug 18, 2022• Proven solutions
If you wish to edit or create videos like a pro, you do not need to be a professional. Instead, be creative, learn new things, and think out of the box. You could draw inspiration from videos and films for their great clips and animations. If you are already familiar with video making, you would know basic editing tasks like trim, crop, transitions, filters, and so on. Ever knew the term J-Cuts, and L-Cuts?
It could be surprising, but yes, your well-known Final Cut Pro X has this powerful feature still overlooked by many people. So, today, we take it on hand and shall share what L-Cuts and J-Cuts mean. You will be able to create it on your own by the end of this article.
Part 1: The Use of L-Cuts and J-Cuts in Video Editing
Ordinary images, text, subtitles, and GIF doesn’t work anymore to get followers or likes on a video on YouTube channel or Instagram. Thus, video creators are tired of trying the same filters, transitions on the video editor tool. To create amazing videos like the ones played on your television and favorite movies, all you need is the split edit type techniques, a powerful editing tool used by professional editors. Although called professional, it isn’t difficult for a beginner if you know J-Cuts and L-Cuts.
They are nothing but the transition between the video and audio at different times and are entirely separate from wipes and fades. Such video editing technique helps in maintaining visual continuity. These super basic cuts are a combination of dialogue and imagery, thus keeping the video flow without a monotonous feeling.
When you look at the above interface, you will see the basic phenomenon behind the two split cuts. In L-Cuts, although the first video ends, the audio continues to clip two as well.
Then, what is a J cut in Final Cut Pro? It is ultimately reverse or opposite of L-Cuts. Yes, the second clip’s audio starts a while before the scene of the first video ends.
Part 2: Step-by-step Guide on Using L-Cuts and J-Cuts in Final Cut Pro X
As Final Cut Pro X comes overloaded with advanced, powerful tools, you can find it a little tricky. Hence, we are here to help you perform the Final Cut Pro L-Cuts in this session. And, yes, the Final Cut Pro J-Cuts as well.
Step 1: Import media files
Once you launch Final Cut Pro X on your Mac device, create a new project by tapping project under the new section of the “File” menu.
You can now import the video file to the workspace by executing “File > Export > Media” or by tapping the “Import Media” option on the welcome screen.
Step 2: Expand audio in video
Now, drag the videos to the timeline in the respective order, and expand or detach the video’s audio on the timeline for easy or precise working.
Step 3: Drag the second video to the left
To create the Final Cut Pro L-Cuts, make sure that the first clip’s edit point or audio fades out at the end.
Finally, drag the second clip’s edit point to the left so that the video gets the audio of the first video.
L-Cuts are now in Final Cut Pro X.
Note: Here, the L-Cuts added video clip has no audio and has related well enough to the first video clip. If the second video has audio, it must be detached first, and then you should drag the edit point.
Step 4: Final Cut Pro J-Cuts
In the case of Final Cut Pro J-Cuts, the process is reverse, where you need to detach the audio of the preceding or following video clip and drag the first video to the right.
When you look at the transition closely, you can see that it resembles the letter J.
Part 3: Final Cut Pro X Keyboard Shortcuts for L-Cuts and J-Cuts
Final Cut Pro X offers specific keyword shorts to perform Final Cut Pro L-Cuts and Final Cut Pro J-Cuts.
1. As the first step, trim the clips shorter to get the media handles. To detach audio from the video clip, you need to press “Ctrl + S” which will expand the audio.
2. Now, move or place the playhead at the endpoint of both the video clips where here are the keyboard shortcuts:
- To shift the playhead to the earlier edit point: press “Semicolon (;) or up arrow key”.
- To move the playhead to the next edit point: press “Apostrophe (‘) or down arrow key”.
3. To choose the audio or the video edit point, you can do one of the following:
- Press “**Shift-Backslash (\)**” to select both sides of the audio endpoint.
- Press “**Backslash (\)**” to pick both sides of the video endpoint.
4. Here is the actual process or the keyboard shortcut that helps accomplish final cut pro-L-cuts or final cut pro-J-cuts by nudging the edit points.
- To nudge or push the edit point to the left or right: press “**Comma (,) or period (.)**”.
- To move the edit point to the left or right with ten frames: press “**Shift-Comma (,) or Sift-Period (.)**”.
- Using timecode to add or subtract the present edit: press the “**Plus (+)” or “Minus (-)**” key with the timecode duration.
Conclusion
Are you wondering and puzzled that you are a popular Final Cut Pro X user but weren’t aware of this powerful split edit tool till now? It isn’t too late for you to start yet. Finally, as assured at the beginning of the article, we gave you detailed information on what are J-Cuts in Final Cut Pro along with L-Cuts. With practical implementation on creating Final Cut Pro L-Cuts and J-Cuts, all the best for your first video project!
Benjamin Arango
Benjamin Arango is a writer and a lover of all things video.
Follow @Benjamin Arango
Instant Cartoon Effects for Your Photos
Best Websites for Turning a Photo into a Cartoon

Ollie Mattison
Mar 27, 2024• Proven solutions
Cartooning a photo is a simple and yet effective way of enhancing a picture and making it more visually appealing. Besides adding an artistic touch to portraits you take, cartooning a photo can also be a great way to have fun with your friends because the results of picture cartooning can be as entertaining as visually striking.
Besides portraiture, this visual effect can be applied to virtually any other genre of photography, although the contents of the shoot usually determine how well the effect is going to work. What’s more, you don’t need a professional video editing software to cartoon a photo, since there are so many websites that let you apply this effect to your photos for free.
That’s why we selected some of the best websites for converting a photo into a cartoon.
10+ Best Online Cartoon Photo Makers
Making cartoons out of photos doesn’t have to be a difficult task that takes a lot of effort to complete. In fact, online cartoon photo makers are easy to use and they don’t require you to have a lot of photo editing experience.
We’ve selected some of the best online photo editors and photo converters that enable you to cartoon your photos in just a few clicks.
Part 1: Best Free Online Cartoon Photo Editors
You don’t have to purchase an expensive photo editing software if you want to cartoon your photos because there are so many different online photo editing platforms that allow you to apply this effect to your photos for free. Let’s take a closer look at what they have to offer.
2. BeFunky
Befunky is one of the best photo editors you can find online, which is why it is hardly surprising that it offers cartoonization effects. In fact, you can choose from five different cartoonization effects that are all equally impressive.
All of the cartoon effects Befunky has to offer are located in the Artsy menu, and you just have to click on Cartoonizer DLX, Cross Hatch DLX, Pop Art DLX, or Graphic Novel DLX effects in order to apply them to your photo. Furthermore, you can use the Erase mode if you don’t want to catoonize the entire photo or head over to the Adjust menu to specify the amount of the effect you’ll apply and increase or decrease the photo’s sharpness.
Go to https://www.befunky.com/features/photo-to-cartoon/ and you can then turn your photos to cartoon easily in BeFunky.
3. Lunapic
This is yet another online photo editing platform that gives you access to a broad range of photo editing options for free. Even though a bit outdated, the Lunapic’s interface resembles Photoshop’s interface, so you won’t need much time to get used to it if you ever used Adobe’s iconic photo editing software.
Once you’ve uploaded a photo, you just have to go to the Effects menu and select the Cartoon option. Lunapic will then automatically apply the effect to the photo you uploaded and you just need to preview the image before you save it. The only downside is that you can’t adjust the effect’s settings in case you don’t like the results.
If you want to add cartoon effect to photo with this photo editor, you can go to https://www12.lunapic.com/editor/?action=cartoon .
4. wish2be cartoon photo editor
If you would like to turn yourself or your friends into a cartoon character , Wish2Be cartoon photo editor can be a fun option. The platform’s Free Caricature feature allows you to become a cartoon character in just three easy steps.
You start by customizing the background, selecting the body type, hairstyle, or adding different accessories, gadgets, or even weapons. Once you are done, you can proceed to upload a photo of the person you want to turn into a cartoon character. Optionally, you can add a text layer and adjust its position and size within the picture. If you like the caricature you created, you can buy a print or you can choose to share your design for free. The Pro Cartoonizer feature this platform offers is only available if you purchase one of the available subscription plans.
Here is the website https://www.wish2be.com/app/cartoon-photo-editor/ for cartoon photos with Wish2Be.
5. SnapsTouch
This is a simple online photo editor that lets you turn your photos into sketches, paintings, or drawings. Choosing the Painting option is probably the easiest way to turn a photo into a cartoon, although this effect can also be achieved with the Pencil Sketch feature.
After you upload a photo you want to turn into a cartoon, you can choose between Painting 1 and Painting 2 options in order to determine the style of the cartoon you’re creating. In addition, you can decide if you want to include the outline in the painting as well as set the size of the brush and how many levels the final image should have. Click on the Paint button and wait for SnapsTouch to generate the cartoonized picture, and you can then proceed to download it to your computer.
To use this online photo editor to cartoon, go to http://www.snapstouch.com/Painting.aspx .
Part 2: 8 Free Online Photo to Cartoon Converters That You Should Try
Converting a photo into a cartoon automates this process, which makes cartoon converters a great option for anyone who finds online photo editing apps difficult to use. Here are some of the best online photo to cartoon converters you can use for free.
1. KusoCartoon
You can cartoon a photo with the photo to cartoon converter even if you never went through this process before. All you need to do is upload the photo to the platform, pick the cartoon style you like and click on the Photo to Cartoon button.
The platform will automatically apply the effect to your photo and display the results after it cartoons the picture. If you are not satisfied with the results, you can change the cartoon style, reduce or increase the number of colors, and adjust the saturation and brightness values. In addition, the platform lets you decide if the lines in the picture are going to be thick or thin or how intense the shadows are going to be.
Convert a photo to cartoon with KusoCartoon: https://kusocartoon.com/photo-to-cartoon.php .
2. pho.to
Cartoon is just one out of hundreds of effects the pho.to platform offers. In addition to cartooning a photo, you can also use this platform to retouch portraits, enhance photos automatically, or apply different types of visual effects.
You can upload a photo from your computer, your Facebook profile, or the cloud and the platform will cartoonize it as soon as the upload process is completed. In case you don’t like the results you can click on the Adjustments button and open the image in the pho.to’s editor to enhance its colors or apply stickers. However, all photos you cartooned with this photo to cartoon converter are going to be watermarked if you use its free version.
You can visit https://funny.pho.to/cartoon/ to turn photos to cartoons with pho.to.
3. Cartoonize.net
You can turn a photo into a cartoon in just a few moments with this platform. Cartoonize.net is going to apply a cartoon effect to a photo you upload automatically, but it also lets you choose from dozens of effects that make photos look like cartoons.
You just have to click on an effect you like in case you don’t like the effect the platform selected for you to apply it. However, you can’t fine-tune the effect’s settings, and some of your photos may not look perfect after you apply a cartoon effect to them. Besides cartooning photos, you can use this platform to perform basic photo editing actions like cropping or rotating, while the platform also offers powerful text tools that enable you to add text layers to photos you cartoon.
To cartoon a photo with Cartoonize.net, go to https://www.cartoonize.net/ .
4. PhotoCartoon
Creating cartoons from photos with this platform is a fun process anyone can complete. You just have to upload a photo via URL or from your computer and then proceed to choose one of the available cartoon effects.
You can choose from effects like Cartoon, Toon Cloudy, or Watercolor, and you can just click on the one you like to apply it to your photo. In addition, you can also add text to each photo you cartoonize with the platform and choose a font or the size and color of the text. Moreover, each effect can be adjusted using the Brightness, Contrast, Saturation, and Hue sliders. The only downside is that the platform watermarks all photos you edit with it and you must purchase the PhotoCartoon software in order to remove it.
Want to create cartoons from photos with PhotoCartoon? Visit https://photocartoon.net/ to get started.
5. Anymaking
This cartoon photo maker offers a basic set of photo editing options so that you can add frames around your pictures, crop, or resize your images and apply photo filters. Besides these tools, Anymaking also features an impressive collection of fun photo effects.
So, you just have to click on the Cartoon effect, and then proceed to upload a picture you want to turn into a cartoon. Once the picture is uploaded you can set the Color Level, Smoothness, and Edge Size values before clicking on the Apply Effect button. You can then save the cartoonized photo to your computer, but you should keep in mind that you must enable Flash in your browser in order to use the Anymaking online photo editor.
You can go to https://anymaking.com/fun-cartoon-photo-maker-effects to add cartoon effect to photo to
6. Picture to People
Picture to People is much more than a simple photo to cartoon converter, as the platform features a photo editor, text customization tools, and a broad range of other photo editing options. You just have to upload a photo in order to start converting it. After the picture is uploaded you can adjust Color Improvement, Color Detail, Contour Style, and Contour Strength options.
In addition, you can choose whether or not you want to make a soft drawing. In case you do, you can adjust the Softness Level and Softness Extent values and then click on the Generate button. The platform will take a few moments to cartoonize your photo, but you can only download the photo to your computer since Picture to People doesn’t have social sharing options.
Go to http://www.picturetopeople.org/image\_effects/photo\_cartoon/photo\_cartoon.html to convert photos to cartoons with the Picture to People converter.
7. cartoon.pho.to
In addition to the Cartoon effect, the pho.to platform also features the Cartoons mode that cartoonizes photos automatically. Once you upload a picture from Facebook, your hard drive, or via an URL the platform will generate a preview where you can see how your cartoonized photo looks. Besides the Cartoon effect, this mode also offers the Face Morphing and Face Auto Crop options.
You should click on the Save and Share button if you like the result. However, fine-tuning the effect’s settings isn’t possible, so there isn’t much you can do if you didn’t like the results of cartoonization. Optionally you can open the photo you turned into a cartoon in the platform’s editor and add text layers, stickers or tweak the brightness and contrast values.
Visit https://cartoon.pho.to/ to use the cartoon.pho.to tool.
8. Prima Cartoonizer
All you need to do after you arrive at the Prima Cartoonizer’s home page is click on the Choose File button and the platform’s editor will launch as soon as the upload is completed. You can then start browsing through the huge collection of cartoon effects.
Once you find the effect you like you should click on it in order to apply it to your photo and then preview the results. Adjusting the effect’s settings is not possible, and some cartoon effects are only available on the desktop version of the app. Moreover, all photos you cartoonize on this platform are watermarked and you must install Prima Cartoonizer on your computer if you want to create watermark-free cartoons from your photos.
Want to convert photos to cartoons with Prima Cartoonizer, go to https://primacartoonizer.com/ .
Conclusion
Online cartoon photo editors and converters are remarkably easy to use, and they enable you to turn any photo you take into an entertaining cartoon in just a few clicks. However, some of these online platforms watermark your pictures and don’t allow you to adjust the effect’s settings, which impact the quality of the final cartoonized photo.
Which websites for turning a photo into a cartoon are you going to choose? Leave a comment below and share your opinions with us.
Ollie Mattison
Ollie Mattison is a writer and a lover of all things video.
Follow @Ollie Mattison
Ollie Mattison
Mar 27, 2024• Proven solutions
Cartooning a photo is a simple and yet effective way of enhancing a picture and making it more visually appealing. Besides adding an artistic touch to portraits you take, cartooning a photo can also be a great way to have fun with your friends because the results of picture cartooning can be as entertaining as visually striking.
Besides portraiture, this visual effect can be applied to virtually any other genre of photography, although the contents of the shoot usually determine how well the effect is going to work. What’s more, you don’t need a professional video editing software to cartoon a photo, since there are so many websites that let you apply this effect to your photos for free.
That’s why we selected some of the best websites for converting a photo into a cartoon.
10+ Best Online Cartoon Photo Makers
Making cartoons out of photos doesn’t have to be a difficult task that takes a lot of effort to complete. In fact, online cartoon photo makers are easy to use and they don’t require you to have a lot of photo editing experience.
We’ve selected some of the best online photo editors and photo converters that enable you to cartoon your photos in just a few clicks.
Part 1: Best Free Online Cartoon Photo Editors
You don’t have to purchase an expensive photo editing software if you want to cartoon your photos because there are so many different online photo editing platforms that allow you to apply this effect to your photos for free. Let’s take a closer look at what they have to offer.
2. BeFunky
Befunky is one of the best photo editors you can find online, which is why it is hardly surprising that it offers cartoonization effects. In fact, you can choose from five different cartoonization effects that are all equally impressive.
All of the cartoon effects Befunky has to offer are located in the Artsy menu, and you just have to click on Cartoonizer DLX, Cross Hatch DLX, Pop Art DLX, or Graphic Novel DLX effects in order to apply them to your photo. Furthermore, you can use the Erase mode if you don’t want to catoonize the entire photo or head over to the Adjust menu to specify the amount of the effect you’ll apply and increase or decrease the photo’s sharpness.
Go to https://www.befunky.com/features/photo-to-cartoon/ and you can then turn your photos to cartoon easily in BeFunky.
3. Lunapic
This is yet another online photo editing platform that gives you access to a broad range of photo editing options for free. Even though a bit outdated, the Lunapic’s interface resembles Photoshop’s interface, so you won’t need much time to get used to it if you ever used Adobe’s iconic photo editing software.
Once you’ve uploaded a photo, you just have to go to the Effects menu and select the Cartoon option. Lunapic will then automatically apply the effect to the photo you uploaded and you just need to preview the image before you save it. The only downside is that you can’t adjust the effect’s settings in case you don’t like the results.
If you want to add cartoon effect to photo with this photo editor, you can go to https://www12.lunapic.com/editor/?action=cartoon .
4. wish2be cartoon photo editor
If you would like to turn yourself or your friends into a cartoon character , Wish2Be cartoon photo editor can be a fun option. The platform’s Free Caricature feature allows you to become a cartoon character in just three easy steps.
You start by customizing the background, selecting the body type, hairstyle, or adding different accessories, gadgets, or even weapons. Once you are done, you can proceed to upload a photo of the person you want to turn into a cartoon character. Optionally, you can add a text layer and adjust its position and size within the picture. If you like the caricature you created, you can buy a print or you can choose to share your design for free. The Pro Cartoonizer feature this platform offers is only available if you purchase one of the available subscription plans.
Here is the website https://www.wish2be.com/app/cartoon-photo-editor/ for cartoon photos with Wish2Be.
5. SnapsTouch
This is a simple online photo editor that lets you turn your photos into sketches, paintings, or drawings. Choosing the Painting option is probably the easiest way to turn a photo into a cartoon, although this effect can also be achieved with the Pencil Sketch feature.
After you upload a photo you want to turn into a cartoon, you can choose between Painting 1 and Painting 2 options in order to determine the style of the cartoon you’re creating. In addition, you can decide if you want to include the outline in the painting as well as set the size of the brush and how many levels the final image should have. Click on the Paint button and wait for SnapsTouch to generate the cartoonized picture, and you can then proceed to download it to your computer.
To use this online photo editor to cartoon, go to http://www.snapstouch.com/Painting.aspx .
Part 2: 8 Free Online Photo to Cartoon Converters That You Should Try
Converting a photo into a cartoon automates this process, which makes cartoon converters a great option for anyone who finds online photo editing apps difficult to use. Here are some of the best online photo to cartoon converters you can use for free.
1. KusoCartoon
You can cartoon a photo with the photo to cartoon converter even if you never went through this process before. All you need to do is upload the photo to the platform, pick the cartoon style you like and click on the Photo to Cartoon button.
The platform will automatically apply the effect to your photo and display the results after it cartoons the picture. If you are not satisfied with the results, you can change the cartoon style, reduce or increase the number of colors, and adjust the saturation and brightness values. In addition, the platform lets you decide if the lines in the picture are going to be thick or thin or how intense the shadows are going to be.
Convert a photo to cartoon with KusoCartoon: https://kusocartoon.com/photo-to-cartoon.php .
2. pho.to
Cartoon is just one out of hundreds of effects the pho.to platform offers. In addition to cartooning a photo, you can also use this platform to retouch portraits, enhance photos automatically, or apply different types of visual effects.
You can upload a photo from your computer, your Facebook profile, or the cloud and the platform will cartoonize it as soon as the upload process is completed. In case you don’t like the results you can click on the Adjustments button and open the image in the pho.to’s editor to enhance its colors or apply stickers. However, all photos you cartooned with this photo to cartoon converter are going to be watermarked if you use its free version.
You can visit https://funny.pho.to/cartoon/ to turn photos to cartoons with pho.to.
3. Cartoonize.net
You can turn a photo into a cartoon in just a few moments with this platform. Cartoonize.net is going to apply a cartoon effect to a photo you upload automatically, but it also lets you choose from dozens of effects that make photos look like cartoons.
You just have to click on an effect you like in case you don’t like the effect the platform selected for you to apply it. However, you can’t fine-tune the effect’s settings, and some of your photos may not look perfect after you apply a cartoon effect to them. Besides cartooning photos, you can use this platform to perform basic photo editing actions like cropping or rotating, while the platform also offers powerful text tools that enable you to add text layers to photos you cartoon.
To cartoon a photo with Cartoonize.net, go to https://www.cartoonize.net/ .
4. PhotoCartoon
Creating cartoons from photos with this platform is a fun process anyone can complete. You just have to upload a photo via URL or from your computer and then proceed to choose one of the available cartoon effects.
You can choose from effects like Cartoon, Toon Cloudy, or Watercolor, and you can just click on the one you like to apply it to your photo. In addition, you can also add text to each photo you cartoonize with the platform and choose a font or the size and color of the text. Moreover, each effect can be adjusted using the Brightness, Contrast, Saturation, and Hue sliders. The only downside is that the platform watermarks all photos you edit with it and you must purchase the PhotoCartoon software in order to remove it.
Want to create cartoons from photos with PhotoCartoon? Visit https://photocartoon.net/ to get started.
5. Anymaking
This cartoon photo maker offers a basic set of photo editing options so that you can add frames around your pictures, crop, or resize your images and apply photo filters. Besides these tools, Anymaking also features an impressive collection of fun photo effects.
So, you just have to click on the Cartoon effect, and then proceed to upload a picture you want to turn into a cartoon. Once the picture is uploaded you can set the Color Level, Smoothness, and Edge Size values before clicking on the Apply Effect button. You can then save the cartoonized photo to your computer, but you should keep in mind that you must enable Flash in your browser in order to use the Anymaking online photo editor.
You can go to https://anymaking.com/fun-cartoon-photo-maker-effects to add cartoon effect to photo to
6. Picture to People
Picture to People is much more than a simple photo to cartoon converter, as the platform features a photo editor, text customization tools, and a broad range of other photo editing options. You just have to upload a photo in order to start converting it. After the picture is uploaded you can adjust Color Improvement, Color Detail, Contour Style, and Contour Strength options.
In addition, you can choose whether or not you want to make a soft drawing. In case you do, you can adjust the Softness Level and Softness Extent values and then click on the Generate button. The platform will take a few moments to cartoonize your photo, but you can only download the photo to your computer since Picture to People doesn’t have social sharing options.
Go to http://www.picturetopeople.org/image\_effects/photo\_cartoon/photo\_cartoon.html to convert photos to cartoons with the Picture to People converter.
7. cartoon.pho.to
In addition to the Cartoon effect, the pho.to platform also features the Cartoons mode that cartoonizes photos automatically. Once you upload a picture from Facebook, your hard drive, or via an URL the platform will generate a preview where you can see how your cartoonized photo looks. Besides the Cartoon effect, this mode also offers the Face Morphing and Face Auto Crop options.
You should click on the Save and Share button if you like the result. However, fine-tuning the effect’s settings isn’t possible, so there isn’t much you can do if you didn’t like the results of cartoonization. Optionally you can open the photo you turned into a cartoon in the platform’s editor and add text layers, stickers or tweak the brightness and contrast values.
Visit https://cartoon.pho.to/ to use the cartoon.pho.to tool.
8. Prima Cartoonizer
All you need to do after you arrive at the Prima Cartoonizer’s home page is click on the Choose File button and the platform’s editor will launch as soon as the upload is completed. You can then start browsing through the huge collection of cartoon effects.
Once you find the effect you like you should click on it in order to apply it to your photo and then preview the results. Adjusting the effect’s settings is not possible, and some cartoon effects are only available on the desktop version of the app. Moreover, all photos you cartoonize on this platform are watermarked and you must install Prima Cartoonizer on your computer if you want to create watermark-free cartoons from your photos.
Want to convert photos to cartoons with Prima Cartoonizer, go to https://primacartoonizer.com/ .
Conclusion
Online cartoon photo editors and converters are remarkably easy to use, and they enable you to turn any photo you take into an entertaining cartoon in just a few clicks. However, some of these online platforms watermark your pictures and don’t allow you to adjust the effect’s settings, which impact the quality of the final cartoonized photo.
Which websites for turning a photo into a cartoon are you going to choose? Leave a comment below and share your opinions with us.
Ollie Mattison
Ollie Mattison is a writer and a lover of all things video.
Follow @Ollie Mattison
Screen and Webcam Recording: The Top 10 Windows 10 Tools
10 Best Webcam Recording Software for Windows 10

Richard Bennett
Mar 27, 2024• Proven solutions
Which webcam softwarehave you installed on your laptop or desktop? Using the right webcam software to live stream videos, screen record videos, or chat on Skype results in high-quality images, smooth streaming, and high-quality images and videos.
There is a huge number of free webcam software with advanced features yet free for you to download, and use on your PC.
But how would you determine the best webcam software to use?
Before you mounted that webcam on your desktop or laptop, you had a reason. It’s your webcam features and purpose that should guide you to select the right software for the webcam camera.
In this article, we will show you 10 webcam software for Windows in this guide. Included are the most useful factors to consider as you make your choice – complexity of use, free/paid, integrations, editing tools, and more. You will learn:
- Part 1: The Best Webcam & Screen Recorder for Windows and Mac [Video Tutorial]
- Part 2: Top 10 Best Free Webcam Software for Windows
First take a quick look of the 10 best webcam software that is available on your Windows from a video:
For Win 7 or later (64-bit)
 Secure Download
For macOS 10.14 or later
Secure Download
Part 1: The Best Webcam & Screen Recorder for Computer
You need a sound and webcam recorder to record your video tutorials, streaming videos, presentations, or any other type of video. Wondershare Filmora is the software to use. Other than its most admired friendly intuitive interface, it’s simple and easy to use-suitable for both beginners and professionals.
For Win 7 or later (64-bit)
Secure Download
For macOS 10.14 or later
Secure Download
Among the outstanding features, you’ll find in Filmora include,
- Fast-paced recording speed of up to 120 fps
- Adverse professional editing tools that are easy to use
- Simultaneous recording from both webcam and computer screen
- Compatible with 50+ different file formats
- Rich title text and tutorial features
It’s free to download. Have a try now! Join in the Wondershare Video Community and get some inspiration from other Filomora users.
Part 2: Top 10 Best Free Webcam Software for Windows
To help you evaluate which webcam software best suits your needs, I’ve featured the strengths, shortcomings, and support services in each software review.
This is the list of the best free webcam software for Windows 10.
| 1 - Logitech Capture | 2 - CyberLink Youcam |
|---|---|
| 3 - ManyCam | 4 - SplitCam |
| 5 - Bandicam | 6 - NCH - Video Capture Software |
| 7 - YAWCAM | 8 - Windows Camera |
| 9 - Fake Webcam | 10 - IP Camera Viewer |
1. Logitech Capture
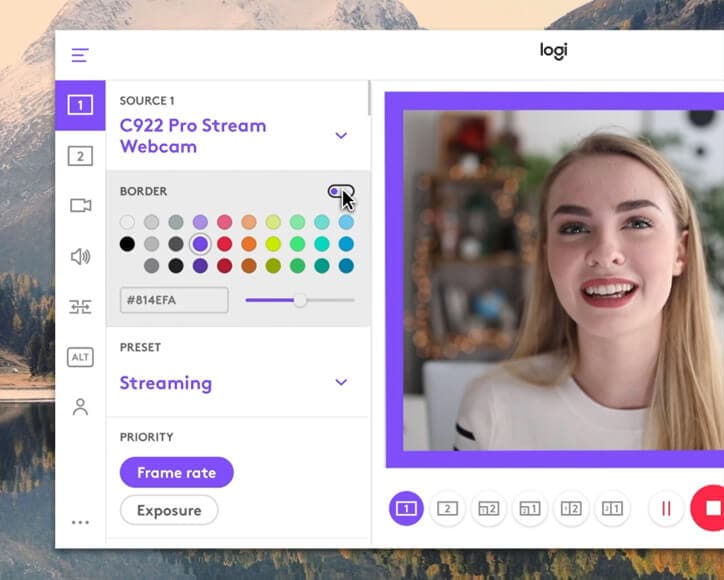
The multiple source recording feature and direct streaming app are the key strengths of this software. According to its mission statement- All-In-One Content Creation- you can use this software to record, edit, customize, and stream to your favorite channel.
Operating systems: Windows 10/8/7
Price: Free
Supported webcams: 1080P PRO STREAM, BRIO STREAM, C920s HD PRO, C922 PRO STREAM
Logitech Capture is among the few free webcam recording software for Windows 10 with studio controls applicable during recording. You can use this feature to adjust your image, create frames, adjust focus and transitions, and enable ChromaKey as you record.
In case you want to create a picture-in-picture presentation, this software allows you to use two webcams simultaneously. With the source switching and the auto-focus features, you can record the best tutorials or guides that show all dimensions and your image.
Pros
- Rich in transitions and effects
- Portrait optimization for mobile devices
- Its Capture app offers direct streaming to YouTube
- You can take passports or still images
Cons
- Limited to YouTube channel
- Account registration is mandatory
2. CyberLink Youcam
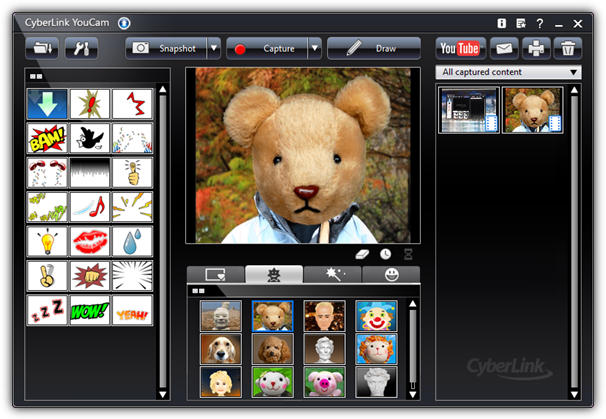
If you are used to video chatting and video recording, then, you’ll have 200+ fun effects to make your real-time videos as interesting as possible. In fact, the seamless app integration feature will keep your live streaming chats without buffering for long.
Operating systems: Windows 10/8/1.8/7
Price: Free/ Paid
Supported file formats: WMV, MP4, AVI
YouCam is the best free webcam software Windows 10 for YouTubers, business professionals, Streamers, home users, and Vloggers. It seamlessly integrates with live streaming media channels like Twitch, Wirecast, OBS Studio, Facebook Live, Xsplit, and YouTube Live.
The YouCam’s AR technology is one of its hidden treasures that will lighten up your skin by applying a natural-looking makeup. If your room is badly light, use the Live Skin Smoothing feature. Just below it is the TrueTheater Enhancement option to help you automatically adjust your facial sharpness and lighting.
Pros
- Hundreds of animated emojis
- Suitable for video conferencing services
- Plenty of interactive colorful particles and distortions
- Availability of face beautification tool
Cons
- Only limited to the Windows operating system
- Very few features for the free plan
3. ManyCam
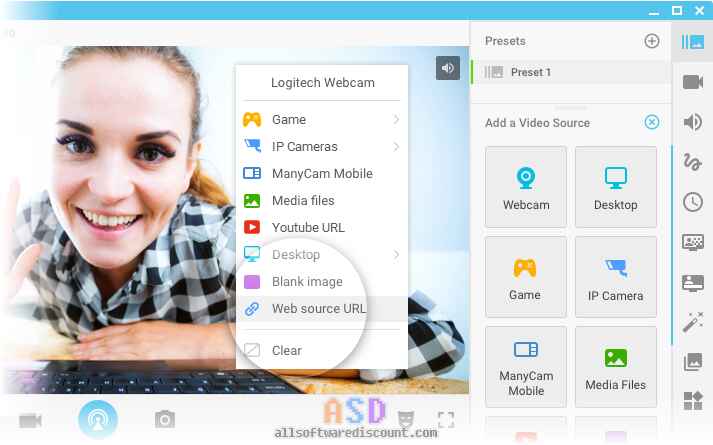
Downloading this webcam software guarantees you smooth streaming and effortless recording of videos. Also, this software will help you during game steaming, online education, mobile live streaming, and live telehealth communication.
Operating systems: Windows 10/8/7 and macOS X
Price: Free /Paid
Supported file formats: MJPEG, IP, MP4, AVI, MPEG, MOV
ManyCam is a free webcam recording software for windows 10 . It’s among the most widely used software internationally-not for many reasons, but because of its friendly intuitive user interface and live streaming tools for lessons and lecturers.
So, if you are a lecturer/teacher, you can use the Software Development Kit (SDK) to integrate the webcam with any online teaching platform. Among the features designed to facilitate better online teaching include the picture in picture, Chroma Key, multiple video sources, and screen sharing.
Pro
- Ability to stream 4K videos
- Real-time camera control settings
- No watermark even on the free plan
- Screencasting and screen recording feature
- Real-time drop and drag effects
Cons
- Expensive business subscription plans
- No Light enhancement features
- Most features are manual as opposed to being automatic

Filmora WebCame & Screen Recorder
Filmora - WebCame & Screen Recorder
• No-time delay to record webcam and screen while live streaming or gaming
• Edit recording video for marketing replay or adding game commentary
• Cross-platform supported - (Windows, Mac, iOS, Android)
Start Webcam & Screen Record Start Webcam & Screen Record Start Webcam & Screen Record Learn More >
4. SplitCam
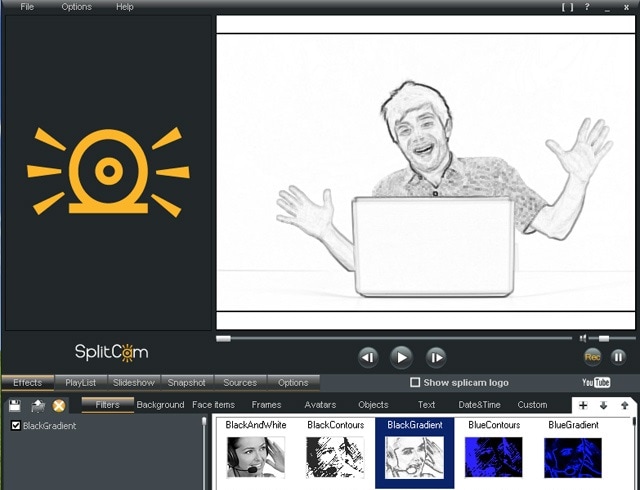
To stream your desktop/laptop screen SplitCam is the most appropriate software. With only the inbuilt virtual webcam, you can share your screen videos to media channels and IMS. Other uses of this software are recording webcam chatting , streaming live videos, and messaging.
Operating systems: Windows 10/8/7
Price: Free
SplitCam is not as popular as the other free webcam software windows 10 like ManyCam and YouCam. This is because it doesn’t integrate with some of the world’s renowned social media platforms- Facebook and Instagram. However, you can use this software to stream, take snapshots, and record videos for YouTube, Skype, Justin.tv, Gtalk, and Windows Live Messenger.
SplitCam is rich in fantastic webcam effects. Haven’t you been surprised to see someone appear to be streaming from the ocean or the Amazon Mountain? This is what you can do with SplitCam. Other cool effects are frames, texts on videos, filters, and facial items like masks and fake face glasses.
Pros
- Open and simple interface
- Integratable with the messaging apps
- Supports a wide range of resolutions ( between 320x180 and 2048x1536)
Cons
- Applicable to a small number of channels
- Supported file formats not defined
5. Bandicam
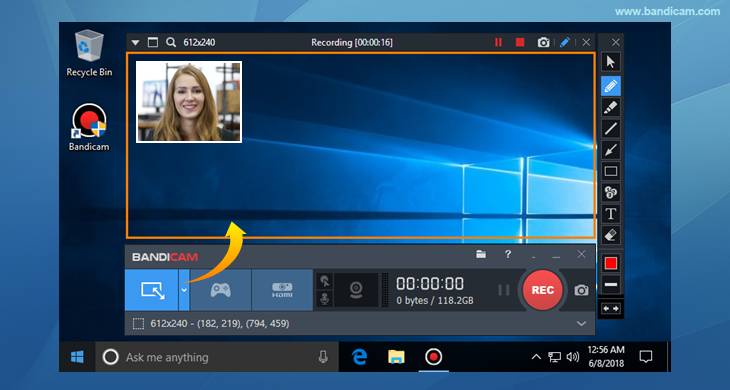
Do you want a recorder for screen recording, recording your gameplay, or capturing videos from devices like smartphones and PlayStation? Look for no other software but BandiCam. You can also merge two or more video files, remove unwanted parts, and select the only part to screen record.
Operating systems: Windows Vista, 10/8/7
Price: Free/paid
Supported file format: AVI, MP4, JPEG, TIF, GIF, PNG
Supported graphics cards: Nvidia NVENC, Nvidia NVENC (),
BandiCam is another HD webcam software Windows 10 with the capability of capturing high compression videos and games on your PC screen videos without compromising the video quality. Don’t forget to record all webinars aired in your niche.
Netflix is becoming more popular each day due to the thrilling videos. With the BandiCam screen recorder, you can record live-streamed videos on Netflix for over 24hrs. These are the tools to edit your recorded video: real-time drawing tool, webcam overlay, sound mixer, and Chroma Key.
Pros
- No hidden features
- Widescreen capture
- Can record 2D/3D videos in HD mode
- Can capture fast-paced videos of up to 144 FPS
Cons
- Not suitable for beginners
- Cannot be used to live stream videos
6. NCH - Video Capture Software

Of all the listed webcam software in this review, this software has the most diverse functions. You can record streaming videos, record your computer screen, record from external devices, and record from a webcam. It’s also perfect for recording audios and simultaneous recording from screen and webcam.
Operating systems: Windows 10, 8, 8.1, 7, XP, Vista 64 bit and Mac OS X 10.5 and above
Price: Free/paid
Supported file formats: MP4, WMV, AVI, MPG, FLV, MOV
Debut Video Capture is the only free webcam recording software for Windows 10 believed to capture or record videos from any external source. It has also preset settings for HD and TV with pre-production enhancement features like color adjustment settings, overlay buttons and frame rate, aspect ratio, and resolution settings.
If you always think of becoming rich, the Express Burn Disc Burner is the tool that will help you make money. Record the most trending videos and use this tool to burn DVDs and CDs.
Pros
- Can record videos for any social media platform
- Supports a wide range of audio and video file formats
- All features are open and easy to use
- Availability of video editing software
Cons
- Only monthly subscriptions for paid plans
- Watermark for the free download
- Difficult to record a full-screen movie
Try Filmora to Smoothly Record WebCame and Screen!
Filmora Web Camera & Screen Recorder can capture any area of the PC screen and webcam. It’s perfect to capture and record while making a live gaming match, marketing promotion, guiding a tour, and more. Plus, you can edit the recording video files in Filmora directly! Worth to have a try!
Start Webcam & Screen Recording Start Webcam & Screen Recording Start Webcam & Screen Recording Learn More >
7. YAWCAM
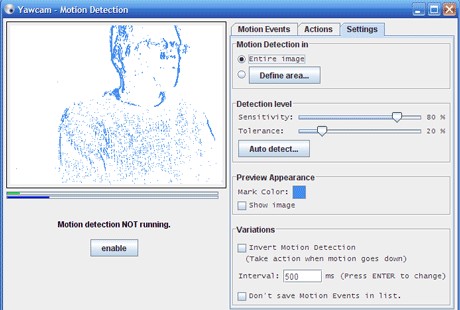
This webcam software can be referred to as the simplest for all beginners with the will to start streaming and recording videos for personal or home use.
Supported file formats: PNG, JPG, MJPEG, GIF, JavaScript
Price: Free
Supported operating systems: Windows 2000/10/8/7/ Vista and XP
YAWCAM is an absolutely free webcam software windows 10. Why is it the simplest software to use? Just download and you will find all features on one page. Simple language commands aligned in a drop-down menu ready to be used with only one click.
Some of the best features include overlay texts and images, scheduler, motion detection, and an inbuilt webserver. For you to use this webcam software, use these supported devices; DirectX compatible webcams, DV-camera, or video capture devices.
Pros
- No watermark
- Easy to use
- Friendly user interface
Cons
- Few transitions and effects
8. Windows Camera
We all trust any app or software by Microsoft over others! If you also do, then you can download Windows Camera and use it to record videos, take snapshots and shoot videos.
Operating system: Windows 10
Price: Free
Supported devices: Xbox One, Windows, mobile
Windows Camera is among the best free webcam software for Windows 10. This is because of the software’s few but easy-to-use and effective features that are expertly designed for PCs and tablets installed with Windows 10.
The automatic photo back combined with the photo-shoot timer makes it perfect for taking selfies and passports. Using the panorama feature, you can take photos of the best scenes and share them on media platforms.
Pros
- Simplicity is its main strength
- Supports resolutions above 1080p
- Good for photographers
Cons
- Has no built-in virtual webcam
- Requires a camera to support 4K videos
9. Fake Webcam

Supported file formats: AVI, MPEG, DVD, VCD, WMV, 3GP, MP4, SVCD, MOV, ASF,
Price: Free /paid
Operating systems: Windows 7/8/10 (32/64 bit)
Fake Webcam is a free webcam software Windows 10 whose name is creatively used to suggest it almost functions like a webcam. This doesn’t fall far from the truth! You can truly use this software to broadcast, add effects and filters, record on full screen, and fake your voice.
To share or stream your photos and videos on Skype, YIM, or Gtalk, using the screen recorder would give the best results. What makes Fake Webcam stand out is the free video converter and the free video toolkit.
Pros
- Free support tools
- Supports all video and audio formats
- Can convert file formats and stream to any channel
- Availability of the screen recorder
- Integratable with almost all instant messengers
Cons
- Major tools not free(Fake Webcam and Screen recorder)
10. IP Camera Viewer
Do you run a supermarket store, mall or you’ve installed security surveillance cameras in your compound? IP Camera Viewer is the most effective webcam software for video monitoring systems.
Supported file formats: JPEG, MPEG-4, MJPEG, and
Price: Free
Operating systems: Windows 10 / 8 / 7 /2012 /Vista and XP
IP Camera Viewer is the most used free webcam recording software for windows 10 as its compatible with almost all IP camera models like Panasonic, Toshiba, Canon, D-Link, Sony, and more the 2000 others. With the capability of viewing and controlling 4 camera feeds at once, you can use this software to monitor your entire compound.
Some of the important advanced IP Camera Viewer functions include listening to webcam audios, adjust image settings, zoom or tilt images, schedule monitoring times, and detect motions.
Pros
- Automatically uploads recorded videos and photos to a server
- Compatible with almost all IP camera models
- Simple and easy to use
Cons
- No inbuilt media player
- Cannot adjust the image or video quality
You may also want to read >>> 10 Best Webcams | A Buyer’s Guide
![]()
A cross-platform for making videos anywhere for all creators

Why your video editing isn’t good enough? How about some creative inspo?
- 100 Million+ Users
- 150+ Countries and Regions
- 4 Million+ Social Media Followers
- 5 Million+ Stock Media for Use
* Secure Download

FAQs about Webcam Software for Windows
1. What is Webcam Software?
A webcam is a video camera that feeds or streams images or video in real-time to or over a computer network. And webcam software enables users to record video or stream video over the Internet.
Webcam software is an application that allows you to capture video from your laptop/desktop webcam and record or stream video over the Internet. You can use them to deliver professional videos, streaming, and online courses easily.
2. Does Windows have built-in webcam software?
Windows 10 has an in-built webcam app called Camera that lets you record videos and take pictures with your webcam. This is definitely better than downloading 3rd party webcam recording software where spyware/malware is rampant.
3. Does a webcam need software?
Yes, if the camera hardware offers depth, low-light support, night vision, etc. If you use any software on the camera, these functions are only available if the driver is installed.
Conclusion
After a keen of all the webcam software above, it’s evident that every developer had an intended purpose. You cannot therefore just randomly wake up and download any without considering its functions, supported devices, file formats, and the auxiliary apps available. All this information is contained herein.
According to some users, there are free webcam software Windows 10 that more often would not show any video images but the audio is absolutely clear. To help your fellow user, what bad experience have you ever had after recording a game using webcam software ? Kindly share your comment or suggestion on our social media platforms.


Richard Bennett
Richard Bennett is a writer and a lover of all things video.
Follow @Richard Bennett
Richard Bennett
Mar 27, 2024• Proven solutions
Which webcam softwarehave you installed on your laptop or desktop? Using the right webcam software to live stream videos, screen record videos, or chat on Skype results in high-quality images, smooth streaming, and high-quality images and videos.
There is a huge number of free webcam software with advanced features yet free for you to download, and use on your PC.
But how would you determine the best webcam software to use?
Before you mounted that webcam on your desktop or laptop, you had a reason. It’s your webcam features and purpose that should guide you to select the right software for the webcam camera.
In this article, we will show you 10 webcam software for Windows in this guide. Included are the most useful factors to consider as you make your choice – complexity of use, free/paid, integrations, editing tools, and more. You will learn:
- Part 1: The Best Webcam & Screen Recorder for Windows and Mac [Video Tutorial]
- Part 2: Top 10 Best Free Webcam Software for Windows
First take a quick look of the 10 best webcam software that is available on your Windows from a video:
For Win 7 or later (64-bit)
Secure Download
For macOS 10.14 or later
Secure Download
Part 1: The Best Webcam & Screen Recorder for Computer
You need a sound and webcam recorder to record your video tutorials, streaming videos, presentations, or any other type of video. Wondershare Filmora is the software to use. Other than its most admired friendly intuitive interface, it’s simple and easy to use-suitable for both beginners and professionals.
For Win 7 or later (64-bit)
Secure Download
For macOS 10.14 or later
Secure Download
Among the outstanding features, you’ll find in Filmora include,
- Fast-paced recording speed of up to 120 fps
- Adverse professional editing tools that are easy to use
- Simultaneous recording from both webcam and computer screen
- Compatible with 50+ different file formats
- Rich title text and tutorial features
It’s free to download. Have a try now! Join in the Wondershare Video Community and get some inspiration from other Filomora users.
Part 2: Top 10 Best Free Webcam Software for Windows
To help you evaluate which webcam software best suits your needs, I’ve featured the strengths, shortcomings, and support services in each software review.
This is the list of the best free webcam software for Windows 10.
| 1 - Logitech Capture | 2 - CyberLink Youcam |
|---|---|
| 3 - ManyCam | 4 - SplitCam |
| 5 - Bandicam | 6 - NCH - Video Capture Software |
| 7 - YAWCAM | 8 - Windows Camera |
| 9 - Fake Webcam | 10 - IP Camera Viewer |
1. Logitech Capture
The multiple source recording feature and direct streaming app are the key strengths of this software. According to its mission statement- All-In-One Content Creation- you can use this software to record, edit, customize, and stream to your favorite channel.
Operating systems: Windows 10/8/7
Price: Free
Supported webcams: 1080P PRO STREAM, BRIO STREAM, C920s HD PRO, C922 PRO STREAM
Logitech Capture is among the few free webcam recording software for Windows 10 with studio controls applicable during recording. You can use this feature to adjust your image, create frames, adjust focus and transitions, and enable ChromaKey as you record.
In case you want to create a picture-in-picture presentation, this software allows you to use two webcams simultaneously. With the source switching and the auto-focus features, you can record the best tutorials or guides that show all dimensions and your image.
Pros
- Rich in transitions and effects
- Portrait optimization for mobile devices
- Its Capture app offers direct streaming to YouTube
- You can take passports or still images
Cons
- Limited to YouTube channel
- Account registration is mandatory
2. CyberLink Youcam
If you are used to video chatting and video recording, then, you’ll have 200+ fun effects to make your real-time videos as interesting as possible. In fact, the seamless app integration feature will keep your live streaming chats without buffering for long.
Operating systems: Windows 10/8/1.8/7
Price: Free/ Paid
Supported file formats: WMV, MP4, AVI
YouCam is the best free webcam software Windows 10 for YouTubers, business professionals, Streamers, home users, and Vloggers. It seamlessly integrates with live streaming media channels like Twitch, Wirecast, OBS Studio, Facebook Live, Xsplit, and YouTube Live.
The YouCam’s AR technology is one of its hidden treasures that will lighten up your skin by applying a natural-looking makeup. If your room is badly light, use the Live Skin Smoothing feature. Just below it is the TrueTheater Enhancement option to help you automatically adjust your facial sharpness and lighting.
Pros
- Hundreds of animated emojis
- Suitable for video conferencing services
- Plenty of interactive colorful particles and distortions
- Availability of face beautification tool
Cons
- Only limited to the Windows operating system
- Very few features for the free plan
3. ManyCam
Downloading this webcam software guarantees you smooth streaming and effortless recording of videos. Also, this software will help you during game steaming, online education, mobile live streaming, and live telehealth communication.
Operating systems: Windows 10/8/7 and macOS X
Price: Free /Paid
Supported file formats: MJPEG, IP, MP4, AVI, MPEG, MOV
ManyCam is a free webcam recording software for windows 10 . It’s among the most widely used software internationally-not for many reasons, but because of its friendly intuitive user interface and live streaming tools for lessons and lecturers.
So, if you are a lecturer/teacher, you can use the Software Development Kit (SDK) to integrate the webcam with any online teaching platform. Among the features designed to facilitate better online teaching include the picture in picture, Chroma Key, multiple video sources, and screen sharing.
Pro
- Ability to stream 4K videos
- Real-time camera control settings
- No watermark even on the free plan
- Screencasting and screen recording feature
- Real-time drop and drag effects
Cons
- Expensive business subscription plans
- No Light enhancement features
- Most features are manual as opposed to being automatic
Filmora WebCame & Screen Recorder
Filmora - WebCame & Screen Recorder
• No-time delay to record webcam and screen while live streaming or gaming
• Edit recording video for marketing replay or adding game commentary
• Cross-platform supported - (Windows, Mac, iOS, Android)
Start Webcam & Screen Record Start Webcam & Screen Record Start Webcam & Screen Record Learn More >
4. SplitCam
To stream your desktop/laptop screen SplitCam is the most appropriate software. With only the inbuilt virtual webcam, you can share your screen videos to media channels and IMS. Other uses of this software are recording webcam chatting , streaming live videos, and messaging.
Operating systems: Windows 10/8/7
Price: Free
SplitCam is not as popular as the other free webcam software windows 10 like ManyCam and YouCam. This is because it doesn’t integrate with some of the world’s renowned social media platforms- Facebook and Instagram. However, you can use this software to stream, take snapshots, and record videos for YouTube, Skype, Justin.tv, Gtalk, and Windows Live Messenger.
SplitCam is rich in fantastic webcam effects. Haven’t you been surprised to see someone appear to be streaming from the ocean or the Amazon Mountain? This is what you can do with SplitCam. Other cool effects are frames, texts on videos, filters, and facial items like masks and fake face glasses.
Pros
- Open and simple interface
- Integratable with the messaging apps
- Supports a wide range of resolutions ( between 320x180 and 2048x1536)
Cons
- Applicable to a small number of channels
- Supported file formats not defined
5. Bandicam
Do you want a recorder for screen recording, recording your gameplay, or capturing videos from devices like smartphones and PlayStation? Look for no other software but BandiCam. You can also merge two or more video files, remove unwanted parts, and select the only part to screen record.
Operating systems: Windows Vista, 10/8/7
Price: Free/paid
Supported file format: AVI, MP4, JPEG, TIF, GIF, PNG
Supported graphics cards: Nvidia NVENC, Nvidia NVENC (),
BandiCam is another HD webcam software Windows 10 with the capability of capturing high compression videos and games on your PC screen videos without compromising the video quality. Don’t forget to record all webinars aired in your niche.
Netflix is becoming more popular each day due to the thrilling videos. With the BandiCam screen recorder, you can record live-streamed videos on Netflix for over 24hrs. These are the tools to edit your recorded video: real-time drawing tool, webcam overlay, sound mixer, and Chroma Key.
Pros
- No hidden features
- Widescreen capture
- Can record 2D/3D videos in HD mode
- Can capture fast-paced videos of up to 144 FPS
Cons
- Not suitable for beginners
- Cannot be used to live stream videos
6. NCH - Video Capture Software
Of all the listed webcam software in this review, this software has the most diverse functions. You can record streaming videos, record your computer screen, record from external devices, and record from a webcam. It’s also perfect for recording audios and simultaneous recording from screen and webcam.
Operating systems: Windows 10, 8, 8.1, 7, XP, Vista 64 bit and Mac OS X 10.5 and above
Price: Free/paid
Supported file formats: MP4, WMV, AVI, MPG, FLV, MOV
Debut Video Capture is the only free webcam recording software for Windows 10 believed to capture or record videos from any external source. It has also preset settings for HD and TV with pre-production enhancement features like color adjustment settings, overlay buttons and frame rate, aspect ratio, and resolution settings.
If you always think of becoming rich, the Express Burn Disc Burner is the tool that will help you make money. Record the most trending videos and use this tool to burn DVDs and CDs.
Pros
- Can record videos for any social media platform
- Supports a wide range of audio and video file formats
- All features are open and easy to use
- Availability of video editing software
Cons
- Only monthly subscriptions for paid plans
- Watermark for the free download
- Difficult to record a full-screen movie
Try Filmora to Smoothly Record WebCame and Screen!
Filmora Web Camera & Screen Recorder can capture any area of the PC screen and webcam. It’s perfect to capture and record while making a live gaming match, marketing promotion, guiding a tour, and more. Plus, you can edit the recording video files in Filmora directly! Worth to have a try!
Start Webcam & Screen Recording Start Webcam & Screen Recording Start Webcam & Screen Recording Learn More >
7. YAWCAM
This webcam software can be referred to as the simplest for all beginners with the will to start streaming and recording videos for personal or home use.
Supported file formats: PNG, JPG, MJPEG, GIF, JavaScript
Price: Free
Supported operating systems: Windows 2000/10/8/7/ Vista and XP
YAWCAM is an absolutely free webcam software windows 10. Why is it the simplest software to use? Just download and you will find all features on one page. Simple language commands aligned in a drop-down menu ready to be used with only one click.
Some of the best features include overlay texts and images, scheduler, motion detection, and an inbuilt webserver. For you to use this webcam software, use these supported devices; DirectX compatible webcams, DV-camera, or video capture devices.
Pros
- No watermark
- Easy to use
- Friendly user interface
Cons
- Few transitions and effects
8. Windows Camera
We all trust any app or software by Microsoft over others! If you also do, then you can download Windows Camera and use it to record videos, take snapshots and shoot videos.
Operating system: Windows 10
Price: Free
Supported devices: Xbox One, Windows, mobile
Windows Camera is among the best free webcam software for Windows 10. This is because of the software’s few but easy-to-use and effective features that are expertly designed for PCs and tablets installed with Windows 10.
The automatic photo back combined with the photo-shoot timer makes it perfect for taking selfies and passports. Using the panorama feature, you can take photos of the best scenes and share them on media platforms.
Pros
- Simplicity is its main strength
- Supports resolutions above 1080p
- Good for photographers
Cons
- Has no built-in virtual webcam
- Requires a camera to support 4K videos
9. Fake Webcam
Supported file formats: AVI, MPEG, DVD, VCD, WMV, 3GP, MP4, SVCD, MOV, ASF,
Price: Free /paid
Operating systems: Windows 7/8/10 (32/64 bit)
Fake Webcam is a free webcam software Windows 10 whose name is creatively used to suggest it almost functions like a webcam. This doesn’t fall far from the truth! You can truly use this software to broadcast, add effects and filters, record on full screen, and fake your voice.
To share or stream your photos and videos on Skype, YIM, or Gtalk, using the screen recorder would give the best results. What makes Fake Webcam stand out is the free video converter and the free video toolkit.
Pros
- Free support tools
- Supports all video and audio formats
- Can convert file formats and stream to any channel
- Availability of the screen recorder
- Integratable with almost all instant messengers
Cons
- Major tools not free(Fake Webcam and Screen recorder)
10. IP Camera Viewer
Do you run a supermarket store, mall or you’ve installed security surveillance cameras in your compound? IP Camera Viewer is the most effective webcam software for video monitoring systems.
Supported file formats: JPEG, MPEG-4, MJPEG, and
Price: Free
Operating systems: Windows 10 / 8 / 7 /2012 /Vista and XP
IP Camera Viewer is the most used free webcam recording software for windows 10 as its compatible with almost all IP camera models like Panasonic, Toshiba, Canon, D-Link, Sony, and more the 2000 others. With the capability of viewing and controlling 4 camera feeds at once, you can use this software to monitor your entire compound.
Some of the important advanced IP Camera Viewer functions include listening to webcam audios, adjust image settings, zoom or tilt images, schedule monitoring times, and detect motions.
Pros
- Automatically uploads recorded videos and photos to a server
- Compatible with almost all IP camera models
- Simple and easy to use
Cons
- No inbuilt media player
- Cannot adjust the image or video quality
You may also want to read >>> 10 Best Webcams | A Buyer’s Guide
![]()
A cross-platform for making videos anywhere for all creators
Why your video editing isn’t good enough? How about some creative inspo?
- 100 Million+ Users
- 150+ Countries and Regions
- 4 Million+ Social Media Followers
- 5 Million+ Stock Media for Use
* Secure Download
FAQs about Webcam Software for Windows
1. What is Webcam Software?
A webcam is a video camera that feeds or streams images or video in real-time to or over a computer network. And webcam software enables users to record video or stream video over the Internet.
Webcam software is an application that allows you to capture video from your laptop/desktop webcam and record or stream video over the Internet. You can use them to deliver professional videos, streaming, and online courses easily.
2. Does Windows have built-in webcam software?
Windows 10 has an in-built webcam app called Camera that lets you record videos and take pictures with your webcam. This is definitely better than downloading 3rd party webcam recording software where spyware/malware is rampant.
3. Does a webcam need software?
Yes, if the camera hardware offers depth, low-light support, night vision, etc. If you use any software on the camera, these functions are only available if the driver is installed.
Conclusion
After a keen of all the webcam software above, it’s evident that every developer had an intended purpose. You cannot therefore just randomly wake up and download any without considering its functions, supported devices, file formats, and the auxiliary apps available. All this information is contained herein.
According to some users, there are free webcam software Windows 10 that more often would not show any video images but the audio is absolutely clear. To help your fellow user, what bad experience have you ever had after recording a game using webcam software ? Kindly share your comment or suggestion on our social media platforms.
Richard Bennett
Richard Bennett is a writer and a lover of all things video.
Follow @Richard Bennett
Blurring Faces with Best Video Editing Software
Best Video Editing Software to Blur Faces in Video
Ollie Mattison
Mar 27, 2024• Proven solutions
One of the most commonly sought bits of video-editing knowledge is the ability to blur the face in videos, whether for privacy reasons, artistic effect, or whatever sort of thing you’re going for. You can go wild once you learn how to blur certain parts of a video, and this is something that, in our opinion, every aspiring video editor should learn how to do.
Now there are hundreds of video editing software, and every video editor has his own personal choice when it comes to choosing the right tool for the job. Our list focuses on what are, in our opinion, the most accessible and efficient NLE’s on the market.
1. Blur Face with Filmora Video Editor [with Faceoff / Mosaic]
Filmora is a favorite among many amateur video editors because the free version is robust by itself and features most of what one would need when not dealing with professional projects. It is available for both macOS and Windows.
How to Blur the Faces in Filmora:
- Select the clip that needs to apply blur face in the timeline, and then go to the Effects tab and select Utility.

- If the image is still, then you can click Mosaic option and drag it in the video clip in the timeline.

- Double click the video clip applied Mosaic effect in the timeline to enter the video effects tab, in where you can dictate the size of the area, the mosaic types, and also adjust the opacity.
- If the image is in motion and you’d like the blurred area to be mobile as well, drag the Face Off from the Effects tab to the timeline and adjust it in the Video Effects tab as well. You can pick the face-off pattern under Video Effects and the Face-off feature will tracks the face that appears on the screen and applies a blur to it.

- When you’re done, click OK to save the changes and then click Export and pick your desired video format.
Learn more detail about Adding Blur effects to Videos in Filmora .
2. Using YouTube Video Enhancements to Blur Faces
Those interested in learning how to blur faces in videos in order to apply the trick to their You Tube videos will find the fact that you can do this through the Video Enhancements section of your Creator Studios dashboard quite convenient. This addition is something that has been introduced in 2006 and has been well received by the community.
How to Blur the Faces with YouTube Enhancement tool:
- Sign in your YouTube account and select the Creator Studio option after clicking the avatar. Locate the video that you want to edit and access video Enhancements.
- You will see two blurring options in the Enhancement window: Blur faces and Custom blurring. To blur all faces appear in the video, go to Blur faces and click Edit

- YouTube will use the face detection tool to analyze all faces in the video and displays the faces in the left side. You can click the face image to blur a specific face throughout the video.

- Preview the blurring effects and if everything goes OK, click Save to save the face blurring effect to video. After you’re finished the editing, click Save to save the edits in-place, or Save as New Video, which creates a new video (this would mean, however, that you would lose any views you previously had).

In the Enhancement window, you can also blur a specific area of the video with the custom blurring option. Want to edit YouTube videos with more features, check our picks of thebest video editing software for YouTubers in 2018.
3. Blur Face with Movavi video editor
Movavi is a popular choice for when it comes to free video editing softwares. It is available for both Windows and MacOS and is a breeze to work in - the perfect software to learn how to blur the faces in videos in.
How to Blur the Faces with Movavi video editor:
- Open Movavi and locate the Filters
- Click Blur.

- Once the filter gallery opens, drag your desired filter over the clip or image.
- You can apply either the Blur Intense or the Blur Mild effects if you would like to determine their strength.
- In order to blur a specific part of the video, select the clip and locate the More
- Click Highlight and Conceal, and then click Conceal.
- Position the orange box over the area that you want to be affected.
- You can adjust the Opacity slider to determne the strength of the effect.
- Click on Pixels if you want the blur preset to be pixellated.
- You can also click on Add Mask if you would like to apply a mask to certain areas of the clip.
4. Blur face with Adobe Premiere Pro CC professional video editor
Premiere Pro CC is Adobe’s dedicated video editing software. There are many video editors out there that have some experience in Photoshop as well, and since there’s a chance they work in Premiere Pro CC due to how similar the UI of both of these products is, we’ve decided to give this NLE some attention as well. Available for both MacOS and Windows.
How to Blur the Faces in Premiere Pro?
- Select the video clip in the timeline.
- Access the Effects tab, and then click Video Effects, and then Stylize.
- Click Mosaic.
- Go to the Effects Control tab, and pick the shape of blurred area. The elliptical and 4-point polygon mask options are what most people use when blurring faces in particular.
- Drag the Mask over the intended area
- Adjust Positioning, Scale, and/or Rotation to your liking.
- You can fine-tune the effect further by adjusting the Mask Expansion, the Horizontal and Vertical blocks the mosaic effect is composed of, and the Feather
What sort of video editing software you go for when you want to edit the face in videos is ultimately up to you - we’ve only expressed our personal preferences in the hopes that it might help some of the people that are interested in the subject. Most of the steps present in this list are similar to each other and you will find that once you learn how to do this trick, you will become far more familiarized with all the various effects available to you.
Ollie Mattison
Ollie Mattison is a writer and a lover of all things video.
Follow @Ollie Mattison
Ollie Mattison
Mar 27, 2024• Proven solutions
One of the most commonly sought bits of video-editing knowledge is the ability to blur the face in videos, whether for privacy reasons, artistic effect, or whatever sort of thing you’re going for. You can go wild once you learn how to blur certain parts of a video, and this is something that, in our opinion, every aspiring video editor should learn how to do.
Now there are hundreds of video editing software, and every video editor has his own personal choice when it comes to choosing the right tool for the job. Our list focuses on what are, in our opinion, the most accessible and efficient NLE’s on the market.
1. Blur Face with Filmora Video Editor [with Faceoff / Mosaic]
Filmora is a favorite among many amateur video editors because the free version is robust by itself and features most of what one would need when not dealing with professional projects. It is available for both macOS and Windows.
How to Blur the Faces in Filmora:
- Select the clip that needs to apply blur face in the timeline, and then go to the Effects tab and select Utility.
- If the image is still, then you can click Mosaic option and drag it in the video clip in the timeline.
- Double click the video clip applied Mosaic effect in the timeline to enter the video effects tab, in where you can dictate the size of the area, the mosaic types, and also adjust the opacity.
- If the image is in motion and you’d like the blurred area to be mobile as well, drag the Face Off from the Effects tab to the timeline and adjust it in the Video Effects tab as well. You can pick the face-off pattern under Video Effects and the Face-off feature will tracks the face that appears on the screen and applies a blur to it.
- When you’re done, click OK to save the changes and then click Export and pick your desired video format.
Learn more detail about Adding Blur effects to Videos in Filmora .
2. Using YouTube Video Enhancements to Blur Faces
Those interested in learning how to blur faces in videos in order to apply the trick to their You Tube videos will find the fact that you can do this through the Video Enhancements section of your Creator Studios dashboard quite convenient. This addition is something that has been introduced in 2006 and has been well received by the community.
How to Blur the Faces with YouTube Enhancement tool:
- Sign in your YouTube account and select the Creator Studio option after clicking the avatar. Locate the video that you want to edit and access video Enhancements.
- You will see two blurring options in the Enhancement window: Blur faces and Custom blurring. To blur all faces appear in the video, go to Blur faces and click Edit
- YouTube will use the face detection tool to analyze all faces in the video and displays the faces in the left side. You can click the face image to blur a specific face throughout the video.
- Preview the blurring effects and if everything goes OK, click Save to save the face blurring effect to video. After you’re finished the editing, click Save to save the edits in-place, or Save as New Video, which creates a new video (this would mean, however, that you would lose any views you previously had).
In the Enhancement window, you can also blur a specific area of the video with the custom blurring option. Want to edit YouTube videos with more features, check our picks of thebest video editing software for YouTubers in 2018.
3. Blur Face with Movavi video editor
Movavi is a popular choice for when it comes to free video editing softwares. It is available for both Windows and MacOS and is a breeze to work in - the perfect software to learn how to blur the faces in videos in.
How to Blur the Faces with Movavi video editor:
- Open Movavi and locate the Filters
- Click Blur.
- Once the filter gallery opens, drag your desired filter over the clip or image.
- You can apply either the Blur Intense or the Blur Mild effects if you would like to determine their strength.
- In order to blur a specific part of the video, select the clip and locate the More
- Click Highlight and Conceal, and then click Conceal.
- Position the orange box over the area that you want to be affected.
- You can adjust the Opacity slider to determne the strength of the effect.
- Click on Pixels if you want the blur preset to be pixellated.
- You can also click on Add Mask if you would like to apply a mask to certain areas of the clip.
4. Blur face with Adobe Premiere Pro CC professional video editor
Premiere Pro CC is Adobe’s dedicated video editing software. There are many video editors out there that have some experience in Photoshop as well, and since there’s a chance they work in Premiere Pro CC due to how similar the UI of both of these products is, we’ve decided to give this NLE some attention as well. Available for both MacOS and Windows.
How to Blur the Faces in Premiere Pro?
- Select the video clip in the timeline.
- Access the Effects tab, and then click Video Effects, and then Stylize.
- Click Mosaic.
- Go to the Effects Control tab, and pick the shape of blurred area. The elliptical and 4-point polygon mask options are what most people use when blurring faces in particular.
- Drag the Mask over the intended area
- Adjust Positioning, Scale, and/or Rotation to your liking.
- You can fine-tune the effect further by adjusting the Mask Expansion, the Horizontal and Vertical blocks the mosaic effect is composed of, and the Feather
What sort of video editing software you go for when you want to edit the face in videos is ultimately up to you - we’ve only expressed our personal preferences in the hopes that it might help some of the people that are interested in the subject. Most of the steps present in this list are similar to each other and you will find that once you learn how to do this trick, you will become far more familiarized with all the various effects available to you.
Ollie Mattison
Ollie Mattison is a writer and a lover of all things video.
Follow @Ollie Mattison
Also read:
- Updated In 2024, Free Animated Logo Maker Roundup Top Picks + Pro Design Advice
- New The Ultimate List Top 5 Free MPEG Video Splitting Software
- Videopad Review Is It the Best Video Editing Software for You , In 2024
- Updated In 2024, Apple Video Editing Essentials Top Picks for Pros and Beginners
- Updated 2024 Approved The Ultimate List of Free VOB Video Editors
- Updated In 2024, Aspect Ratio Made Easy Top Online Calculator Resources
- New In 2024, Discover the Power of VR Converting Videos Made Easy
- Updated The Ultimate List of 10 Free Online Video Trimmers 2023 Edition for 2024
- New In 2024, Best Apps to Create Engaging Video Invitations on Your Smartphone
- New The Science of Screen Size Calculating Pixel Aspect Ratio
- Updated 2024 Approved Free and Easy The Best iPhone Video Rotation Apps
- New The Quickest Way to Resize a Video for Any Screen for 2024
- In 2024, Revolutionize Your Mobile Videos with These Text Animation Apps
- Updated In 2024, Mastering Audio Transitions in FCPX L-Cuts and J-Cuts Explained
- New In 2024, The Ultimate Guide to Free Video Editing on Ubuntu Top 10 Software
- Updated Video Voiceover Software for PC The Top 6 Contenders for 2024
- Updated Mac Users, Rejoice! Top Windows Movie Maker Alternatives
- New 2024 Approved The Ultimate List Best Video Editing Apps for Vloggers (iOS & Android)
- 2024 Approved Unlocking Facebook Video Engagement The Definitive Aspect Ratio Guide
- New 2024 Approved Fast Track to Film Fame Easy Movie Creation Secrets
- In 2024, Mac Movie Magic 8 Essential Video Editing Tools
- Updated 2024 Approved Elevate Your Storytelling Advanced Video Editing Techniques for Sony Camcorder Users
- The Ultimate List 28 Top-Rated Video to GIF Converters for 2024
- Video to Audio Conversion Made Easy A Step-by-Step Guide to Choosing the Right App for 2024
- New In 2024, PowerDirector Pro Tip How to Achieve Consistent Color Across Clips
- Updated Best Free and Paid Windows Movie Maker Alternatives for Mac for 2024
- In 2024, Unlock Chromebooks Full Potential Install Linux
- New Make Your Own 3D Videos Top Tools for Beginners and Pros Alike
- Updated Top Picks Simple Video Editors for Newbies
- Updated The Ultimate AVS Video Editor Review A Beginners Guide
- 2024 Approved The Ultimate Guide to Editing Sony Digital Camcorder Videos for Stunning Results
- Updated 2024 Approved Free Images for Business Tips and Tricks for Commercial Use
- Updated In 2024, Image Dimension Mastery Calculating and Adjusting Ratios Like a Pro
- Updated Video Editing Mastery Top Picks for Apple Users for 2024
- New The Ultimate Guide to Time-Lapse Apps for Smartphones
- New S Best Time-Lapse Video Editing Tools A Comprehensive Review
- New Unleash Your Creativity Top Gaming Intro Makers for Windows, Mac, and Online Platforms for 2024
- 2024 Approved No-Cost Video Looping Solutions for Windows and Mac Computers
- New 2024 Approved The Ultimate Guide to Creating Stop Motion Videos for Instagram
- Updated Free Up Space Fast The Ultimate FCPX Storage Cleanup Guide for 2024
- New Maximize Your Music Library Tips and Reviews for YouTube to MP3 Conversion
- New In 2024, No Crack Required How to Use Filmora Absolutely Free
- New Edit Like a Pro Best Vertical Video Apps for iOS and Android for 2024
- Updated Read This Guide to Learn How to Split Large Videos in Windows Live Movie Maker for Sharing on YouTube. Some Other Video Editing Tips Are Also Provided
- Top 8 Mac Video Editing Software for Cinematic Results for 2024
- Updated Remove Unwanted Elements Top Video Blur Apps for Mobile for 2024
- Updated Best AVI Video Editor for Windows 8 Latest 2023 Features for 2024
- 6 Ways to Change Spotify Location On Your Vivo T2 5G | Dr.fone
- In 2024, The Most Useful Tips for Pokemon Go Ultra League On Tecno Pop 8 | Dr.fone
- Delete Gmail Account With/Without Password On Honor X50 GT
- How to Fix the Soft Bricked Honor X8b? | Dr.fone
- In 2024, How to Unlock Apple ID Activation Lock On iPhone 15 Plus?
- In 2024, How To Remove iCloud From iPhone 14 Plus Smoothly
- How To Simulate GPS Movement With Location Spoofer On Realme GT Neo 5 SE? | Dr.fone
- In 2024, Animated Video Magic 12 Best Online Makers to Try Now
- Why Does My Realme GT 5 Pro Keep Turning Off By Itself? 6 Fixes Are Here | Dr.fone
- New 2024 Approved Best 5 Solutions on How to Add Emojis to iPhone
- Does Life360 Notify When You Log Out On Oppo A1x 5G? | Dr.fone
- Top 6 Apps/Services to Trace Any Xiaomi Redmi Note 13 Pro+ 5G Location By Mobile Number | Dr.fone
- In 2024, How to Bypass Android Lock Screen Using Emergency Call On Infinix Smart 7 HD?
- Apply These Techniques to Improve How to Detect Fake GPS Location On Tecno Pova 6 Pro 5G | Dr.fone
- Title: 2024 Approved Smooth Transitions Mastering L-Cuts and J-Cuts in Final Cut Pro X
- Author: Ava
- Created at : 2024-05-19 14:41:28
- Updated at : 2024-05-20 14:41:28
- Link: https://video-content-creator.techidaily.com/2024-approved-smooth-transitions-mastering-l-cuts-and-j-cuts-in-final-cut-pro-x/
- License: This work is licensed under CC BY-NC-SA 4.0.
